Equipment Needed
Step-by-Step Instructions
First, let’s start by seasoning the chicken breasts. I like to sprinkle both sides with salt and pepper to enhance the natural flavors. Then, I heat up the olive oil in my skillet over medium heat. Once the oil is nice and hot, I carefully place the chicken in the pan and let it sear for about 5-6 minutes on each side until it’s cooked through. The aroma of garlic will soon fill your kitchen! Once cooked, I remove the chicken, letting it rest for a few minutes before slicing it into juicy strips.
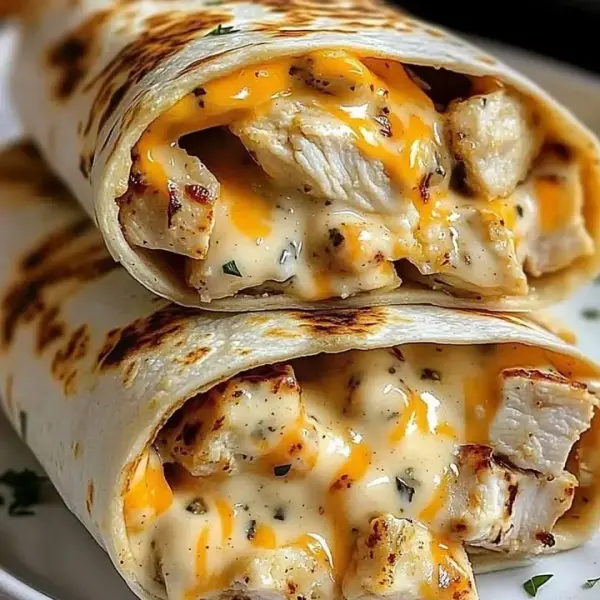
Next, in the same skillet, I lower the heat and add the minced garlic, letting it sauté until it’s fragrant—about 1 minute will do. I then return the sliced chicken to the pan and mix in the cream cheese and half of the mozzarella. I enjoy watching the cheese melt into a creamy, dreamy sauce that envelops the chicken. Don’t forget to sprinkle in some chopped parsley for that fresh kick!
Now, it’s time to assemble the wraps. I take a large tortilla and scoop a generous portion of the cheesy chicken mixture into the center. I fold the sides of the tortilla over the filling and roll it up tightly. To ensure everything stays together, I carefully place the wrap seam-side down in a lightly oiled pan. I let it toast for about 2-3 minutes on each side until it’s golden brown and crispy.
Lastly, I like to finish off with a sprinkle of the remaining mozzarella cheese on top, allowing it to melt slightly before slicing the wrap in half. Trust me, the sight of that gooey cheese is enough to make anyone’s mouth water!
Pro Tips for Best Results
One of my favorite tips for this recipe is to let the chicken rest before slicing. It might seem small, but that juicy, tender bite is worth waiting for! I’ve found that if I skip this step, the chicken tends to be drier.
I also recommend using freshly grated cheese instead of pre-shredded cheese, as it melts much better and gives a lovely creaminess to the wraps. It seems like a small detail, but it really does elevate the dish.
Lastly, don’t shy away from experimentation! The base recipe is fantastic as is, but I’ve tested adding a dash of cayenne pepper for those who enjoy a bit of heat. It’s a great way to spice things up if you’re in the mood!
Common Mistakes to Avoid
One mistake I made early on was overcooking the chicken. It might be tempting to leave it in the skillet longer to ensure it’s cooked through, but an overcooked chicken breast can turn rubbery. Make sure you use a meat thermometer; 165°F is your magic number!
Another thing to watch out for is using too much filling. While I know it’s hard to hold back when layering on the cheesy concoction, overstuffing can lead to messy wraps that won’t hold together. Save some filling for later enjoying on its own!
Also, don’t skip the rest period after cooking the chicken. I’ve rushed this step before, and it really makes a difference. Resting allows the juices to redistribute, giving you the most tender bites.
Finally, avoid wrapping your tortillas tightly for grilling. I learned the hard way that if I over-tightened my wrap before putting it in the pan, it led to tearing and leaking. Just enough pressure to hold it together will do wonders.
Serving Suggestions
When I serve these wraps, I like to pair them with a simple side salad—just some fresh greens, cherry tomatoes, and a light vinaigrette. The crunch and acidity from the salad create a refreshing balance to the richness of the wraps.
Another favorite of mine is to whip up some homemade sweet potato fries. The sweetness complements the savory flavors in the wrap beautifully. Plus, the contrast of textures makes for a pleasing plate!
And let’s not forget about dipping sauces! I love serving these wraps with a side of tangy ranch or a spicy sriracha sauce. It adds an extra layer of flavor and excitement to each bite.
Variations & Customizations
One of the best things about these wraps is how versatile they are. You can easily swap out the chicken for shredded rotisserie chicken or even sautéed veggies for a vegetarian option. Believe me, I’ve done it, and it’s just as delicious!
If you’re a fan of bold flavors, try adding some sun-dried tomatoes or olives into the filling. They’ll give the wraps a Mediterranean twist that’s simply delightful and a little unexpected.
For those who enjoy different cheeses, experiment with colby jack or pepper jack cheese for added zing. This simple swap can take the flavor profile to another level!
How to Store, Freeze & Reheat
If you happen to have leftovers (which is rare in my kitchen!), you can store the wraps in an airtight container in the fridge. They stay fresh for about 3 days, but I suggest reheating them in a skillet to keep that lovely crunch!
For longer storage, you can freeze the assembled wraps before grilling. Wrap each one tightly in plastic wrap and then foil to prevent freezer burn. When you’re ready for a quick dinner, simply remove them from the freezer and let them thaw in the fridge overnight.
When it comes time to reheat, I recommend using a skillet again. The oven will do the trick too, but I find the skillet helps regain that crispy, toasted exterior we love so much!
Conclusion
I hope you enjoy making and indulging in these Cheesy Garlic Chicken Wraps as much as I do. They have become a staple in my kitchen, bringing family and friends together for meals filled with laughter and satisfied smiles. Cooking should be fun and delicious, and this recipe checks all those boxes. Happy cooking!