
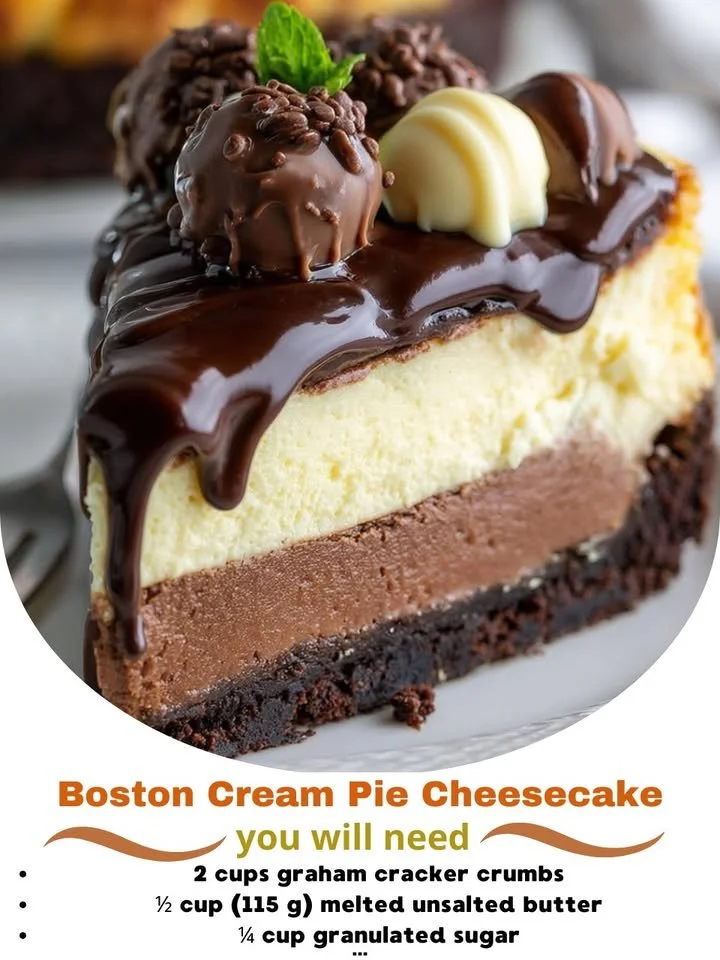
Welcome to my kitchen, where I love experimenting with flavors and textures! Today, I’m thrilled to share one of my absolute favorite desserts: Boston Cream Pie Cheesecake. For anyone who shares my passion for sweet treats, this recipe combines the classic flavors of a Boston cream pie with the rich, creamy delight of cheesecake. Every bite is a taste of indulgence that I can’t resist!
Why You’ll Love This Recipe
This Boston Cream Pie Cheesecake is a showstopper of a dessert, perfect for gatherings or a special night in. The rich, velvety cheesecake layer pairs perfectly with luscious chocolate ganache, all nestled atop a buttery graham cracker crust. It’s a delightful mix of textures and flavors that truly feels like a celebration on your palate. It may sound a bit daunting, but I promise it’s easier than it looks and so worth the effort! You’ll have everyone asking for seconds. (See the ingredients in the next page below…)
Ingredients
- 1 ½ cups graham cracker crumbs
- ½ cup unsalted butter, melted
- 1 cup granulated sugar
- 4 (8 oz) packages cream cheese, softened
- 4 large eggs
- 1 tablespoon vanilla extract
- 1 cup heavy cream
- 1 cup powdered sugar
- 1 cup semi-sweet chocolate chips
- ½ cup heavy cream (for ganache)
- 1 teaspoon vanilla extract (for ganache)
Equipment Needed
- 9-inch springform pan
- Mixing bowls
- Electric mixer or whisk
- Rubber spatula
- Small saucepan
- Measuring cups and spoons
- Parchment paper
Step-by-Step Instructions
To start, preheat your oven to 325°F (160°C). In a medium-sized bowl, combine the graham cracker crumbs and melted butter, mixing until it resembles wet sand. Press this mixture firmly into the bottom of a 9-inch springform pan to create a sturdy crust. Now, moving to the cheesecake filling, in a large bowl, beat the softened cream cheese until smooth, adding in the granulated sugar until creamy. Once combined, mix in the eggs, one at a time, followed by the vanilla extract. This batter should be thick and luscious, inviting you to taste it (just one small spoonful, I promise!). (See the next page below to continue steps…)
Next, pour the cheesecake mixture over the crust, smoothing the top with a spatula. Bake this in the preheated oven for about 60 minutes, or until the center is slightly jiggly but set around the edges. Once baked, let it cool at room temperature for about an hour before refrigerating it for at least 4 hours, or preferably overnight. I find that chilling it overnight really allows those flavors to meld together beautifully.
While the cheesecake is chillin’, it’s time to prepare the chocolate ganache. In a small saucepan over low heat, combine the heavy cream with the chocolate chips, stirring gently until melted and smooth. I love how the rich aroma of melting chocolate fills my kitchen at this moment! Set aside to cool slightly before adding in the vanilla extract. Drizzle this heavenly ganache over your cheesecake once it’s fully chilled. For an extra touch, you might even want to garnish with whipped cream or chocolate shavings.
Pro Tips for Best Results
I tested this recipe three ways, and my favorite result was to allow the cheesecake to chill overnight. It really helps the flavors develop, and I swear, it tastes even better the next day! Another tip: when mixing your batter, make sure your cream cheese is at room temperature. This helps to prevent a lumpy texture that can occur with cold cream cheese. Trust me, a few minutes of softening time pays off!
Also, if you want a fluffier cheesecake, don’t overmix the batter after adding the eggs. Beat just until combined; that way, you’ll avoid incorporating too much air, which can cause cracks during baking. Finally, when making your ganache, ensure the chocolate and cream are well-combined, but don’t overheat the mixture. Low and slow is the key to that smooth and glossy finish!
Common Mistakes to Avoid
One common mistake I see (and made myself!) is not letting the cheesecake cool completely before adding the ganache. If it’s too warm, the ganache can melt into the cheesecake instead of sitting beautifully on top. It’s worth the wait to allow that perfect layer to form. (See the next page below to continue…)
Another pitfall is using a dull knife for slicing. A clean, sharp knife dipped in hot water yields a clean cut, allowing you to show off those beautiful layers. I learned this the hard way, resulting in a messy slice that didn’t do my dessert justice!
When baking your cheesecake, remember to check for doneness. The edges should appear set while the center still jiggles slightly. An overbaked cheesecake can turn out dry, which we definitely want to avoid. A toothpick inserted into the edge can guide you; just don’t poke right in the center.
Serving Suggestions
When it comes to serving this delightful dessert, I suggest slicing it into generous wedges and pairing it with a dollop of whipped cream. The cream adds a light, fluffy contrast to the creamy richness of the cheesecake. It’s a beautiful and delicious contrast!
For an extra touch of elegance, you might want to sprinkle some chocolate shavings or toasted almonds over the top. It not only makes for a stunning presentation but enhances the chocolate flavors in a delightful way.
Lastly, if you’re feeling adventurous, serve it alongside some fresh berries. Their tartness complements the sweet cheesecake and adds a burst of freshness that’s simply irresistible!
Variations & Customizations
Once I got the hang of the classic version, I started to play with this recipe to create my custom variations. One of my favorites is adding a layer of caramel sauce underneath the ganache for a salted caramel twist. It’s a game changer that adds depth and sweetness, and I highly recommend doing this at least once!
If you prefer a lighter version, try substituting some of the cream cheese with Greek yogurt. The taste will still be creamy, but it cuts down on the richness while adding a tangy flavor that works beautifully in this dessert.
You can also experiment with different crusts! Instead of graham crackers, I’ve tried using Oreo cookies or even ground-up vanilla wafers. Each base gives a unique flavor that complements the cheesecake in surprisingly delicious ways.
How to Store, Freeze & Reheat
To store leftovers (if they last that long), simply cover the cheesecake tightly with plastic wrap or transfer it to an airtight container. It will keep in the refrigerator for about 4-5 days. Just make sure to serve it cold for the best texture and flavor!
If you want to make this ahead of time or have a delightful stash for later, freezing works wonderfully too. Wrap slices individually in plastic wrap, followed by aluminum foil, for up to three months. When you’re ready for a slice of this heavenly dessert, just move it to the fridge and allow it to thaw overnight.
As for reheating? While I advocate for enjoying it chilled, if you prefer it slightly warm, you can reheat individual slices in the microwave for about 15-20 seconds. Just be cautious not to overdo it because nobody wants a hot cheesecake—it messes with the texture and flavor!
Conclusion
I hope you’re as excited to try this Boston Cream Pie Cheesecake recipe as I am to share it with you! It’s a delightful combination of flavors that truly brings comfort and joy to any occasion. Don’t hesitate to play around with your own variations, and most importantly, enjoy the process. Happy baking!