
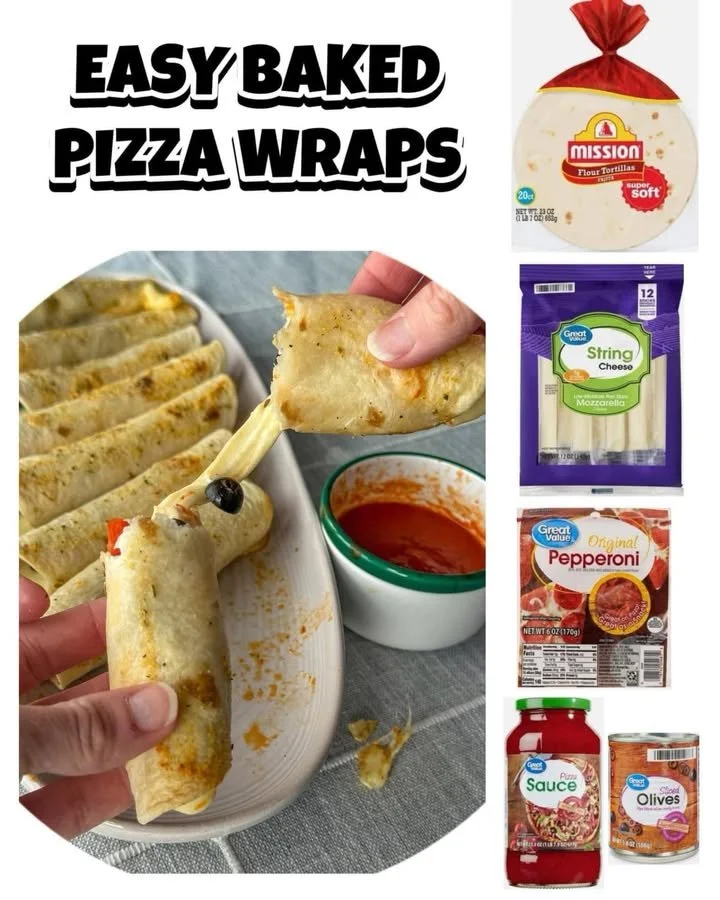
One day, while scrolling through my favorite food blog, I stumbled upon a recipe for Baked Pizza Wraps. The photo caught my eye—golden brown and crispy, filled with bubbling cheese and vibrant toppings. I could almost smell the savory goodness wafting through my kitchen as I read the ingredients list. It felt like the perfect solution for a delicious snack or a quick meal when I had a craving for pizza but didn’t want the hassle of making dough from scratch. The moment I pulled them out of the oven, my kitchen was filled with an irresistible aroma, and I knew I had struck culinary gold.
Why You’ll Love This Recipe
If you’re like me and enjoy pizza but dislike the time-consuming process of traditional preparation, you’re going to adore these Baked Pizza Wraps. They’re incredibly versatile, allowing you to tailor the fillings to suit your cravings or what you have on hand. You’re going to feel the joy of biting into a warm, cheesy wrap that’s bursting with flavor—a moment that truly feels like a hug from the inside. And the best part? They are easy enough to whip up as a quick lunch or snack, yet impressive enough to serve at a casual gathering with friends.
Ingredients
- 4 large flour tortillas
- 1 cup shredded mozzarella cheese
- ½ cup sliced pepperoni (See the next page below to continue…)
- ½ cup diced bell peppers (any color)
- ½ cup sliced black olives
- 1 tablespoon Italian seasoning
- ½ cup pizza sauce (plus extra for dipping)
- Olive oil spray (for brushing)
Equipment Needed
- Baking sheet
- Parchment paper
- Mixing bowl
- Cooking brush
- Knife for slicing
Step-by-Step Instructions
As I prepare the Baked Pizza Wraps, the first thing I do is preheat my oven to 400°F (200°C). This is crucial because it ensures that the wraps get that perfect crispiness. While my oven is warming up, I grab a mixing bowl and throw in the mozzarella cheese, sliced pepperoni, diced bell peppers, black olives, and Italian seasoning. Just watching those vibrant colors mix together makes me excited to get everything wrapped up.
Next, I take a large flour tortilla and lay it flat on my countertop. I spoon a good amount of the cheesy filling onto one side; I usually go for about half a cup. I then carefully fold the tortilla over, tucking it in like I’m wrapping up a precious gift. Don’t worry if it seems a bit overstuffed; that’s part of the fun! I make sure to coat my baking sheet with parchment paper to prevent any sticking, a step I learned the hard way—trust me, you don’t want melted cheese on your baking sheet! (See the next page below to continue…)
Once all the wraps are assembled and the oven is ready, I place them seam-side down on the baking sheet and lightly spray the tops with olive oil. This gives them that beautiful golden finish when they bake. I pop them in the oven for about 15-20 minutes, but trust your nose! I’ve had moments in my own kitchen where I lost track of time because the aroma was so heavenly—it’s hard to tell if it’s been 15 or 25 minutes sometimes.
After about 20 minutes, I pull out the baking sheet, and oh boy, are they perfect! Golden on the outside, and I can already see the cheese oozing slightly out of the sides. I let them cool for a few minutes (if I can wait that long) before cutting them in half, revealing melty goodness inside. I serve them with some pizza sauce for dipping, and believe me, that first bite is worth every minute spent.
Pro Tips for Best Results
I’ve tested this recipe in a couple of different ways, and one of my favorite tips is to ensure your veggies are finely diced. This allows for even distribution of flavor, and no one wants a giant chunk of pepper ruining the bite. You want that perfect balance of cheese and toppings in each mouthful!
Also, don’t skip out on the olive oil spray; I initially thought it wouldn’t make a difference, but honestly, it gives the wraps a delightful crunch that really takes them to another level. Feel free to brush the tops, too, to enhance that golden hue.
Lastly, I recommend experimenting with the cheese. I’ve tried mixing mozzarella with provolone and even a touch of cheddar for a different cheese pull experience. Each time, it brought a unique flavor profile that I absolutely loved! (See the next page below to continue…)
Common Mistakes to Avoid
I remember the first time I made these wraps; I didn’t seal them properly at the seams, thinking they would hold together during baking. Spoiler alert: they didn’t! The melted cheese oozed out everywhere, and I ended up with a massive mess in my oven. Don’t underestimate the importance of sealing those edges tightly!
Another mistake I made was not preheating my oven long enough. When I realized the wrap was in a cooler oven than it should be, all I could think about was how far off I was from crunchy perfection. Waiting for the oven to reach the proper temperature may feel tedious, but it makes a world of difference.
Lastly, be careful with your toppings. A super generous amount sounds inviting, but if you overload the wraps, you might find them too soggy or unable to hold together. I learned this the hard way too, so trust me when I say, moderation is key!
Serving Suggestions
When I serve these Baked Pizza Wraps, I like to pair them with a fresh side salad—it adds a lovely crunch and balances the cheesy goodness. Sometimes I’ll whip up a simple arugula salad with olive oil and balsamic vinegar. The lightness of the salad complements the richness of the wraps beautifully.
I also enjoy setting out an array of dips, from classic pizza sauce to ranch dressing or garlic aioli. It’s a fun way for everyone to customize their experience, and it gives guests something to talk about. Getting a little adventurous with flavors can really elevate the whole meal!
If I’m feeling indulgent, I might accompany these wraps with some crispy sweet potato fries or homemade garlic knots. Nothing says “pizza night” quite like those delicious treats on the side.
Variations & Customizations
This recipe is wonderfully adaptable, and I’ve enjoyed trying different variations over time. For a healthier twist, I’ve substituted whole wheat tortillas and filled them with grilled veggies, goat cheese, and a sprinkle of feta. It provides all those delicious flavors without the heaviness of traditional pizza.
Sometimes, when I want to spice things up, I’ll swap out the pizza sauce for a pesto base. The savory, herbal notes of pesto pair incredibly well with mozzarella and sun-dried tomatoes—trust me, it’s a complete game-changer!
I can’t leave out dessert either—yes, I’ve made sweet versions of these wraps! I fill them with chocolate chips and bananas, fold them over, and bake until golden. Drizzle a bit of powdered sugar over top, and you have a fun treat that’s perfect for any occasion.
How to Store, Freeze & Reheat
Storing Baked Pizza Wraps is super easy. Once they’ve cooled completely, I wrap them in plastic wrap or aluminum foil and place them in the refrigerator. They’re great for a few days and make for an easy reheat when you’re craving something quick.
For longer storage, these wraps freeze like a charm. I individually wrap each one in plastic, and then I toss them into a freezer bag. They’ll keep for about a month, though they never last that long in my kitchen—I’m always tempted to bring them back into rotation!
When it’s time to reheat, I suggest using the oven instead of the microwave. Just preheat to around 350°F (175°C) and place the wraps directly on the rack for a few minutes. This way, they stay crispy on the outside and gooey on the inside—far superior to the texture you get from the microwave.
Conclusion
In the end, Baked Pizza Wraps have become a beloved staple in my home. Whether I’m whipping them up for a party or just as a personal snack, they bring joy and comfort to my kitchen. I hope you find as much joy in making and sharing these wraps as I have. So roll up your sleeves, gather your ingredients, and get ready for a delicious adventure!