
Unlike a traditional flour‑butter‑water pie crust that requires cutting in cold fat and careful handling, a 10 Minute Oreo Pie Crust skips all the fussy steps and leans on ground sandwich cookies and butter. The Oreos (cream filling and all) are crushed into fine crumbs in a food processor or in a bag with a rolling pin, then combined with melted butter until the mixture resembles damp sand.
That crumb mixture is pressed firmly into the bottom and up the sides of a 9‑inch pie pan, then either baked for about 8–10 minutes at 350°F for a firmer, slightly crunchy crust or simply chilled for at least 10–30 minutes for a quick, no‑bake version. The result is a deeply chocolate, cookie‑like crust that holds together well and offers a satisfying textural contrast to creamy fillings.
Equipment
Food processor or blender to crush Oreos into fine crumbs (or a heavy plastic bag and rolling pin as a low‑tech alternative).
Microwave‑safe bowl or small saucepan to melt butter.
Mixing bowl and spatula or spoon to combine crumbs and butter (if not mixing directly in the processor).
9‑inch pie dish (standard or deep‑dish) or a springform pan if you’re making a cheesecake.
Measuring cup (with a flat bottom) or a small glass to press crumbs into an even, compact layer.
Ingredients
This is a classic Oreo crust formula that matches most “10 minute” and “2‑ingredient” Oreo pie crust recipes.
About 22–32 Oreo cookies (regular or Double Stuf), which yields roughly 2 to 2½ cups of fine crumbs. You do not need to remove the cream filling; it adds flavor and helps bind the crust.
5–7 tablespoons melted butter, usually unsalted, though many bakers use salted butter without issues. The exact amount can vary depending on the number of Oreos and how finely they are crushed; you want just enough to coat and moisten the crumbs so they stick together when pressed.
Some recipes add a tablespoon or two of sugar and a pinch of salt for extra sweetness and flavor balance, but the base 10‑minute Oreo crust typically uses just cookies and butter.
Instructions And Steps
Start by crushing the Oreos. Add whole Oreo cookies to the bowl of a food processor fitted with the S‑blade and pulse until they turn into fine, even crumbs with no large chunks remaining. You don’t need to scrape out the cream centers; they’re meant to be included and help the crumbs clump.
If you don’t have a processor, place the cookies in a sturdy zip‑top bag, seal it, and crush them with a rolling pin or a heavy pan until the crumbs are as fine as you can make them. Measuring the crumbs after crushing (aiming for around 2 to 2½ cups) ensures you get the right ratio of butter to crumbs even if cookie size varies.
Next, melt the butter. In a microwave‑safe bowl or small saucepan, gently melt the butter until just liquid, then let it cool for a minute so it’s warm but not scorching hot. Pour the Oreo crumbs into a mixing bowl if they aren’t already there. Drizzle the melted butter over the crumbs and stir with a spatula or fork until every bit of crumb looks evenly moistened and the mixture resembles damp sand that clumps when pressed between your fingers.
If it still seems dry and crumbly and doesn’t hold together when squeezed, add another tablespoon of melted butter; if it looks overly wet or greasy and leaves a lot of butter in the bowl, you may need to sprinkle in a bit more crumb or hold back some butter the next time.
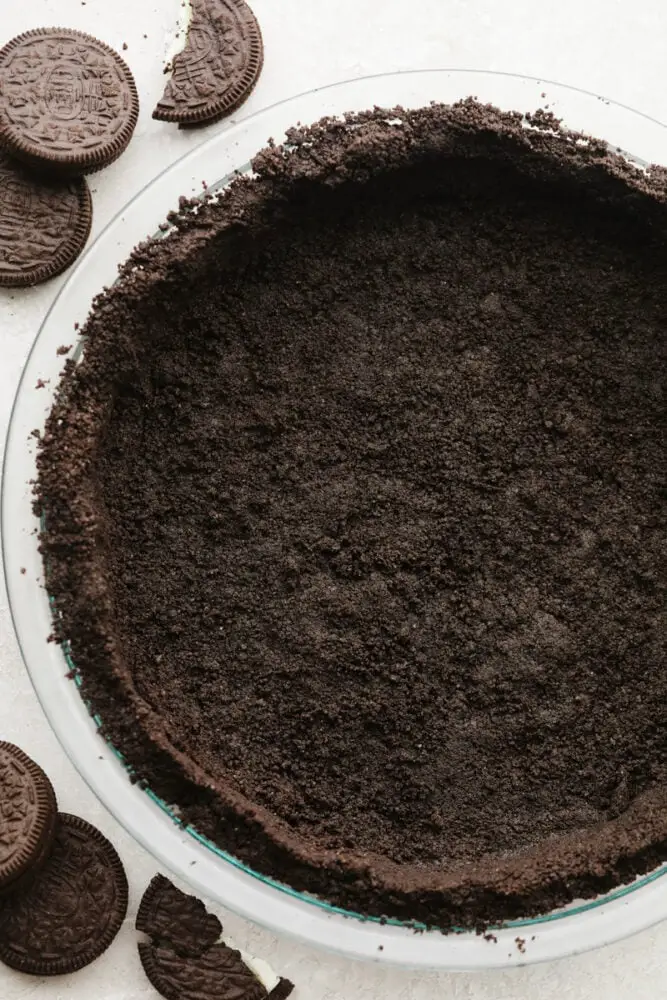
Now press the mixture into the pie pan. Lightly grease your 9‑inch pie dish or springform pan if you’re worried about sticking, though many bakers simply press the crust into an ungreased pan because the butter and cookie filling already have plenty of fat. Pour the buttery crumbs into the center of the pan and use your hands to spread them evenly across the bottom.
Then use the flat bottom of a measuring cup or glass to firmly press the crumbs into a compact, even layer, starting with the bottom and then pushing some crumbs up the sides to form the crust wall. Take your time here: the more evenly and firmly you press, the neater and more stable your crust will be.
Make sure the crust layer isn’t too thin in any area and that the seam where the sides meet the bottom is tightly packed so the crust doesn’t crack there.
To set the crust, you can either bake it briefly or chill it, depending on your filling and the texture you want. For the classic “10 minute Oreo pie crust,” preheat your oven to 350°F (175–180°C), then bake the pressed crust for about 8–10 minutes until it looks slightly puffed and smells fragrant.
Baking melts the butter fully into the crumbs and helps the crust firm up, giving it a crisp, cookie‑like texture that holds up well under creamy fillings and slices more cleanly. Remove the crust from the oven and let it cool completely at room temperature before adding any filling, especially if the filling is no‑bake or chilled.
If you prefer a true no‑bake approach or don’t want to turn on the oven, you can skip baking and simply chill the crust. After pressing the crumbs into the pan, place the crust in the refrigerator for at least 10–30 minutes until the butter firms up and the crust feels solid when gently pressed.
This method yields a slightly softer, more crumbly crust compared to the baked version, but it’s perfect for many no‑bake pies and cheesecakes. Some bakers note that even a brief bake of 8 minutes at 350°F dramatically improves structure while still working well with “no‑bake” fillings later, so you can choose based on your preference for firmness.
Once the crust is cooled (if baked) or well chilled (if no‑baked), it’s ready to fill. You can pour in everything from no‑bake cheesecake filling and chocolate mousse to ice cream, pudding, or cookies‑and‑cream filling. If your recipe requires further baking with the filling, treat this crust as a pre‑baked base and follow the filling recipe’s time and temperature, keeping an eye on the edges so they don’t over‑brown.
Tips And Tricks
The easiest way to guarantee the right texture is to process the Oreos to uniform, fine crumbs; larger chunks can make the crust fragile and harder to press into a smooth, stable layer. Including the cream filling is standard, and multiple sources emphasize that there’s no need to scrape it out—the filling helps bind the crust and adds sweetness.
Be careful not to overdo the butter: the crumb mixture should hold together when pressed but shouldn’t look greasy or pool butter at the bottom of the bowl, which can make the crust overly hard or leaky when baked.
Pressing firmly and evenly is more important than many people realize. Using a flat‑bottomed measuring cup gives you leverage to really pack the crumbs, which helps the crust slice cleanly and stay in one piece when you remove slices. For a deep‑dish or 9‑inch springform pan, you may want to increase the number of Oreos and butter slightly to ensure there’s enough mixture to build a sturdy side wall.
If you’re pairing the crust with a very sweet filling, you can choose regular Oreos instead of Double Stuf or reduce any added sugar in the crust, since Oreos are already sweet on their own. For a slightly saltier, more balanced crust, a pinch of salt in the crumb‑and‑butter mixture helps cut through richness, especially if you’re using unsalted butter.
Once assembled, chilled Oreo crusts keep well in the fridge for a couple of days, and you can even wrap and freeze a baked, cooled crust for later use; just thaw briefly before filling.
10 Minute Oreo Pie Crust is one of those foundational, flexible recipes that turns a box of cookies and a few tablespoons of butter into a sturdy, decadent base for almost any creamy dessert, saving you time while delivering intense chocolate flavor and that familiar Oreo crunch in every bite.