
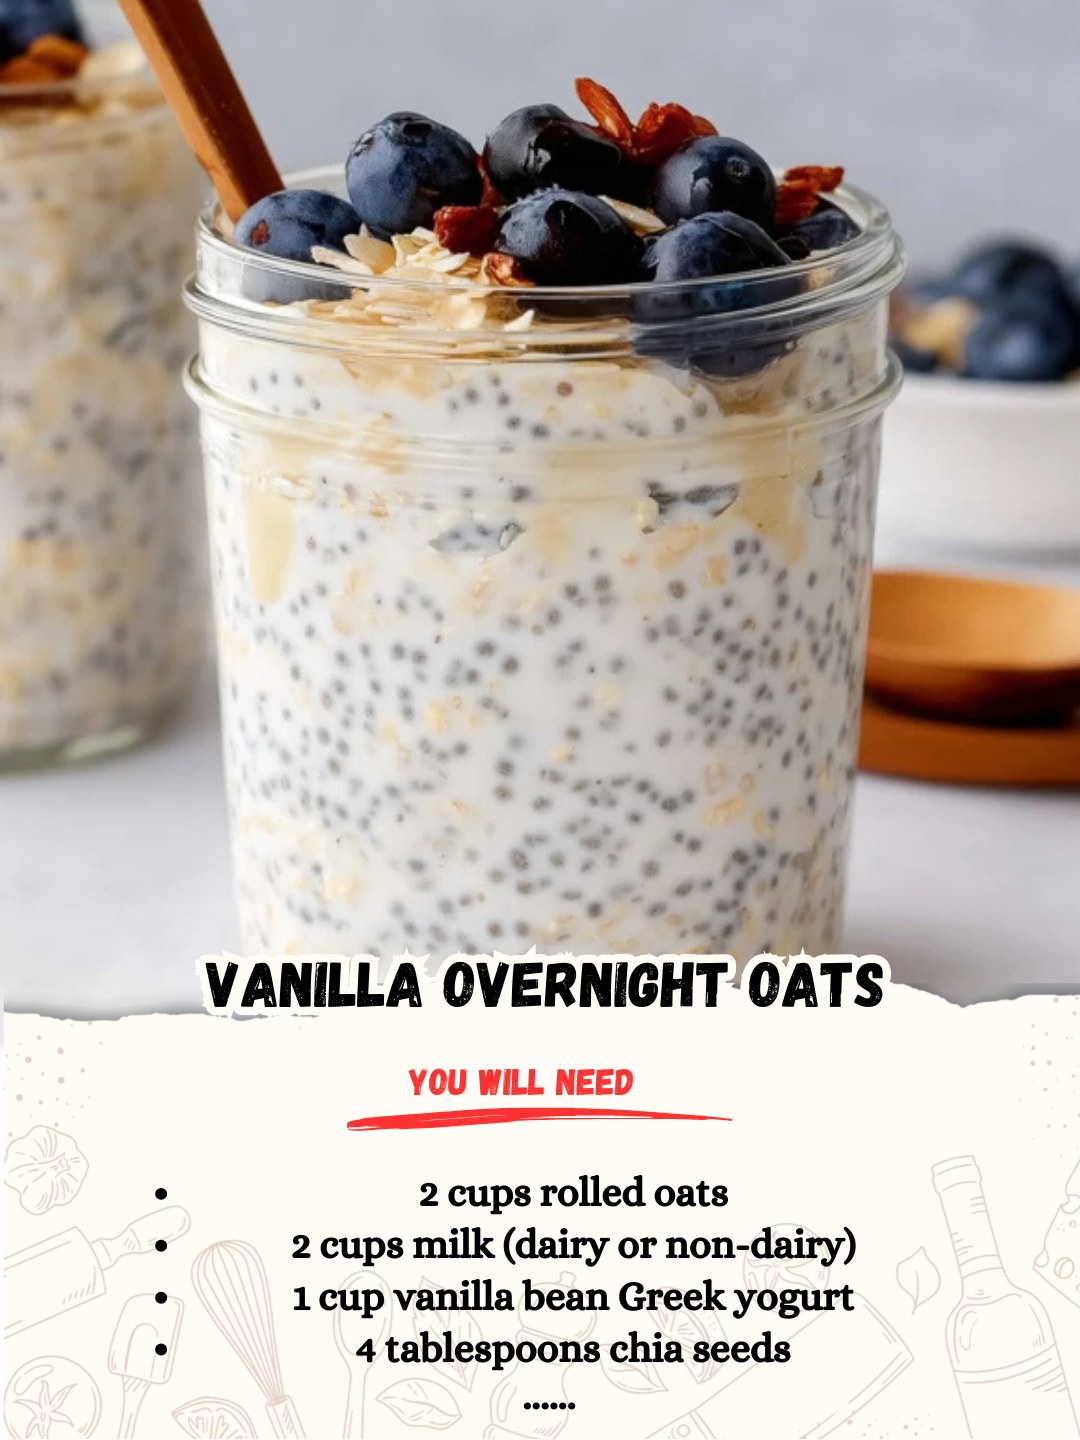
I’ll never forget the chaotic morning that made me finally try overnight oats. I was rushing, hungry, and had zero time to cook. I remembered a jar I’d lazily mixed the night before—skeptical it would be any good. I unscrewed the lid, and my kitchen filled with the subtle, sweet scent of vanilla. I took a tentative bite of the cold, creamy, perfectly textured oats, and it was a revelation. It was like eating vanilla pudding for breakfast, but it kept me full for hours. That simple jar transformed my rushed mornings. No more frantic cooking, just a delicious, ready-to-eat breakfast waiting for me. It felt like I’d discovered a secret life hack, and I’ve been hooked ever since.
Why You’ll Love This Recipe
You’ll love this recipe because it is the ultimate solution for busy mornings, offering a delicious, nutritious, and portable breakfast that literally makes itself while you sleep. It requires less than 5 minutes of active prep the night before and uses just four simple ingredients to create a creamy, satisfying, and endlessly customizable base. It’s forgiving, perfect for meal prep, and delivers a comforting, pudding-like texture that feels like a treat, not a chore. This recipe is your ticket to a calm, nourished, and happy morning, every single day.(See the ingredients in the next page below…)
Ingredients
- 2 cups old-fashioned rolled oats (do not use quick or steel-cut)
- 2 cups milk of choice (I use whole dairy milk or unsweetened almond milk)
- 1 cup vanilla bean Greek yogurt (or plain yogurt + 1 tsp vanilla extract)
- 4 tablespoons chia seeds
Equipment Needed
- Large mixing bowl
- Whisk or spatula
- Measuring cups and spoons
- Airtight containers or jars for storing (4-5 jars, each about 12-16 oz)
- Spoon for serving
Step-by-Step Instructions
My process always starts at night, in a quiet kitchen. I grab my large mixing bowl—this is easier than mixing directly in individual jars to ensure everything is evenly combined. I pour in the two cups of old-fashioned rolled oats. I’ve learned through trial and error that this specific type of oat is crucial. Quick oats turn to mush, and steel-cut oats stay too hard. The old-fashioned ones absorb the liquid perfectly, becoming tender but still retaining a pleasant, hearty texture. To the oats, I add the four tablespoons of chia seeds. Don’t skip these! They’re not just for health; they are the magical thickener that gives the oats their signature creamy, spoonable pudding consistency as they soak.(See the next page below to continue steps…)
Next, I add the wet ingredients. I measure out two cups of my chosen milk. I love the richness of whole dairy milk, but unsweetened almond milk works wonderfully for a lighter option. I pour it over the oat and chia mixture. Then, I add the entire cup of vanilla bean Greek yogurt. The first time I made this, I used plain yogurt and forgot to add vanilla, and the result was bland and tangy in a way that didn’t feel like breakfast. The pre-flavored vanilla yogurt adds the perfect level of sweetness and that beautiful vanilla aroma. If you only have plain yogurt, you must add at least a teaspoon of pure vanilla extract here.
Now, for the most important step: the thorough mix. I take my whisk or spatula and stir everything together vigorously for a good minute or two. I make sure to scrape the bottom and sides of the bowl to incorporate every dry oat and chia seed. The mixture will look very loose and soupy at this stage. This is exactly what you want! I learned the hard way that if you skimp on stirring, you’ll find a dry, unincorporated clump of oats or a pocket of chia seeds at the bottom of your jar in the morning. Trust me, a thorough stir now prevents a gloopy surprise later.
Once the mixture is perfectly homogenous, I divide it evenly among my clean jars or airtight containers. I like to use wide-mouth 16-ounce jars so I have room for toppings in the morning. I screw the lids on tightly, give each jar a gentle shake to settle the contents, and place them in the refrigerator. That’s it. As I close the fridge door, I feel that little spark of satisfaction knowing tomorrow’s breakfast is already done. I let them rest for a minimum of 6 hours, but ideally overnight. The magic happens in the dark, cold fridge as the oats and chia seeds slowly drink up the liquid, softening and swelling into a thick, spoonable, and incredibly creamy breakfast pudding.
Pro Tips for Best Results
The type of oat you use is the foundation. I tested this with quick oats once, thinking it would be faster. The result was a bowl of flavorless, gummy paste by morning. Old-fashioned rolled oats are the only way to go. They have the perfect surface area and thickness to absorb liquid without losing their structural integrity, giving you that ideal chewy-creamy balance. If you only have quick oats, reduce the milk by about 1/4 cup to compensate, but I highly recommend seeking out the old-fashioned kind.
Chia seeds are the secret to the perfect texture, but they need to be distributed evenly. If you just sprinkle them on top without mixing, they can clump together into gelatinous blobs. I always add them to the dry oats first and whisk them together before adding any liquid. This ensures they’re separated and will thicken the mixture uniformly. If you find the mixture too thick in the morning, you can always stir in a splash of extra milk. It’s much easier to thin it out than to thicken it up!
The waiting period is not just a suggestion; it’s the cooking process. I made the mistake of only letting mine soak for 3 hours once, and the oats were still crunchy and the chia seeds were unpleasant. A full 6-8 hours is the sweet spot. Overnight is truly best. This long, slow soak allows the oats to become fully tender and the chia seeds to release their soluble fiber, creating that luxuriously thick, spoonable texture we’re after. Patience here is your friend.
Common Mistakes to Avoid
My first big mistake was using steel-cut oats. I thought they’d be healthier and heartier. They were—too hearty. Even after 12 hours, they were still unpleasantly chewy and hard. They require cooking with heat to soften properly. For the no-soak method of overnight oats, you must use old-fashioned rolled oats. They are processed just enough to become perfectly tender with a cold soak. Trust me, this one ingredient swap makes or breaks the entire recipe. (See the next page below to continue…)
Another common error is forgetting to stir the mixture thoroughly before refrigerating. I’ve been guilty of a lazy stir, thinking it would sort itself out. In the morning, I had a separated jar: liquid on top, a dense paste of unhydrated oats and yogurt at the bottom. It was unappetizing and hard to mix. Now, I whisk for a full minute, making sure every oat is coated. This ensures a uniform texture throughout every single jar.
Skipping the chia seeds is a mistake I see often. I left them out once, thinking I’d simplify the recipe. The result was a runny, soupy bowl of oats that lacked the luxurious, pudding-like thickness. The chia seeds are not optional for texture; they are essential thickeners. They absorb up to 10 times their weight in liquid, creating a gel-like consistency that holds everything together and makes the oats feel rich and satisfying.
Finally, using a container that’s too small is a messy oversight. The oats and chia seeds expand as they soak. If you fill a jar to the brim, you’ll open the fridge to find the lid popped off and oats creeping over the rim. I always use a container that gives the mixture at least an inch of headspace at the top to allow for expansion. A wide-mouth jar is also much easier to eat from than a narrow one.
Serving Suggestions
I love serving these oats straight from the fridge, cold and creamy. The beauty is in the toppings, which I add just before eating to keep them fresh. My absolute favorite combination is a handful of fresh berries (blueberries or sliced strawberries), a sprinkle of granola for crunch, and a drizzle of honey or maple syrup. The contrast of the cold, creamy oats, the sweet-tart fruit, and the crunchy granola is a perfect symphony of textures and flavors.
For a more decadent “dessert-for-breakfast” vibe, I’ll stir in a tablespoon of chocolate chips or cocoa nibs and top it with sliced banana and a spoonful of almond butter. The almond butter swirled into the vanilla oats is absolutely heavenly. For a tropical twist, I mix in diced mango and shredded coconut, which pairs beautifully with the vanilla base. The key is to use toppings you love—this recipe is the perfect blank canvas.
When I’m taking breakfast on the go, I keep the toppings separate in a small bag or container and add them when I’m ready to eat. I also love layering the oats in a clear jar for a beautiful parfait effect: a layer of oats, a layer of yogurt or fruit compote, more oats, and then the crunchy toppings on the very top. It turns a simple breakfast into something Instagram-worthy and extra special.
Variations & Customizations
This vanilla base is incredibly versatile. For a “Peaches and Cream” version, I’ll layer the vanilla oats with a homemade peach compote or simply add diced fresh peaches when I mix it all together. The vanilla and peach flavors are a classic, dreamy combination. For a “Carrot Cake” twist, I’ll stir in a handful of finely grated carrot, a pinch of cinnamon, nutmeg, and raisins. It tastes like a healthy slice of cake in a jar.
If you want to boost the protein, you can use a scoop of vanilla protein powder. If you do this, you may need to add an extra splash of milk in the morning, as the protein powder can thicken the mixture significantly. You can also swap the Greek yogurt for cottage cheese blended until smooth—it adds a massive protein punch and a similar tangy creaminess. For a dairy-free version, just ensure your milk and yogurt are both plant-based.
Don’t be afraid to play with spices. While vanilla is the star, a 1/2 teaspoon of cinnamon or pumpkin pie spice mixed into the base creates a warm, comforting flavor perfect for fall. You can also swap the vanilla yogurt for a flavored one like coconut, key lime, or even a hint of lemon for a brighter, more dessert-like experience. The basic 2:2:1:4 ratio (oats:milk:yogurt:chia) is your guide—feel free to decorate it with any flavors you love.
How to Store, Freeze & Reheat
These oats are the ultimate meal prep food. Once prepared in their airtight jars, they will keep perfectly in the refrigerator for 4-5 days. This means you can make a big batch on Sunday and have breakfast ready for the entire workweek. The texture may continue to thicken slightly each day, which is easily fixed by stirring in a teaspoon or two of milk when you’re ready to eat.
Yes, you can freeze overnight oats! I portion them into freezer-safe jars or containers, leaving some headspace for expansion. They will keep for up to 2 months. To thaw, I simply move a jar from the freezer to the refrigerator the night before I want to eat it. They thaw perfectly and maintain their creamy texture. This is a fantastic trick for always having a healthy breakfast on hand.
While these are designed to be eaten cold, you can gently reheat them if you prefer a warm breakfast. I transfer the oats to a microwave-safe bowl and heat in 30-second intervals, stirring in between, until just warmed through. Be careful not to overheat them, as they can become gluey. I actually prefer them cold, as the flavors are brighter and the pudding-like texture is at its best, but warming them is a nice option on a chilly morning.
Conclusion
This Vanilla Overnight Oats recipe is more than just a breakfast; it’s a promise of a smoother, kinder morning. It’s the gift of time and nourishment you give to your future self. From that first life-changing jar to the countless variations I’ve enjoyed since, it has never let me down. It’s simple, reliable, and endlessly delicious. I hope this recipe finds its way into your fridge and becomes the quiet hero of your busy mornings, just as it has in mine. Now, go grab a jar—tomorrow’s best breakfast is only a stir and a night’s sleep away.