
Introduction
The first time I made a traditional chocolate Yule log, my kitchen felt like it had officially entered the holiday season. The smell of cocoa, warm sponge cake, and melting chocolate filled the air, and I remember feeling both excited and a little nervous as I rolled the cake for the first time. I had grown up seeing this dessert on festive tables, but making it myself felt special and meaningful. When I finally sliced into it and saw the perfect spiral, I knew this recipe would become a tradition in my own kitchen too.
Why You’ll Love This Recipe
You’ll love this recipe because it delivers everything you expect from a classic chocolate Yule log without feeling intimidating once you start. I’ve made it several times now, and each time it feels like a comforting ritual rather than a stressful project. The sponge is light yet sturdy, the cocoa pastry cream is deeply chocolatey, and the whipped ganache makes it feel luxurious and festive. I think you’ll enjoy how impressive it looks on the table while still being achievable in a home kitchen with patience and care.
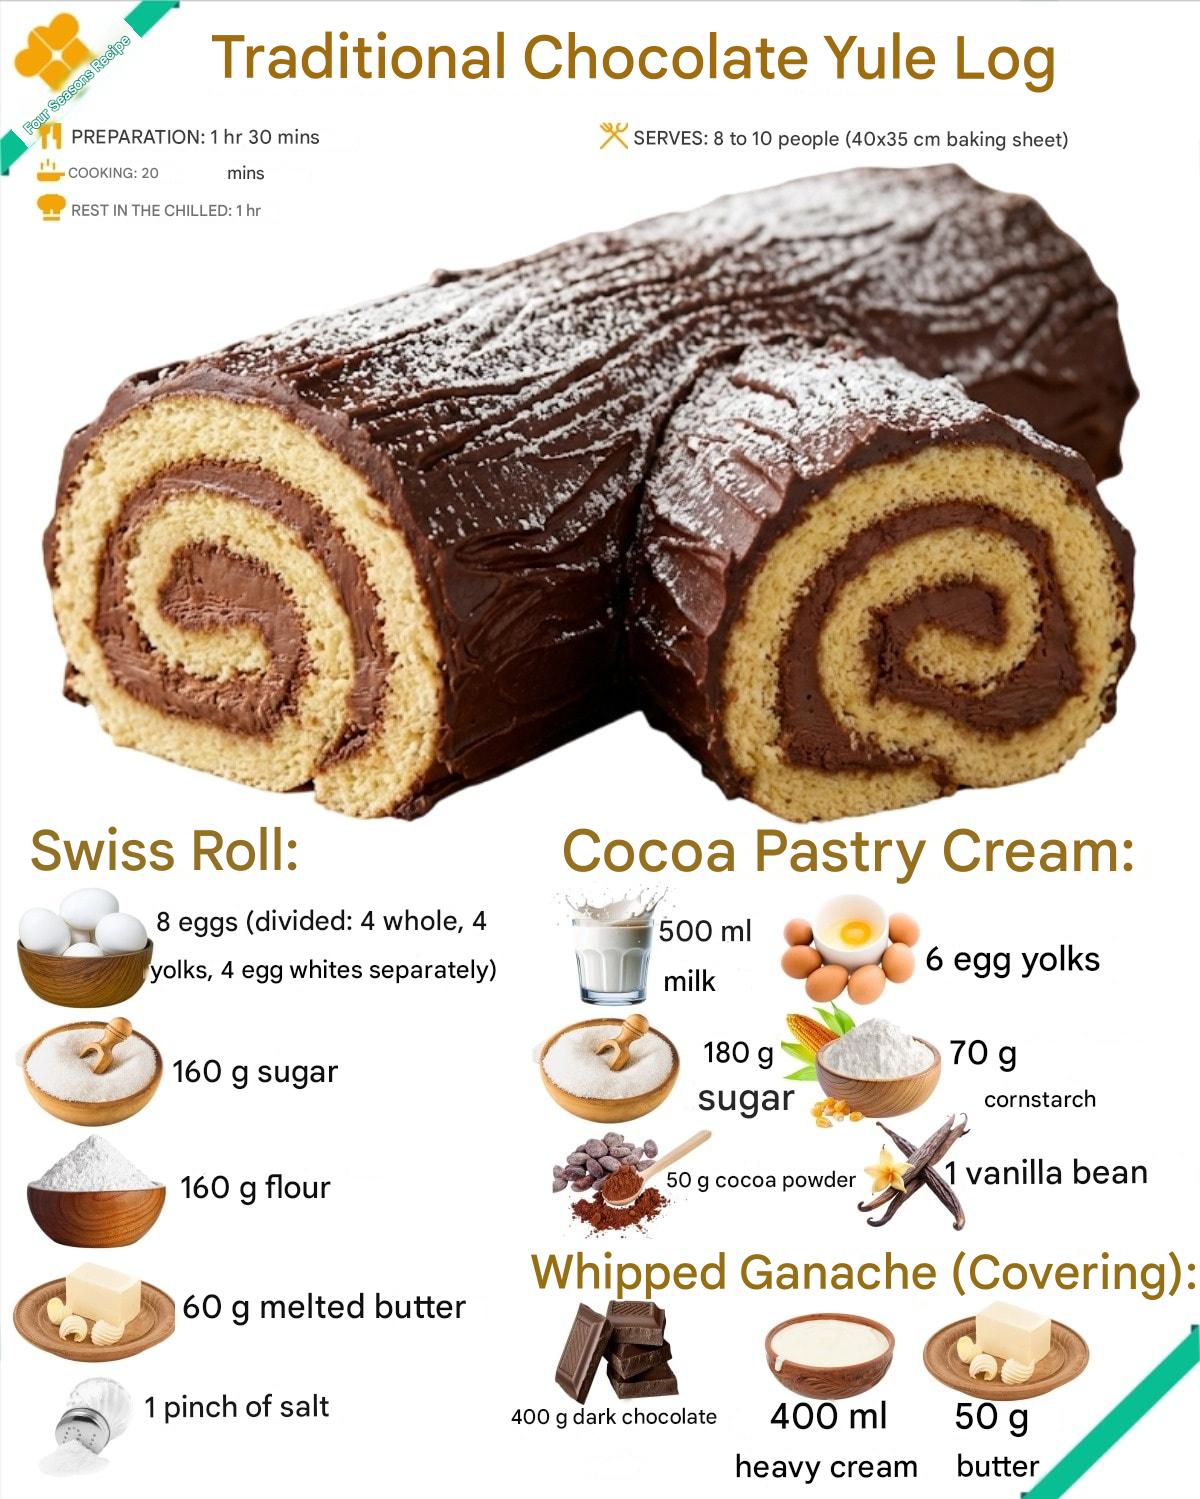
Ingredients
- 8 eggs, divided (4 whole eggs, 4 egg yolks, 4 egg whites)
- 160 g sugar (for the sponge)
- 160 g all-purpose flour
- 60 g melted butter
- 1 pinch of salt
- 500 ml milk
- 6 egg yolks (for the cocoa pastry cream)
- 180 g sugar (for the pastry cream)
- 70 g cornstarch
- 50 g cocoa powder
- 1 vanilla bean
- 400 g dark chocolate
- 400 ml heavy cream
- 50 g butter (for ganache)
When I make this Yule log, I pay close attention to the chocolate and cocoa because they define the flavor. I always choose dark chocolate with good cocoa content, not overly sweet, because it balances the cream beautifully. The vanilla bean in the pastry cream might seem optional, but trust me, it adds depth and warmth that powdered vanilla can’t quite match. Separating the eggs carefully matters too, since the sponge relies on airy whites and rich yolks working together.
Equipment Needed
- Large mixing bowls
- Electric mixer or whisk
- Rubber spatula
- Baking sheet (about 40×35 cm)
- Parchment paper
- Saucepan
- Fine sieve
- Offset spatula
- Clean kitchen towel
In my kitchen, setting up all the equipment before I start makes the process calmer and more enjoyable. An electric mixer saves time, especially for whipping egg whites, but I’ve also whisked by hand when I wanted to slow down and focus. The parchment paper and clean towel are essential for rolling the sponge without sticking or cracking. I also rely heavily on an offset spatula, because it makes spreading the pastry cream and ganache smooth and even.
Step-by-Step Instructions
I begin by preparing the sponge cake, separating the eggs carefully and whisking the whole eggs and yolks with sugar until the mixture becomes pale and thick. This step takes patience, and I’ve learned not to rush it because the structure of the sponge depends on properly aerated eggs. When the mixture ribbons softly, I gently fold in the sifted flour and melted butter, keeping my movements slow so I don’t deflate the batter.
In a separate bowl, I whip the egg whites with a pinch of salt until they hold soft peaks. I fold them into the batter in stages, lifting from the bottom and turning the bowl. I’ve tried adding them all at once before, and trust me, it doesn’t work as well. Once the batter is smooth and airy, I spread it evenly onto a parchment-lined baking sheet, smoothing the surface carefully.
I bake the sponge just until it’s set and springy to the touch, not golden. Overbaking is the enemy here, and I learned that lesson the hard way with a cracked roll. As soon as it comes out of the oven, I turn it onto a clean kitchen towel, peel away the parchment, and gently roll it up while still warm. This step feels intimidating at first, but rolling it warm trains the cake to hold its shape later.(See the next page below to continue…)