
The very first time I made these mint brownies, my whole kitchen filled with that unmistakable blend of rich chocolate and cool peppermint, a scent that practically wrapped itself around me like a cozy winter blanket. I remember leaning over the mixing bowl as the cocoa and butter came together, thinking, “Oh wow… this is going to be dangerous.” When I layered the silky mint icing over the warm brownie base and topped it with the soft chocolate frosting, I knew I had found a recipe I’d make again and again. Every bite was cool, fudgy, creamy, and just downright irresistible.
Why You’ll Love This Recipe
You’ll love this recipe because it delivers everything you want in a dessert: deep chocolate flavor, creamy mint filling, and a luscious chocolate frosting that ties the whole thing together. If you’re someone who loves Andes mints, peppermint patties, or anything in that chocolate-mint family, these brownies are going to feel like your new signature treat. They’re surprisingly easy, and the layers look impressive without asking you to spend hours decorating. You’ll feel like you’re bringing something bakery-worthy to the table with minimal stress.
Ingredients
Brownie Layer
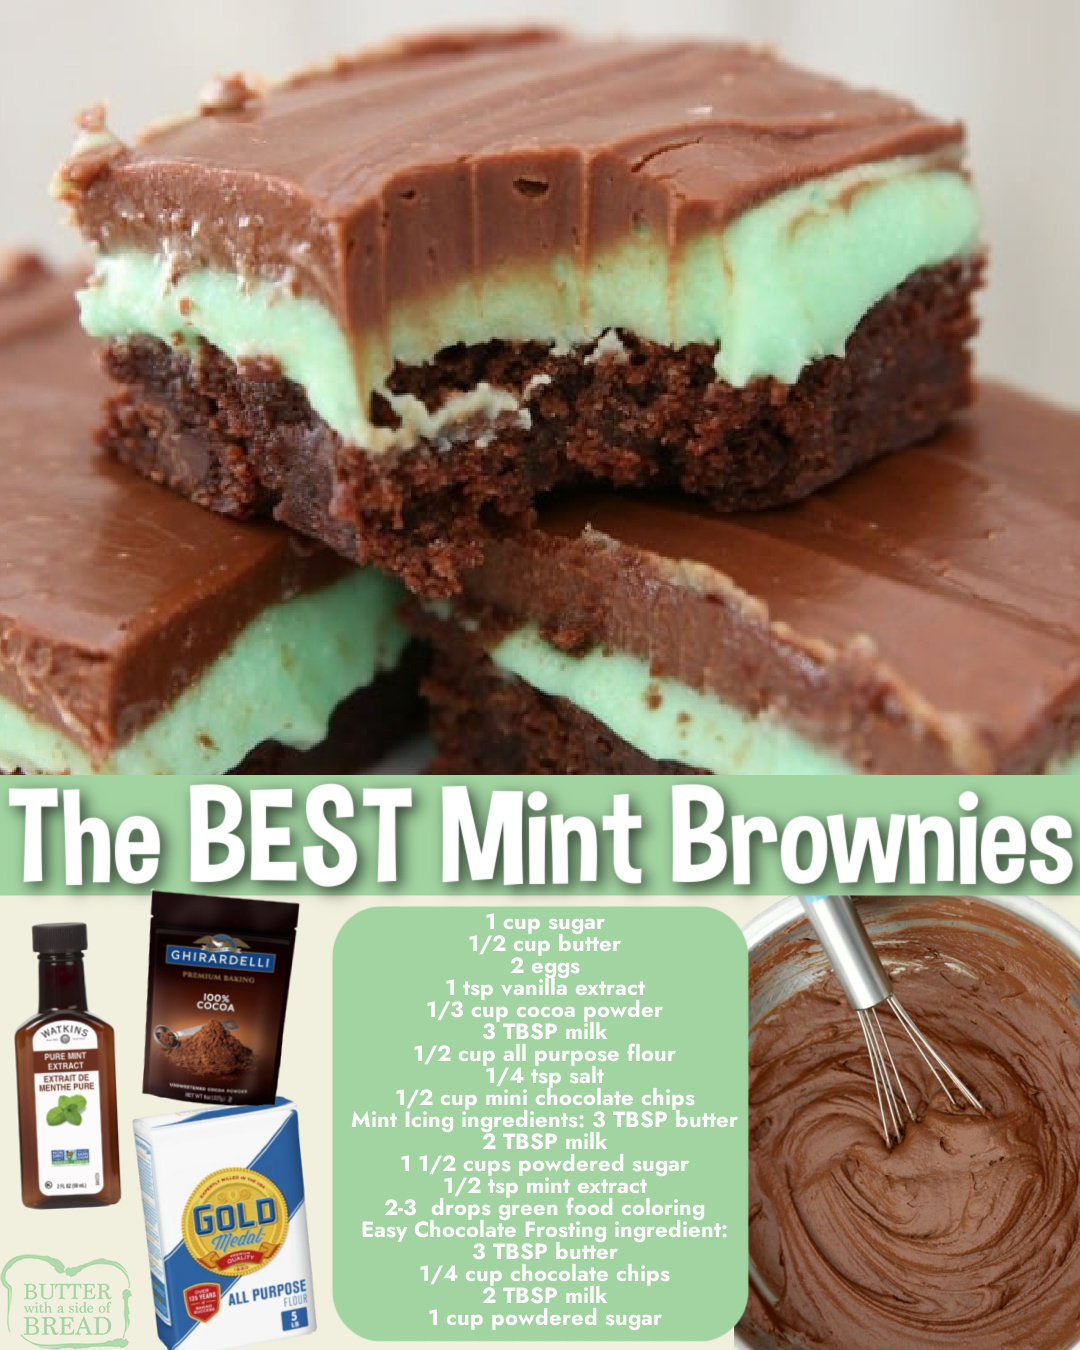
- 1 cup sugar
- ½ cup butter
- 2 eggs
- 1 teaspoon vanilla extract
- ⅓ cup cocoa powder
- 3 tablespoons milk
- ½ cup all-purpose flour
- ¼ teaspoon salt
- ½ cup mini chocolate chips
Mint Icing Layer
- 3 tablespoons butter
- 2 tablespoons milk
- 1½ cups powdered sugar
- ½ teaspoon mint extract
- 2–3 drops green food coloring
Chocolate Frosting Layer
- 3 tablespoons butter
- ¼ cup chocolate chips
- 2 tablespoons milk
- 1 cup powdered sugar
Whenever I make these brownies, I always remind myself not to substitute peppermint extract for mint extract unless I want a sharper, candy-cane flavor. Mint extract delivers the classic creamy mint profile that pairs perfectly with chocolate. You can also adjust the food coloring—sometimes I skip it entirely when I’m making these for adults, but for holiday platters, that pastel green really pops. If you prefer a darker chocolate topping, swap the chocolate chips for semi-sweet morsels.
Equipment Needed
- Mixing bowls
- Medium saucepan
- Whisk or hand mixer
- Rubber spatula
- 8×8 baking pan
- Parchment paper
- Cooling rack
I’ve made these brownies with both a whisk and an electric mixer, and honestly, either works fine as long as your butter is softened and your mixture is smooth. Lining the pan with parchment paper is something I strongly recommend—I’ve skipped it once and regretted every second of prying brownies out of the corners. A small saucepan is perfect for melting the frosting ingredients, but make sure you use low heat to avoid scorching the chocolate. And having a cooling rack makes the layering process much smoother because everything cools evenly.
Step-by-Step Instructions
I always begin by preheating my oven and lining the baking pan with parchment. This simple step sets me up for success later when it’s time to lift the cooled brownies out in one clean piece. In a mixing bowl, I cream the butter and sugar until the mixture becomes light and fluffy, which takes just a couple of minutes. Adding the eggs and vanilla makes the batter glossy, and this is usually the moment I know the brownies will bake up soft and rich.
Next, I whisk in the cocoa powder, milk, flour, and salt. The batter turns thick and velvety, and that chocolate aroma instantly hits the air. The mini chocolate chips go in last, and they melt slightly into the batter as the brownies bake, giving you little pockets of warm chocolate in each bite. I spread the batter into the prepared pan and bake just until the center sets but still feels slightly soft. Overbaking is your worst enemy here—pulling them out on time is how you keep that perfectly fudgy texture.(See the next page below to continue…)