
The first time I made this Swiss raspberry yogurt roll, it was one of those afternoons when I wanted something light, fresh, and not overly sweet, yet still comforting. My kitchen smelled like warm vanilla sponge and fresh raspberries, and I remember feeling oddly proud watching the roll come together so neatly. The contrast between the fluffy cake, creamy yogurt mousse, and tart berries completely won me over. Since then, this recipe has become my go-to whenever I want a dessert that feels elegant but still homemade and approachable.
Why You’ll Love This Recipe
You’ll love this recipe because it feels special without being intimidating, and I say that as someone who used to be nervous about rolling cakes. The sponge is soft and flexible, the yogurt mousse is light and refreshing, and the raspberries cut through everything with just the right amount of brightness. When you make this, you’ll feel like you created something bakery-worthy in your own kitchen, and trust me, that feeling never gets old.
Ingredients
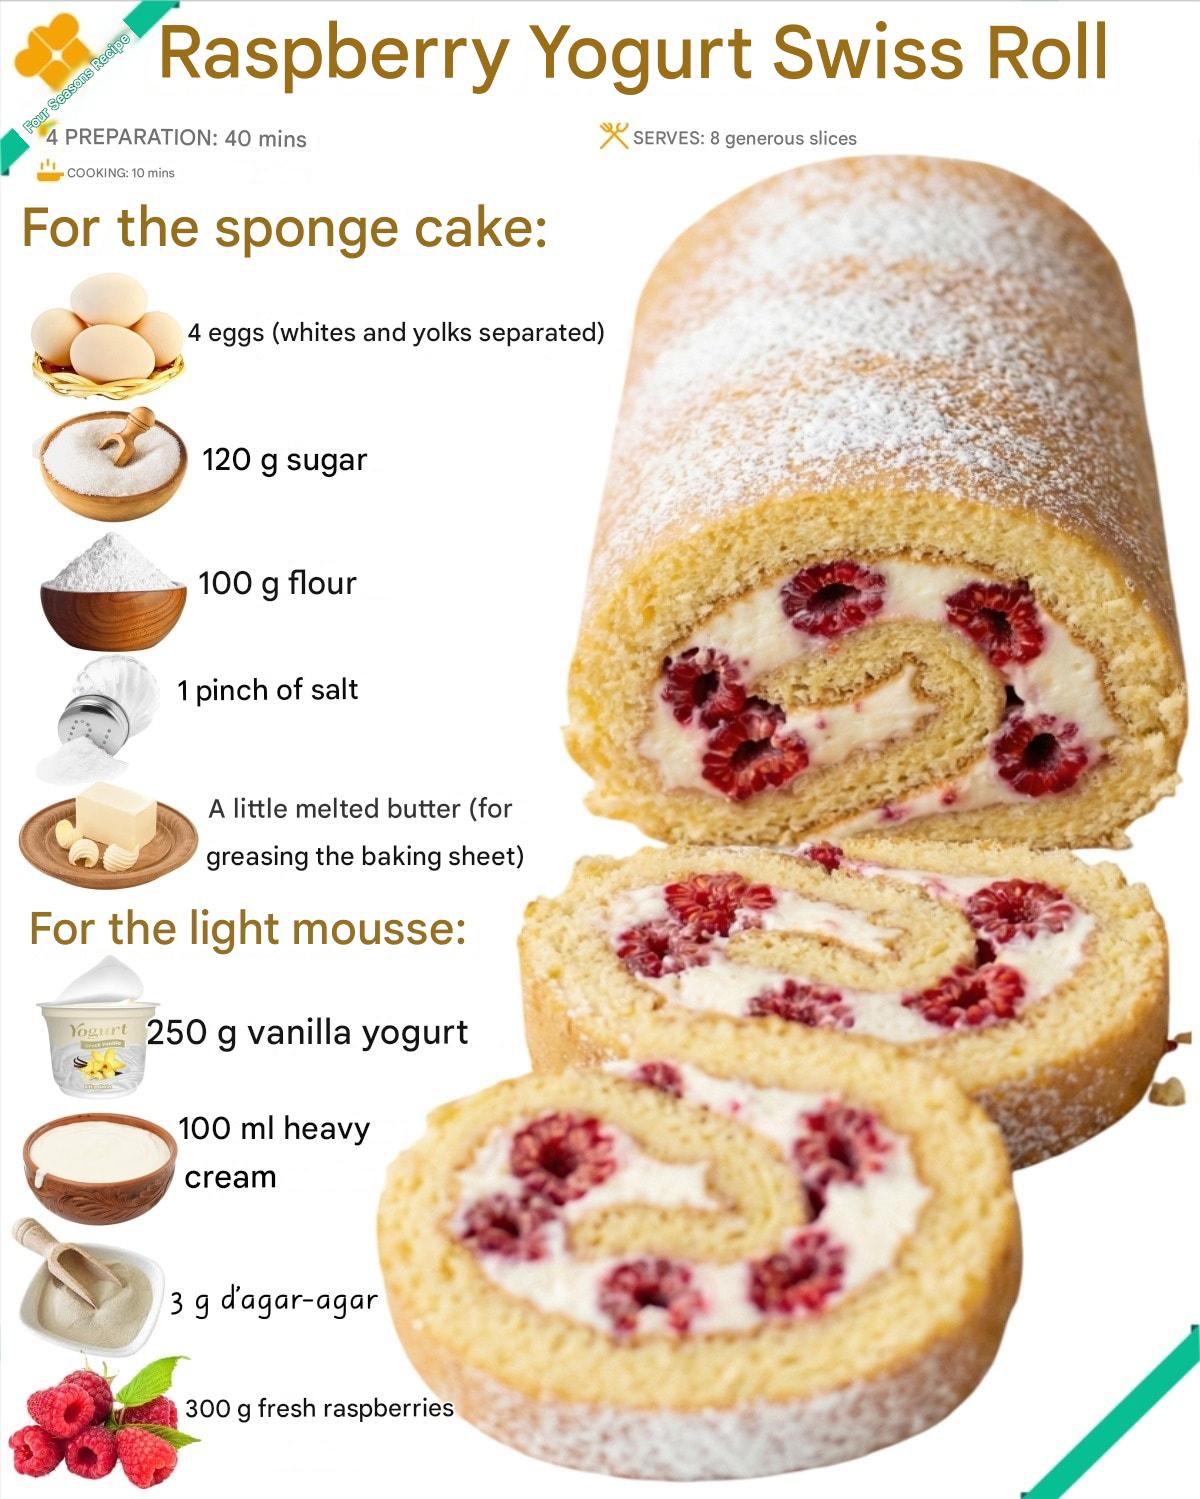
- 4 large eggs, whites and yolks separated
- 120 g granulated sugar
- 100 g all-purpose flour
- 1 pinch of salt
- A small amount of melted butter, for greasing the pan
- 250 g vanilla yogurt
- 100 ml heavy cream
- 3 g agar-agar
- 300 g fresh raspberries
When I make this recipe, I pay close attention to ingredient quality because it really shows in the final result. Use a thick, creamy vanilla yogurt rather than a runny one, or the mousse won’t hold as nicely. Fresh raspberries work best for flavor and texture, though I’ve used frozen in a pinch after thawing and draining them very well. Don’t skip separating the eggs, either; that step is key to achieving the light sponge that makes this roll so satisfying.
Equipment Needed
- Mixing bowls, at least three
- Electric mixer or hand whisk
- Rubber spatula
- Baking sheet
- Parchment paper
- Saucepan
- Offset spatula or butter knife
- Clean kitchen towel
I’ve made this recipe with both fancy tools and very basic ones, and it works either way. An electric mixer makes whipping the egg whites faster, but I’ve done it by hand when I felt like earning my dessert. A simple saucepan is enough for activating the agar-agar, and a clean kitchen towel is essential for rolling the sponge without sticking. You don’t need specialized equipment, just a bit of patience and organization.
Step-by-Step Instructions
I always start by preheating my oven and preparing the baking sheet with parchment paper lightly brushed with melted butter. Then I separate the eggs, whisking the yolks with most of the sugar until pale and creamy. The mixture thickens slightly and turns a soft yellow, and that’s when I know I’m on the right track. I gently fold in the flour and salt, being careful not to overmix, because I’ve learned the hard way that rushing this step makes the sponge dense.
Next, I whip the egg whites with the remaining sugar until they hold soft peaks. This part always feels a bit magical to me, watching the liquid whites transform into something airy and structured. I fold the whites into the batter in batches, using slow, deliberate movements. Trust me, folding gently makes a huge difference, and I’ve ruined a sponge before by being impatient here.
Once the batter is ready, I spread it evenly onto the baking sheet and bake it just until set and lightly golden. Overbaking is the enemy, so I keep a close eye on it during the last couple of minutes. When it comes out of the oven, I immediately turn it onto a clean kitchen towel and peel off the parchment. Rolling it while warm helps prevent cracks later, something I only learned after cracking my first few rolls.(See the next page below to continue…)