
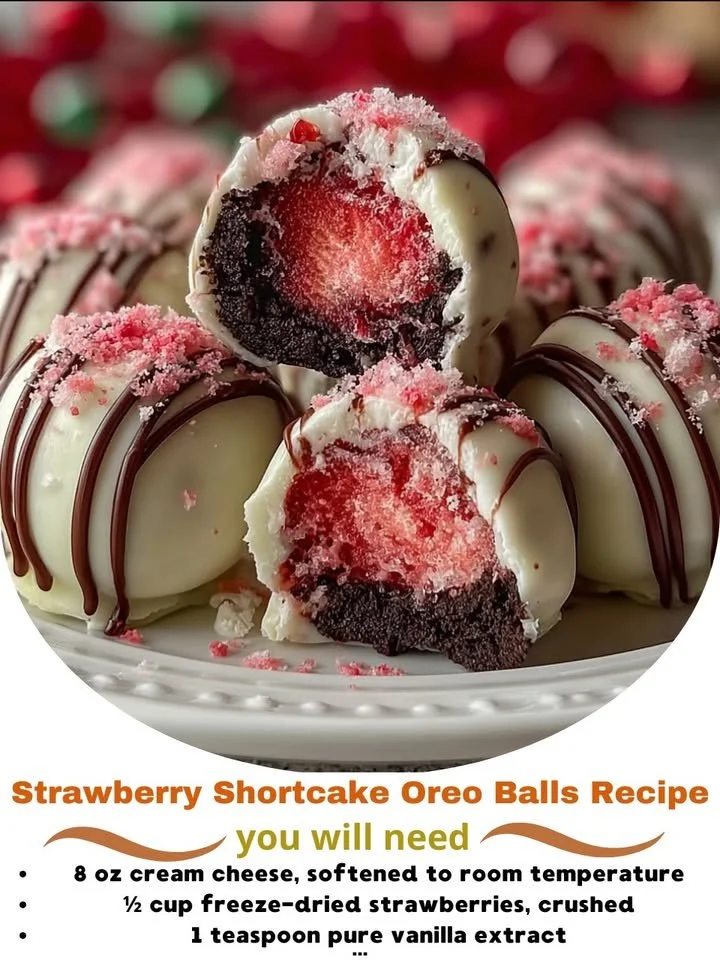
Let me just say, if you’re a fan of strawberries, Oreos, and deliciously sweet snacks, you’re in for a delightful treat! One of my absolute favorite desserts has to be the Strawberry Shortcake Oreo Balls. These little bites are the perfect combination of creamy, crunchy, and fruity, making them an irresistible treat for any gathering or even just for a cozy night in. I can’t wait to share this recipe with you; it’s super simple and packed with flavor!
Why You’ll Love This Recipe
What I absolutely love about these Strawberry Shortcake Oreo Balls is that they’re the perfect blend of two beloved desserts: classic strawberry shortcake and the iconic Oreo cookie. Each bite is a mini explosion of flavor, and they look so cute on a serving platter! Plus, they’re no-bake, which means I can whip them up without firing up the oven and deal with any mess. Perfect for the warmer months or anytime I crave something sweet without too much hassle! (See the ingredients in the next page below…)
Ingredients
– 1 package of Strawberry Cream Oreos
– 8 oz cream cheese, softened
– 1 cup crushed freeze-dried strawberries
– 1 cup white chocolate chips
– Additional crushed Oreos for coating
– Sprinkles or additional freeze-dried strawberries for garnish (optional)
Equipment Needed
– Mixing bowl
– Food processor or blender
– Baking sheet
– Parchment paper
– Microwave-safe bowl
– Fork or dipping tool for coating
Step-by-Step Instructions
I love starting off this recipe by crushing the Strawberry Cream Oreos in my food processor. It’s so satisfying to watch them turn into fine crumbs! I combine the crushed Oreos with softened cream cheese in a large mixing bowl, mixing until everything is well incorporated. The mixture will be slightly sticky, but that’s exactly what you want to form into balls. Once your mixture is ready, I like to chill it in the fridge for about 30 minutes to make it easier to roll. (See the next page below to continue steps…)
Next, I take the chilled mixture out of the fridge and using a small cookie scoop, I form the mixture into one-inch balls. This step might get a bit messy, but I enjoy rolling them in my hands and feeling the sticky texture take shape. Once all the balls are formed, I place them on a baking sheet lined with parchment paper. They should be lined up nicely, ready for their delicious coating!
Now comes the fun part: melting the white chocolate! I microwave the white chocolate chips in a microwave-safe bowl in 30-second intervals, stirring between each session until it’s completely smooth. With the melted chocolate ready, I dip each Oreo ball into it, ensuring they are fully coated. Then, I use a fork to let the excess chocolate drip off before placing them back onto the baking sheet. Don’t forget to sprinkle them with crushed Oreos or extra freeze-dried strawberries to give them a beautiful finish!
Finally, once all the balls are coated and decorated, I pop them in the fridge to set for at least 30 minutes. The moment they come out, my kitchen is filled with the most inviting aroma, making it hard to wait! But trust me, letting them chill will help achieve that perfect bite.
Pro Tips for Best Results
I always recommend using full-fat cream cheese for a richer flavor and creamier texture. I tested it with low-fat cream cheese once, and let me tell you, it just didn’t have that same lusciousness. Trust me; you want every bite to melt in your mouth!
Another tip I found helpful is to keep your hands slightly damp when rolling the balls. This not only helps prevent them from sticking to your fingers but also makes it easier to shape them perfectly. I tried initially rolling them dry, and it could be quite a sticky situation—literally!
Lastly, I encourage you to be creative with your chocolate coatings! I’ve experimented with melting down colored chocolate for holidays, and it adds a beautiful touch. Remember, presentation is everything, and it’ll make your dessert feel extra special.
Common Mistakes to Avoid
One mistake I made during my first attempt was not chilling the Oreo mixture long enough. Trust me; it’s essential for achieving those perfectly round desserts. If your mixture is too warm, it will just end up being a messy situation rather than cute little balls! (See the next page below to continue…)
Another common error is not allowing the white chocolate to cool slightly before dipping the balls. If it’s too hot, the chocolate will melt the balls instead of coating them. I learned this the hard way when my first batch looked more like a sticky mess than elegant treats.
Using old or expired white chocolate can result in a weird flavor or texture, which we definitely want to avoid! Make sure to check your ingredients for freshness—nothing puts a damper on a delicious treat like bad chocolate.
Lastly, I’ve learned that rushing the chilling step can lead to an undesirable texture. Make sure to give your Oreo balls enough time to set in the fridge; it really makes all the difference.
Serving Suggestions
These Strawberry Shortcake Oreo Balls make a delightful treat for any occasion! I love serving them at birthday parties, where they not only taste delicious but also look fabulous on the dessert table. You can place them in a cute cupcake liner for an extra special touch!
They’re also perfect for a movie night treat; just set a plate of them out alongside your favorite snacks, and you’ve got a crowd-pleasing selection! When you take a bite, the flavor explosion will complement your movie perfectly.
And let’s not forget about potlucks! I’ve taken them to several gatherings, and they have consistently been a hit. Everyone loves a bite-sized treat, and these little gems certainly do the trick!
Variations & Customizations
If you’re feeling adventurous, you can easily switch up these Oreo Balls by using different flavors of Oreos! Recently, I made a batch using the Pumpkin Spice Oreos, and they were a hit! This is a perfect way to matchup with seasonal occasions and make these treats your own.
Another fun variation is swapping out the freeze-dried strawberries for other fruits like raspberries or blueberries. Each fruit brings its own unique and tangy taste, enhancing this treat and providing even more flavor combinations to explore!
For chocolate lovers, I’ve also experimented with dark chocolate for the coating; the bittersweetness perfectly balances the sweetness of the filling. If you prefer a less sweet treat, this could be an excellent option for you!
How to Store, Freeze & Reheat
I usually store my Strawberry Shortcake Oreo Balls in an airtight container in the fridge, where they’ll stay good for about a week—if they last that long! They are perfect for grabbing as a quick snack when I need a little pick-me-up.
If you want to prepare ahead of time, these treats freeze beautifully! I typically freeze them in a single layer on a baking sheet and once they’re solid, I transfer them into a freezer bag. They can last for up to three months in the freezer. Just make sure to label and date them!
When you’re ready to enjoy them again, simply remove them from the freezer and let them thaw in the fridge for a couple of hours. No need to worry about reheating—these treats are perfect served cold!
Conclusion
I hope you enjoy making and indulging in these Strawberry Shortcake Oreo Balls as much as I do! They are so versatile, simple to prepare, and incredibly delicious. There’s just something about the combination of flavors and textures that hits the spot every time. So, gather your ingredients, roll up your sleeves, and get ready to delight your taste buds! Happy baking!