
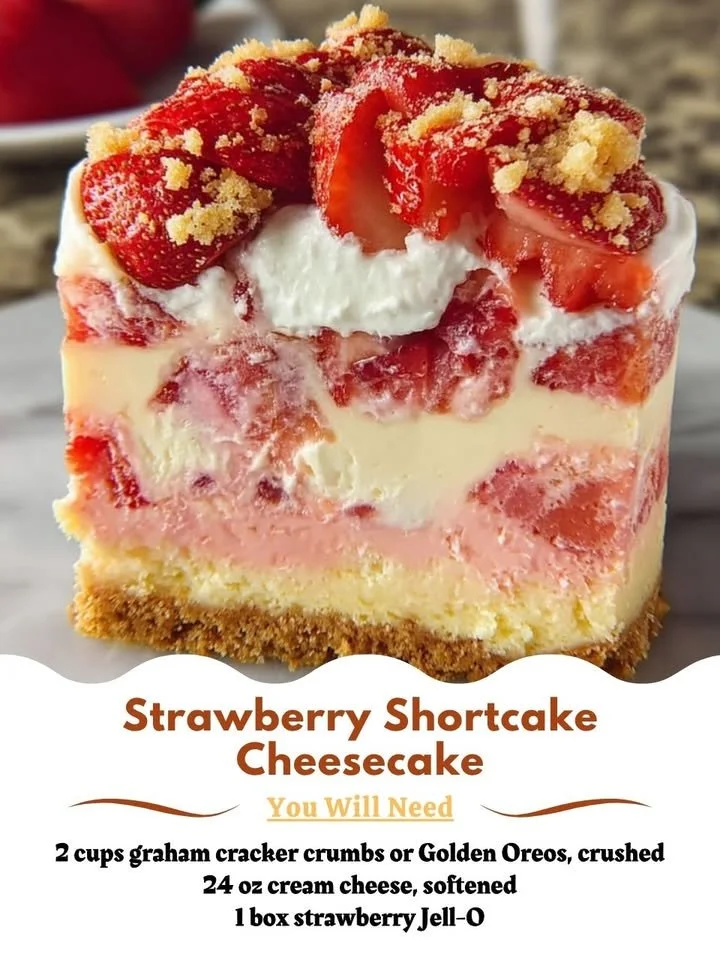
I absolutely adore cheesecake, especially when it’s combined with something as joyful as strawberry shortcake. There’s just something magical about the layers of creamy goodness, fluffy whipped cream, and vibrant strawberries that instantly transports me to warm summer days. Today, I want to share my version of Strawberry Shortcake Cheesecake, which is sure to be a crowd-pleaser! Let’s dive into this delightful recipe that marries two of my favorite desserts seamlessly: cheesecake and strawberry shortcake.
Why You’ll Love This Recipe
This Strawberry Shortcake Cheesecake is rich, creamy, and bursting with fresh flavors. The combination of cheesecake’s dense texture and the lightness of whipped cream, topped with sweet strawberries, creates a treat that will leave you coming back for more. It’s perfect for celebrations, gatherings, or just a sweet indulgence after a long day. Plus, I promise, it’s easier to make than you might think! (See the ingredients in the next page below…)
Ingredients
– 1 1/2 cups graham cracker crumbs
– 1/2 cup unsalted butter, melted
– 1 cup granulated sugar
– 4 (8 oz) packages cream cheese, softened
– 1 teaspoon vanilla extract
– 4 large eggs
– 2 cups fresh strawberries, hulled and sliced
– 1 cup heavy whipping cream
– 1/4 cup powdered sugar
Equipment Needed
– 9-inch springform pan
– Mixing bowls
– Electric mixer or stand mixer
– Rubber spatula
– Measuring cups and spoons
– Baking sheet
– Parchment paper
Step-by-Step Instructions
First, let’s start by making the crust. Preheat your oven to 325°F (160°C). In a mixing bowl, combine the graham cracker crumbs with the melted butter and a tablespoon of sugar, mixing until it resembles wet sand. Press this mixture into the bottom of your springform pan evenly. Bake for about 10 minutes, allowing the crust to set beautifully. The aroma will be utterly heavenly as it bakes! Once it’s done, remove the crust and let it cool completely. (See the next page below to continue steps…)
To prepare the cheesecake filling, in another mixing bowl, beat the softened cream cheese with an electric mixer until creamy and smooth. Gradually add in the remaining sugar and vanilla extract, mixing until well-combined. Then, add the eggs one at a time, beating on low speed until just incorporated. Take care not to overmix — we want a smooth filling, not a fluffy texture. Now it’s time to pour this luscious mixture over the cooled crust.
Bake your cheesecake in the preheated oven for about 55-60 minutes, or until it’s set around the edges but slightly wobbly in the center. I usually turn off the oven, crack the door, and let it cool slowly to prevent any cracks from forming. Trust me, this little tip has saved me many agitated moments in my kitchen! After it cools, place it in the refrigerator for at least 4 hours, or preferably overnight, to let the flavors meld together perfectly.
While the cheesecake chills, prepare the whipped cream and strawberries. In a bowl, beat the heavy whipping cream and powdered sugar together until soft peaks form. When you are ready to serve, layer the cheesecake with sliced strawberries and dollops of whipped cream on top.
Pro Tips for Best Results
I tested this cheesecake three different ways to find the perfect balance of flavors. The addition of vanilla extract really lifts the taste of the cream cheese filling, so don’t skip it! I also tried both fresh and frozen strawberries, and I wholeheartedly recommend fresh for their juicy sweetness. If you’re making this for a crowd, consider whipping up extra strawberries with a sprinkle of sugar; it enhances their flavor even more!
Another tip is to always let your cream cheese sit at room temperature before mixing. This small step makes such a difference in achieving that perfectly smooth and creamy texture. Trust me, your cheesecake will thank you! Before serving, I like to let the cheesecake sit at room temperature for about 15 minutes; it really brings out the flavors and makes for easier slicing.
Lastly, presentation is everything! I like to garnish my cheesecake with whole strawberries and a drizzle of the extra strawberry juice. It not only looks stunning but adds a touch of freshness to each slice.
Common Mistakes to Avoid
One common mistake I made in my earlier attempts was not cooling the cheesecake properly in the oven. I used to cold-shock it by moving it directly from the hot oven to the fridge. This can lead to cracks. Now, I let it cool gradually in the oven, which has made a significant difference in the final look and texture of the cheesecake. (See the next page below to continue…)
Another pitfall is underbaking. If your cheesecake is too jiggly in the middle when you take it out, it may not set properly as it cools. Take my advice, err on the side of a little extra baking time rather than less. A slight wobble is okay but don’t confuse that with being too raw!
Also, make sure your strawberries are ripe and sweet. I once bought a batch that left my cheesecake tasting slightly sour. Always do a taste test and adjust to your liking — I now keep a small extra bowl of sliced strawberries nearby for that very reason!
Lastly, remember that patience is key! It might be tempting to slice right into it after chilling for just a few hours, but the best flavor and texture develop when it has cooled overnight in the fridge.
Serving Suggestions
When it comes time to serve, I love giving the cheesecake a light dusting of powdered sugar for that classic shortcake look. This not only adds a touch of sweetness but also gives it a beautiful presentation. You could even serve it with a side of fresh mint leaves for a pop of color and flavor!
For added indulgence, I often pair my cheesecake with a scoop of vanilla ice cream. The creaminess of the ice cream alongside the rich cheesecake is absolute bliss. If you really want to impress your guests, consider serving it with a drizzle of homemade strawberry sauce or topping it with fresh strawberry compote.
And don’t forget to serve it with coffee or tea! The rich flavors of the cheesecake pair wonderfully with a cup of rich coffee or a calming herbal tea, making it a delightful end to any meal.
Variations & Customizations
If you want to add a twist to your Strawberry Shortcake Cheesecake, consider using different fruits! Blueberries, raspberries, or even peaches would create a delightful variation that still captures the essence of summer. Simply swap out the strawberries for your fruit of choice and follow the same steps!
I also like experimenting with the crust. Instead of graham crackers, you could use crushed vanilla wafer cookies or even gingersnap cookies for a spicy twist. Each type of cookie will give a unique flavor to the crust that dazzles your taste buds.
For those who love a little extra flavor, you can add lemon zest to the cheesecake filling. It’ll brighten up the flavors even more and provide a refreshing contrast to the sweetness of the strawberries. The possibilities are truly endless!
How to Store, Freeze & Reheat
To store your Strawberry Shortcake Cheesecake, simply cover it with plastic wrap and keep it in the refrigerator; it’ll stay good for up to a week. I usually find that it tastes even better the second day once the flavors have fully developed and melded together.
If you want to make this cheesecake ahead of time, it freezes beautifully! After it has completely cooled and set, wrap it tightly in plastic wrap and then aluminum foil. It can be stored in the freezer for up to 2 months. Just remember to bring it back to the fridge to thaw overnight before serving.
When it comes to reheating, I recommend serving it cold fresh from the fridge rather than warming it up. However, if you have excess whipped cream or toppings, you can always prepare them fresh when you’re ready to enjoy your dessert again!
Conclusion
I hope you give this Strawberry Shortcake Cheesecake a try in your kitchen! It’s truly a delight that captures the flavors of summer while combining the best of both worlds: cheesecake and shortcake. Whether for a special occasion or just a sweet treat for yourself, I promise you’ll be rewarded with smiles and satisfied cravings. Happy baking!