
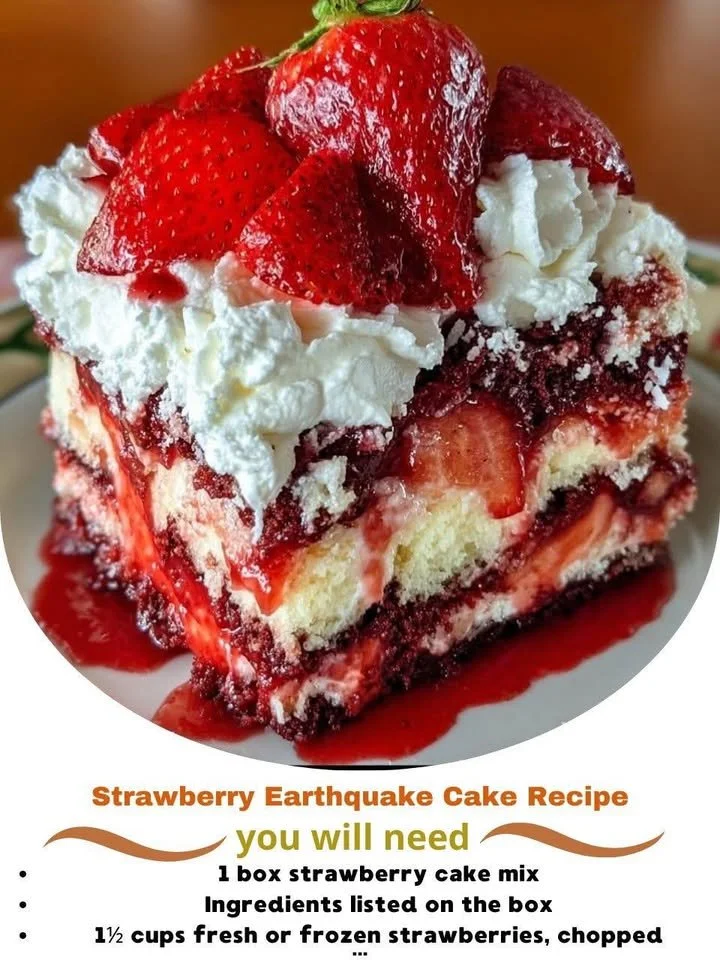
Strawberry Earthquake Cake. This delightful treat is a whimsical combination of strawberry cake with a gooey cream cheese layer that literally erupts from the center like a sweet earthquake when you cut into it. I remember the first time I made it; the warm strawberry aroma filled my kitchen, and I couldn’t wait to dig in. If you’re a fan of the juicy burst of strawberries paired with rich, cream cheesy delight, then you’ll find this cake to be nothing short of miraculous!
Why You’ll Love This Recipe
There’s something utterly satisfying about biting into a slice of Strawberry Earthquake Cake and discovering its unpredictable texture — that tender cake surrounded by a luscious cream cheese layer, all bursting with strawberry flavor. It makes for an incredible dessert at any gathering, bringing smiles and second helpings all around. Plus, it’s surprisingly easy to whip up in your kitchen! Whether you’re hosting a party or just treating yourself on a cozy weekend, this cake is sure to steal the show. (See the ingredients in the next page below…)
Ingredients
– 1 box strawberry cake mix
– 3 large eggs
– 1/2 cup vegetable oil
– 1 cup water
– 1 cup fresh strawberries, diced
– 8 oz cream cheese, softened
– 1/2 cup powdered sugar
– 1 tsp vanilla extract
– 1/2 cup shredded coconut (optional)
– 1/2 cup chopped nuts (optional)
Equipment Needed
– 9×13 inch baking pan
– Mixing bowls
– Electric mixer or whisk
– Rubber spatula
– Measuring cups and spoons
– Knife and cutting board
Step-by-Step Instructions
First things first, preheat your oven to 350°F (175°C). I love the anticipation that fills my kitchen as the oven warms up! In a large mixing bowl, combine the strawberry cake mix, eggs, vegetable oil, and water, mixing well until everything is combined. The bright pink batter is an immediate mood booster! Once mixed, gently fold in the diced strawberries to add that flavorful surprise. Now, pour the batter into a greased 9×13 inch baking pan, spreading it evenly across the bottom. (See the next page below to continue steps…)
Next, in a separate bowl, use your electric mixer or a whisk to beat together the softened cream cheese, powdered sugar, and vanilla extract until well combined and creamy. The moment you take a whiff of that sweet vanilla, you know you’re in for a treat! Pour dollops of the cream cheese mixture over the batter, and then gently swirl it into the batter with a knife or spatula. This is where the “earthquake” magic happens, as it will sink into the cake while it bakes, creating that stunning effect.
Now, if you’re feeling adventurous, sprinkle coconut and/or chopped nuts on top before baking — it adds a lovely crunch that contrasts beautifully with the soft cake. Pop the pan into your preheated oven and bake for about 30-35 minutes, or until a toothpick inserted into the center comes out clean. The aroma that wafts through the kitchen is impossible to resist! Allow the cake to cool completely before slicing (if you can wait that long!), as the flavors will deepen even further.
Pro Tips for Best Results
I tested this recipe three ways to get the perfect balance of flavors and textures. First, I experimented with different types of strawberries; fresh strawberries yield the best flavor, but frozen can work in a pinch! Just be sure to thaw and drain any excess moisture to avoid a soggy cake. Second, I found that allowing the cream cheese mixture to come to room temperature not only makes it easier to blend but also enhances its sweetness and creamy texture.
When it comes to serving, I like to pair slices of this cake with a dollop of whipped cream or a scoop of vanilla ice cream to elevate the dessert experience. The cake’s warm strawberry notes combined with the cool creaminess make for a satisfying juxtaposition. Also, a little drizzle of chocolate syrup can surprise and delight those with a sweet tooth!
Lastly, if you’re planning to serve this at a gathering, consider making it the day before. It actually tastes better the next day as the flavors meld together beautifully. Just keep it covered at room temperature to maintain that wonderful moistness.
Common Mistakes to Avoid
Making Strawberry Earthquake Cake can be a breeze, but I’ve learned a few things the hard way. One common mistake is overmixing the batter. You want to mix it until just combined. If you overdo it, the cake can end up dense instead of light and fluffy. Trust me — it’s worth the extra care! (See the next page below to continue…)
Another pitfall is underbaking. I once pulled my cake out a few minutes too early, thinking it looked perfect. It ended up soggy in the center and needed more time, which threw off my serving schedule. Always rely on the toothpick test, and don’t hesitate to bake it for a few extra minutes if needed.
A lot of people also forget to adjust for their oven’s quirks. Every oven is different; knowing whether yours tends to run hot or cool can make a world of difference. If you find recipes often turn out differently, consider investing in an oven thermometer to keep track!
Serving Suggestions
Once your Strawberry Earthquake Cake is baked and cooled, the fun part begins — serving! I like to cut this scrumptious cake into generous squares and arrange them on a beautiful platter. Presentation enhances the enjoyment of any dish, so don’t skip this step. Consider topping each slice with a sprinkle of powdered sugar or fresh strawberries for that added touch of elegance.
This cake pairs wonderfully with a refreshing beverage. I often serve it alongside sweet iced tea or a fruity raspberry lemonade; the fruity flavors complement each other beautifully. It’s also a splendid choice for a spring or summer gathering, where bright flavors can really shine.
And if you want to treat yourself to a cozy evening, I can’t recommend enough enjoying a slice with a warm cup of coffee. The contrast of temperatures between the hot beverage and the cake is delightful, plus the caffeine will elevate your mood!
Variations & Customizations
While this Strawberry Earthquake Cake is fabulous as is, there are plenty of fun ways to customize it! For instance, if you want a chocolate twist, consider using a chocolate cake mix instead of strawberry, and topping it off with fresh raspberries or cherries for that sweet-tart combo. Chocolate and fruit are a magical pair!
You can also switch up the fruit based on what’s in season or your personal favorites. Blueberries, peaches, or even a mix of berries could work beautifully in this recipe. Each variation yields a unique flavor profile that’s bound to impress your friends and family.
Lastly, if you’re looking for a lighter option, you can experiment with a sugar-free cake mix and low-fat cream cheese. The result will be a delightful, guilt-free dessert that will make you feel good about indulging.
How to Store, Freeze & Reheat
Storing your Strawberry Earthquake Cake is easy! After it cools, simply cover it with plastic wrap or aluminum foil and keep it at room temperature for up to three days. I find that the flavors seem to deepen as it sits, making it even more delicious!
If you want to make this cake ahead of time or have leftovers, it freezes beautifully! I recommend cutting it into slices and wrapping each piece individually in plastic wrap before placing them into a freezer-safe bag. This way, you can enjoy a piece whenever the craving strikes.
When it’s time to enjoy a slice from the freezer, just thaw it in the refrigerator overnight or let it sit at room temperature for about an hour. If you love a warm slice, popping it in the microwave for about 10-15 seconds gives you that freshly baked feel again!
Conclusion
I hope you enjoyed learning about Strawberry Earthquake Cake as much as I love making it! It’s a fantastic option that combines simplicity, flavor, and a dash of fun, making it the perfect dessert for any occasion. Bring this recipe into your kitchen, and I assure you, it will create sweet moments and delicious memories that you’ll cherish for years to come. Happy baking!