
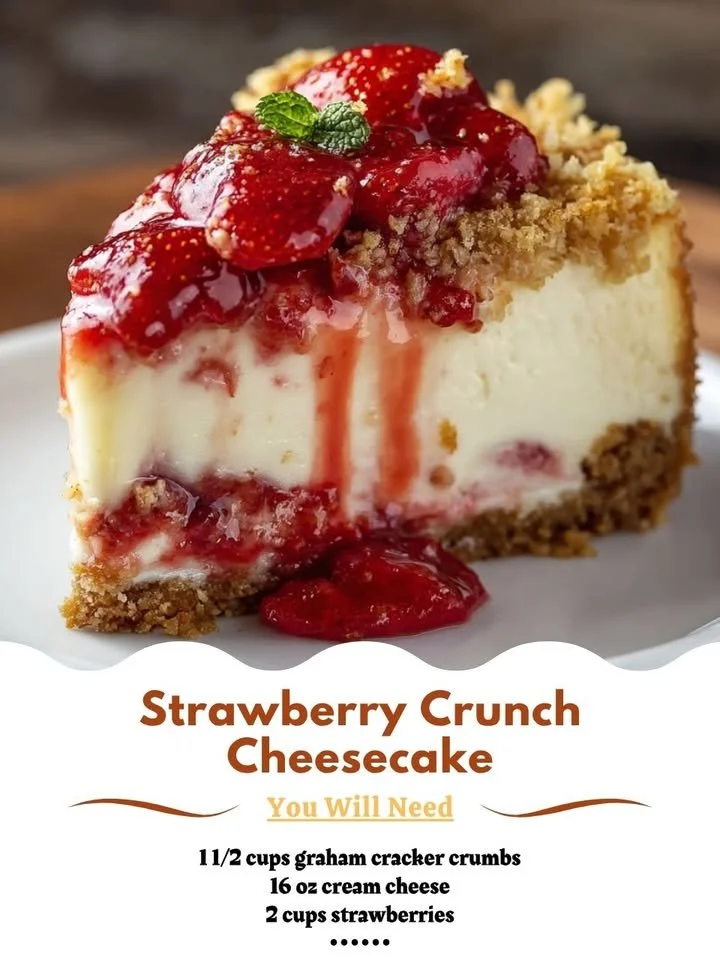
Strawberry Crunch Cheesecake. It’s a delightful blend of creamy cheesecake with the sweetness of fresh strawberries and a crunchy topping that makes each bite feel like a celebration. Whether it’s a sunny picnic or a cozy evening at home, this cheesecake always brings a smile to my face.
Why You’ll Love This Recipe
This Strawberry Crunch Cheesecake is incredibly easy to make, yet it looks and tastes like something you’d find in a bakery. The combination of flavors and textures is absolutely irresistible, from the creamy filling to the crunchy strawberry topping. I can’t help but be reminded of warm summer days every time I make it, and I guarantee it will quickly become a favorite in your household, too! (See the ingredients in the next page below…)
Ingredients
– 1 ½ cups of crushed graham crackers
– ½ cup of melted butter
– 2 cups of cream cheese, softened
– 1 cup of granulated sugar
– 1 teaspoon of vanilla extract
– 2 cups of whipped cream
– 2 cups of fresh strawberries, sliced
– ½ cup of strawberry-flavored gelatin
– 1 cup of crushed freeze-dried strawberries
Equipment Needed
– 9-inch springform pan
– Mixing bowls
– Electric mixer
– Rubber spatula
– Measuring cups and spoons
– Plastic wrap
Step-by-Step Instructions
To start off, I preheat my oven to 350°F (175°C) and prepare my springform pan. I mix the crushed graham crackers with the melted butter until it resembles wet sand, then press this mixture firmly into the bottom of the pan. This crust is the foundation for your cheesecake and gives it that nostalgic crunch. Once that’s done, I pop the pan into the oven for about 10 minutes to give the crust a slight golden touch. The smell? Absolutely divine! (See the next page below to continue steps…)
After letting my crust cool, I turn my attention to making the creamy filling. In a large bowl, I beat the softened cream cheese until it’s smooth and creamy, then add the sugar and vanilla extract. Once it’s all well combined, I gently fold in the whipped cream, taking my time to keep that airy texture. I then pour this luscious mixture over the cooled crust and smooth it out evenly, getting ready for the fun part!
Next, it’s time for the strawberry layer. I combine the sliced strawberries with the strawberry-flavored gelatin in a separate bowl, making sure they are well-coated. This not only adds sweetness but also gives a beautiful color to the cheesecake. I then spread this strawberry mixture on top of the cheesecake filling, creating a delicious and vibrant layer that’s sure to impress!
Finally, I finish off my masterpiece with a sprinkle of crushed freeze-dried strawberries for that extra crunch and a burst of flavor. After covering the cheesecake with plastic wrap, I chill it in the refrigerator for at least four hours, although I often leave it overnight. The anticipation alone makes it worth every minute!
Pro Tips for Best Results
I’ve made this cheesecake several times, and one key tip I can’t stress enough is to always ensure your cream cheese is at room temperature. I once tried using cold cream cheese, and let me tell you, the texture was clumpy and far from smooth. Room temperature cream cheese mixes beautifully and gives you that creamy finish we all crave!
When it comes to the strawberries, I recommend using fresh ones for the best flavor. I’ve experimented with frozen strawberries in the past, and while they work in a pinch, they tend to release too much water and make the cheesecake soggy. Fresh strawberries provide the right balance of flavor and texture!
Lastly, I suggest giving yourself plenty of time to chill the cheesecake before serving. I know it’s tempting to dig in right away, but allowing it to set overnight transforms the flavors and gives it an even better texture. Patience is truly a virtue in baking!
Common Mistakes to Avoid
One common mistake I’ve encountered is overmixing the cheesecake filling. It’s easy to get carried away with the mixer, but overmixing can incorporate too much air, causing cracks when the cheesecake bakes. Trust me; it’s best to mix just until combined for a beautifully smooth finish. (See the next page below to continue…)
Another mistake is rushing the cooling process. I remember hastily removing my cheesecake from the springform pan before it was fully chilled, which resulted in a collapse! Ensure you let it set in the fridge for at least four hours, or even better, overnight.
Also, be mindful of your crust. If you don’t press the graham cracker mixture down firmly enough, you may end up with a crumbly mess when slicing. I find using the bottom of a measuring cup to really pack it down works wonders for a sturdy base.
Finally, don’t ignore the importance of lining the bottom of your springform pan with parchment paper. I skipped this step once and ended up feeling heartbroken when part of my cheesecake stuck. It’s a small step that makes a huge difference!
Serving Suggestions
When it’s finally time to serve my Strawberry Crunch Cheesecake, I like to dress it up a bit. A dollop of fresh whipped cream on top adds a nice touch and pairs beautifully with the strawberries. Sometimes, I even drizzle a little chocolate syrup over the top for a decadent twist!
For gatherings, I often slice the cheesecake into small pieces, perfect for sharing. It’s always a hit at parties, and watching friends and family enjoy it fills my heart with joy. The vibrant colors make for an inviting dessert, and I love to see everyone’s reactions when they take that first bite.
As a personal touch, I like to garnish each slice with a slice of fresh strawberry or a sprinkle of crushed freeze-dried strawberries on the plate. It’s the little details that make a big difference and elevate this dessert even more!
Variations & Customizations
While I absolutely love the classic Strawberry Crunch Cheesecake, there are so many ways to make it your own! For instance, if you want a bit of a twist, you could replace the strawberries with blueberries or raspberries. Just make sure to adjust the sweetness accordingly if using more tart fruits.
For a richer flavor, I sometimes add a layer of chocolate ganache between the crust and the cheesecake filling. The combination of chocolate and strawberries is heavenly! It adds an extra layer of indulgence that truly sings to my sweet tooth.
If you’re looking to add a nutty flavor, consider incorporating crushed nuts into the crust. Almonds or pecans can provide a lovely crunch and a depth of flavor that complements the sweetness of the fruit and cheesecake beautifully.
How to Store, Freeze & Reheat
Storing your Strawberry Crunch Cheesecake is simple! I recommend keeping it covered in the refrigerator, where it will stay fresh for up to five days. It’s a great make-ahead dessert for gatherings, and it’s just as delicious chilled!
If you want to freeze it, slice the cheesecake first, then wrap each piece tightly in plastic wrap and place them in a freezer-safe container. It can be frozen for up to three months. When you’re ready to enjoy, simply thaw it in the refrigerator overnight and indulge!
Reheating isn’t really necessary, as this cheesecake is best served cold or at room temperature. However, if you want to slightly warm a piece for a different experience, give it a quick 10-15 seconds in the microwave. Just be careful not to overheat it, as it can change the delightful texture you’ve worked so hard to achieve.
Conclusion
I hope you’re as excited to make this Strawberry Crunch Cheesecake as I am! It brings together the lovely flavors of summer and the comfort of homemade desserts. Whether it’s for a special occasion or simply because you deserve a treat, this cheesecake is bound to impress. Happy baking, and enjoy every delicious bite!