
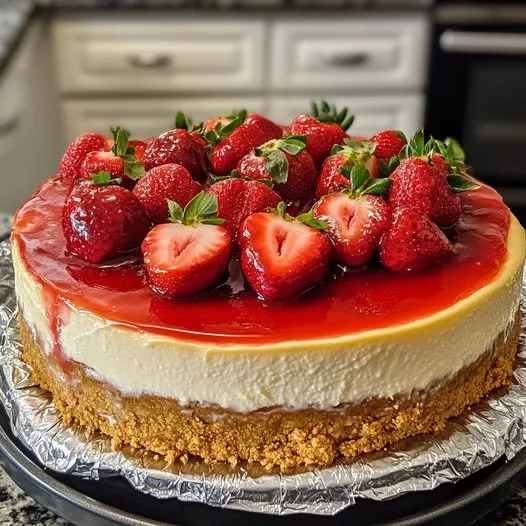
There’s something undeniably heartwarming about a homemade strawberry cheesecake. Every time I whip up this delightful dessert in my kitchen, it evokes fond memories of family gatherings, summer picnics, and laughter shared with friends. The creamy richness of the cheesecake combined with the sweet and slightly tangy strawberries creates a flavor explosion that never fails to impress. Whether it’s for a special occasion or simply to enjoy with a cup of coffee, this recipe has become a staple in my home.
Why You’ll Love This Recipe
One of the main reasons I adore this strawberry cheesecake recipe is its balanced flavors and textures. The buttery graham cracker crust perfectly complements the rich, creamy filling while the fresh strawberries add a burst of freshness. Not to mention, it’s surprisingly easy to make! With a few simple ingredients and steps, I find myself creating a dessert that tastes gourmet yet feels wonderfully homemade. It’s always a crowd-pleaser that leaves everyone coming back for more. (See the ingredients in the next page below…)
Ingredients
– 1 ½ cups graham cracker crumbs
– ½ cup unsalted butter, melted
– 2 cups cream cheese, softened
– 1 cup granulated sugar
– 1 teaspoon vanilla extract
– 3 large eggs
– 1 cup sour cream
– ½ cup fresh strawberries, hulled and sliced
– ¼ cup strawberry preserves (optional for topping)
Equipment Needed
– 9-inch springform pan
– Mixing bowls
– Electric mixer or whisk
– Rubber spatula
– Measuring cups and spoons
– Baking sheet (for the pan in the oven)
– Parchment paper (optional)
Step-by-Step Instructions
To start off, preheat your oven to 325°F (160°C). In a medium bowl, combine the graham cracker crumbs and melted butter, stirring until it resembles wet sand. Press this mixture firmly into the bottom of your springform pan. I like to use the bottom of a measuring cup to ensure it’s evenly packed. Place it in the oven and bake for about 10 minutes until it’s golden and fragrant. Once done, give it some time to cool while you work on the creamy filling. (See the next page below to continue steps…)
Next, in a large mixing bowl, beat the cream cheese until it’s smooth and free of lumps. Gradually add the granulated sugar and continue mixing until incorporated. You’ll know it’s ready when it becomes light and fluffy. Then, add in the eggs, one at a time, ensuring each is fully mixed in before adding the next. Stir in the sour cream and vanilla extract, mixing until everything is well blended. The batter should be creamy and luscious, with a beautiful sheen.
Pour the cheesecake batter over the cooled crust in your springform pan, smoothing the top with a rubber spatula. Make sure there are no air bubbles; a gentle tap on the counter helps with that. To prevent the cheesecake from cracking during baking, I place a baking sheet on a lower rack in the oven with some water – this creates a steamy environment. Bake for about 50 minutes or until the edges are set but the center still has a slight jiggle. Turn off the oven and leave the cheesecake in there for an hour.
Finally, once the cheesecake has cooled to room temperature, transfer it to the refrigerator. Let it chill for at least 4 hours, preferably overnight, allowing the flavors to meld beautifully. When you’re ready to serve, top it with the sliced strawberries and a drizzle of strawberry preserves, if desired. The aroma wafting through my kitchen during this process is pure bliss!
Pro Tips for Best Results
One thing I discovered after testing this recipe multiple times is the importance of using room temperature ingredients. When I forgot to take my cream cheese out in advance, my cheesecake came out with small lumps. Make sure everything is at room temperature for the smoothest texture!
Another tip I have is about the baking process. I tried skipping the water bath once to see if it would save time, but I ended up with crackling on the surface. That steamy method really does make a difference!
Lastly, my preference is to let the cheesecake chill overnight. I’ve learned that this extra waiting period allows the flavors to develop richly and ensures a firmer texture, making it easier to slice when it’s time to serve.
Common Mistakes to Avoid
One common mistake I once made was over-mixing the batter. I was so eager to achieve the perfect creamy texture that I ended up incorporating too much air. This resulted in a cheesecake that puffed up and cracked while baking. I recommend mixing just until the ingredients are combined for the best results. (See the next page below to continue…)
Another pitfall is not letting the cheesecake cool gradually in the oven. I used to pull it out right away, eager to slice into it, but that led to cracks after cooling. Trust me on this—patience is key! The cooling process helps set everything beautifully.
Also, be careful not to skip the chilling stage. If you try to rush through it, you might end up with a cheesecake that’s too soft and difficult to cut. I learned this the hard way when I served it too soon to my friends, only to have it fall apart on the plate.
Serving Suggestions
When it’s time to serve, I love to garnish my strawberry cheesecake with additional fresh strawberries scattered on top. Sometimes, I even add a dollop of freshly whipped cream for that extra touch of indulgence. The contrast in colors makes it visually appealing, and the whipped cream adds lightness.
I often enjoy this cheesecake with a cup of my favorite green tea or a rich espresso. The bitterness of the coffee balances the sweetness of the cheesecake perfectly. I also like to serve it at gatherings with a side of chocolate sauce as an optional drizzle for those chocolate lovers in the crowd.
For a fun twist, consider pairing your cheesecake with a scoop of vanilla or strawberry ice cream. It adds a lovely and creamy contrast that everyone seems to adore.
Variations & Customizations
I love experimenting with this basic recipe! For a chocolate lovers’ treat, I’ve tried adding crushed chocolate cookies to the crust instead of graham crackers. The result is a chocolate-dipped cheesecake that’s simply divine!
If you’re feeling adventurous, swap the strawberries with your favorite fruit. I’ve made this cheesecake with blueberries and even mangoes—both were a huge hit in my home. Just make sure to adjust the sweetness of the filling based on the fruit you choose!
For the health-conscious, I’ve also tested Greek yogurt in place of sour cream. It adds a tangy flavor while keeping the cheesecake creamy and light. I enjoyed it so much that I now often switch between Greek yogurt and sour cream, depending on what I have on hand.
How to Store, Freeze & Reheat
After making this delicious cheesecake, you may be wondering how to store any leftovers (if there are any!). I usually keep it covered in the refrigerator for up to 5 days. Using plastic wrap or an airtight container helps maintain its freshness.
If you want to prepare it ahead of time, this cheesecake freezes beautifully. I recommend wrapping individual slices in plastic wrap and then placing them in an airtight container. When stored properly, it can last up to three months in the freezer. Just be sure to thaw it in the fridge overnight before serving!
Reheating isn’t necessary for this cheesecake, as it is best served chilled. I simply take it out of the refrigerator when I’m ready for my next slice. However, if you prefer it a bit softer, let it sit at room temperature for 15 to 20 minutes before diving in.
Conclusion
I hope you find as much joy in making this strawberry cheesecake as I do in my kitchen! From the sumptuous flavors to the smiles it brings to family and friends, it’s more than just a dessert—it’s a celebration of life’s sweet moments. So gather your ingredients and let your kitchen fill with the delightful aroma of this beloved treat. You won’t regret it!