
Orchids are among the most elegant plants, but they can be surprisingly sensitive when their care goes wrong. Many owners begin to panic when they see yellowing leaves or weakening stems, assuming the plant is beyond saving. Fortunately, with the right method, even a severely rotting orchid can bounce back to life.
When the roots begin to rot, the entire plant suffers, and its ability to absorb nutrients declines rapidly. Root rot is most commonly caused by excess water or poor-quality fertilizers that stress the orchid’s delicate system. Understanding the early warning signs makes revival quicker and far more successful.
Before discarding a struggling orchid, it’s essential to check the roots and evaluate the true extent of damage. Even orchids that look hopeless often have enough potential left to regenerate. With a little patience and the right technique, your orchid can recover beautifully and bloom continuously.
Identifying the Problem
When your orchid’s leaves turn yellow or limp, it’s usually a sign that something is wrong beneath the surface. Healthy roots appear firm, bright, and either white or green depending on moisture levels. Rotted roots, however, look brown, mushy, and may emit a foul smell.
Overwatering and poor drainage are the most frequent causes of root rot, creating an environment where fungi thrive. In some cases, chemical fertilizers used too frequently can burn the roots and trigger decay. These issues weaken your orchid’s immune system and slow its growth.
By checking the roots early, you can prevent extensive damage and give your plant the best chance of revival. Once you recognize unhealthy tissue, you can start the restoration process immediately. This quick response often makes the difference between recovery and complete loss.
Removing the Damaged Roots
The first essential step in reviving a rotting orchid is removing all unhealthy roots. Gently take the plant out of its pot, shaking off excess medium so the roots are fully visible. Using sterilized scissors ensures no new pathogens are introduced.
Carefully trim away any roots that appear brown, black, soft, or hollow, as these will no longer support the plant. Make smooth, clean cuts to minimize stress and encourage new growth in the coming weeks. Removing damaged tissue prevents rot from spreading further.
Once the dead material is gone, your orchid immediately becomes better positioned to produce healthy roots again. Even if only a few viable roots remain, the plant can regenerate. This step resets its foundation and allows the next stages of recovery to work effectively.
Cleaning and Disinfecting the Roots
After pruning, it is critical to disinfect the remaining roots to eliminate bacteria and fungi. A gentle rinse under clean water removes lingering debris and prepares the plant for treatment. This step ensures the roots are free from contaminants before the next stage.
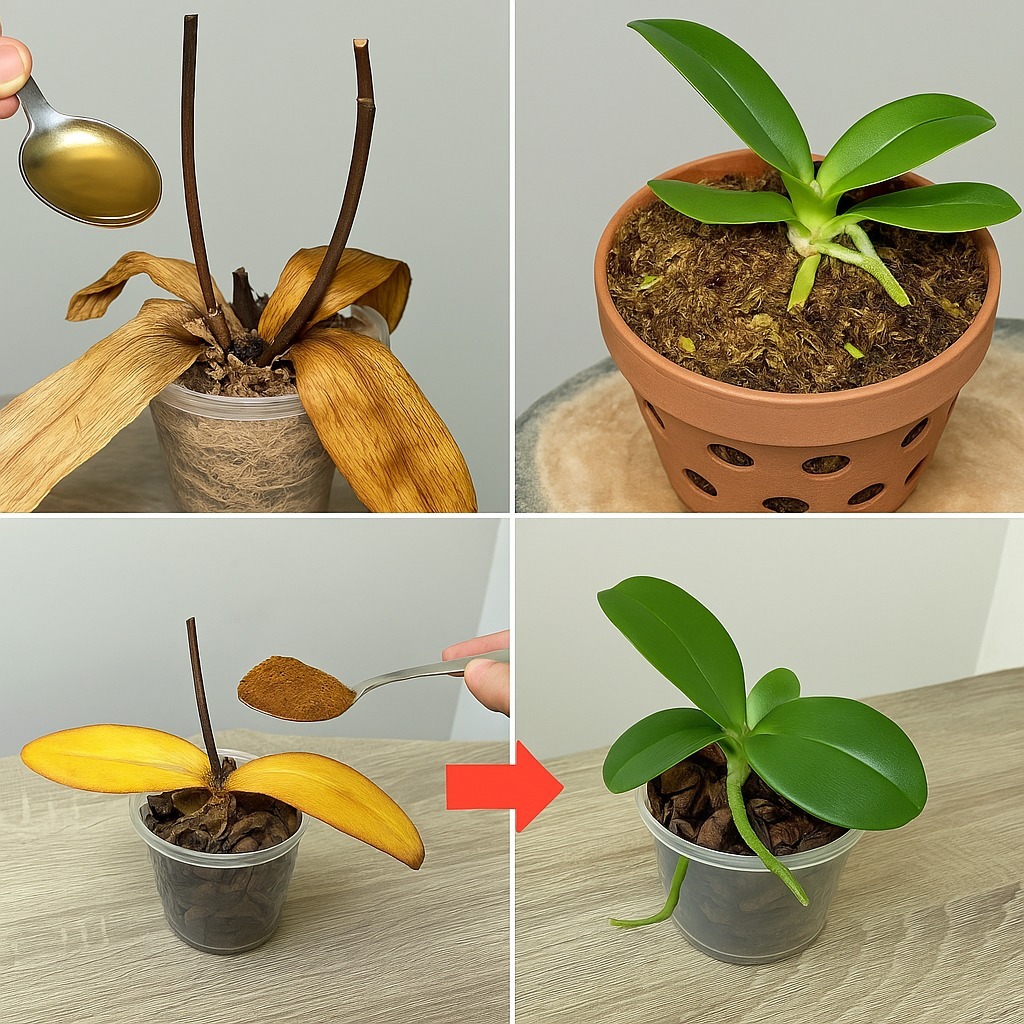
A simple baking soda solution works surprisingly well as a natural disinfectant. Mixing one teaspoon of baking soda into two liters of water creates a mild alkaline bath that kills harmful microorganisms. Soaking the roots for ten minutes helps neutralize infections that may still linger.
Once the soak is complete, let the orchid air dry briefly so excess moisture evaporates. The roots will emerge clean and ready for repotting in a healthier environment. This cleansing step dramatically reduces the chance of rot returning during recovery.
Repotting the Orchid with Dry Moss
Orchids recover best when placed in a medium that balances moisture and ventilation. Dry, sterilized moss provides excellent airflow while retaining enough water to nourish new roots. A clean pot ensures that no leftover pathogens interfere with the healing process.
Begin by placing a loose layer of dry moss at the bottom of the pot. Position the orchid so its remaining roots rest comfortably against the moss. Add more moss gently around the base, ensuring it supports the plant without suffocating the roots.
Avoid compacting the moss too firmly, as orchids depend on air movement for healthy growth. A lightly filled pot mimics the natural conditions orchids prefer. This new environment encourages root regeneration and strengthens the plant’s overall resilience.
Creating a Recovery Environment
Once repotted, your orchid needs a calm environment to begin healing. Place it in a shaded, cool area where light is gentle and indirect. Harsh sunlight can dry out the fragile roots and delay recovery.
Ensure the surrounding air circulates well, helping prevent fungal growth and allowing the plant to breathe. A steady temperature makes the orchid feel secure during its adjustment period. Holding off on watering during the first week helps the roots heal cleanly.
This quiet phase is crucial because the orchid must adapt before receiving moisture again. Patients often underestimate how sensitive orchids are at this stage. With proper conditions, your plant will soon display signs of returning vitality.
Resuming Watering After One Week
Watering too soon can undo all your hard work, so it’s important to wait a full week. When the time comes, soak the pot in clean water for ten minutes. This gentle hydration allows the moss to absorb moisture evenly without overwhelming the roots.
After soaking, let the pot drain completely to avoid stagnation. Keeping the medium moist—but never wet—creates an ideal environment for new roots to grow. A transparent cover, such as a plastic dome, can increase humidity safely.
This greenhouse effect mimics tropical conditions, helping the orchid regain strength. Weekly watering is generally enough to maintain moisture during recovery. Over time, the plant will establish a healthy rhythm and require less oversight.
Boosting Growth with Rice Water
As new roots appear, your orchid will benefit from added nourishment. Rice water is a natural, nutrient-rich fertilizer that supports root development. Soaking rice in water for a few hours releases beneficial amino acids and minerals.
Using rice water once a week strengthens the plant and helps it grow faster. The mild nutrients are gentle enough not to burn the roots, unlike many chemical fertilizers. This makes rice water perfect for recovering orchids.
In addition to feeding the plant, rice water encourages beneficial bacteria to thrive in the medium. These microorganisms support healthier root systems and contribute to long-term vitality. With this boost, your orchid begins to flourish.
The Final Transformation
Within two months, most orchids treated with this method show impressive recovery. Fresh, firm roots emerge, replacing the rotted ones that once threatened the plant. The leaves regain their bright green color and firm texture.
New growth signals that the orchid is ready to produce blooms once again. With consistent care and gentle feeding, flowering becomes frequent and more predictable. Many growers report year-round blooms after completing this revival process.
Reviving an orchid is not only rewarding but completely achievable with patience. By following these steps, you give your plant everything it needs to thrive. The result is a beautiful, vibrant orchid that continues to grow and bloom endlessly.