
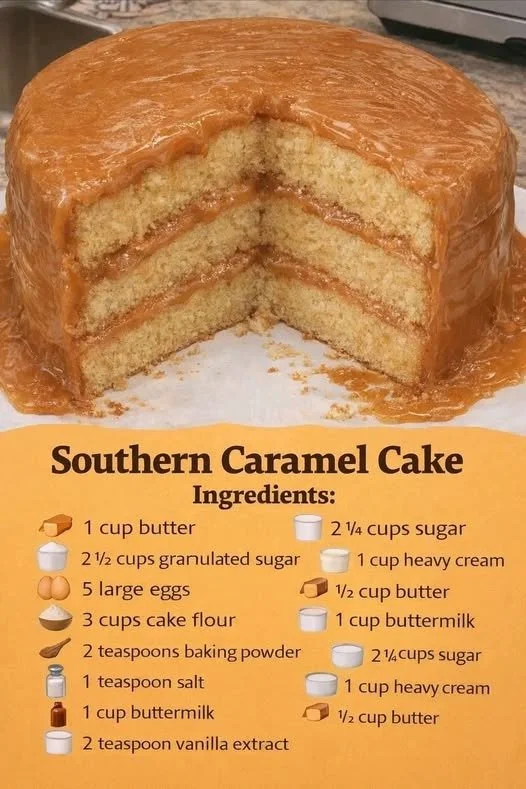
There’s something truly magical about Southern caramel cake that takes me back to my childhood. Growing up in the South, I remember family gatherings where the air was filled with the sweet aroma of caramel simmering on the stove. This cake is the epitome of comfort food—rich, decadent, and perfectly sweetened. Making this cake in my kitchen always feels like a warm hug, reminding me of cherished memories with loved ones. Whether it’s for a birthday, holiday, or just because, this caramel cake is bound to bring a smile to anyone’s face.
Why You’ll Love This Recipe
What sets this Southern caramel cake apart is its incredible depth of flavor and texture. Moist layers of vanilla cake are slathered with a luscious caramel icing that forms a delightful crust. Each bite is a combination of buttery sweetness, and it’s the type of dessert that leaves you reminiscing long after the last crumb has vanished. Plus, making caramel from scratch is simpler than it sounds, and the satisfaction of creating this decadent treat in my own kitchen is unparalleled. Trust me, once you learn how to make this cake, it will quickly become a staple in your baking repertoire. (See the ingredients in the next page below…)
Ingredients
– 2 cups all-purpose flour
– 1 ½ cups granulated sugar
– ½ cup unsalted butter, softened
– 1 cup buttermilk
– 3 large eggs
– 1 teaspoon baking powder
– ½ teaspoon baking soda
– 1 teaspoon vanilla extract
– ½ teaspoon salt
Equipment Needed
– Mixing bowls
– Electric mixer (hand or stand)
– Measuring cups and spoons
– 9-inch round cake pans (2)
– Spatula
– Saucepan for caramel
– Cooling rack
Step-by-Step Instructions
To start, preheat your oven to 350°F (175°C) and grease your round cake pans with butter and a sprinkle of flour. This is a crucial step; I’ve made the mistake of skipping it before, and it was a disaster trying to get my cakes out in one piece! In a large mixing bowl, cream together the softened butter and granulated sugar until the mixture is light and fluffy—this should take about 3 to 4 minutes. I love watching the color change as the air gets incorporated; it just feels like you’re mixing up a little bit of magic! (See the next page below to continue steps…)
Next, add the eggs one at a time, mixing well after each addition. Then, incorporate the buttermilk and vanilla extract—this is where the cake starts to take on its rich Southern flavor. In a separate bowl, whisk together the flour, baking powder, baking soda, and salt. Gradually add the dry ingredients to the wet mixture, mixing until just combined. Be careful not to over-mix; I always remind myself that a few flour specks are perfectly fine. Once combined, divide the batter evenly between the prepared pans, smoothing the tops with a spatula.
Bake the cakes for about 25-30 minutes or until a toothpick inserted into the center comes out clean. This part always gets me buzzing with excitement; the smell of freshly baked cake is heavenly! Let the cakes cool in their pans for about 10 minutes before transferring them to a cooling rack to cool completely. This is crucial, as icing a warm cake can lead to a melty mess, which I’ve also learned the hard way!
Now, while your cakes are cooling, let’s make that luxurious caramel icing! In a medium saucepan, melt 1 cup of sugar over medium heat, stirring constantly until it turns into a beautiful amber color. I can’t help but feel like a caramel wizard when it’s bubbling away. Add in about half a cup of heavy cream (be careful, as it can bubble up!), then stir in the butter and a pinch of salt. Let it cool slightly before you dive in—it’ll thicken as it cools, creating the perfect glossy finish for your cake!
Pro Tips for Best Results
Through trial and error, I’ve found that using room temperature ingredients—like butter and eggs—really does make a significant difference in the texture of the cake. It creates a better emulsion that results in a fluffier cake. So, I always make sure to pull those out ahead of time! Also, I try to measure my flour correctly by spooning it into the measuring cup and leveling it off with a knife. This method has saved me from the overly dense cakes I’ve experienced after packing too much flour in.
Another helpful tip is to make your caramel icing just before you’re ready to use it. If it cools down too much, it will thicken significantly and be harder to spread, and you want that perfect pourable consistency. If you find it’s too thick after cooling, simply reheat it gently on the stove. And remember, don’t be shy about adjusting the amount of caramel on your cake—it’s meant to be decadent, so layer it on generously!
Lastly, I always use a serrated knife to level off my cakes, which ensures that each layer stacks up beautifully. It really makes a difference when it’s time to frost the cake, as the layers fit together perfectly and look so professional. Trust me, a little care in preparation goes a long way!
Common Mistakes to Avoid
One mistake I frequently encountered was not allowing the cakes to cool before frosting, and let me tell you, it was a sticky situation! The icing just melted into the cake instead of sitting pretty on top. I’ve since learned to grant my cakes the proper cooling time and now have no regrets. On the flip side, if you leave them to cool too long, you can end up with dry cakes, so keep that balance in mind! (See the next page below to continue…)
Another issue can arise if you rush the caramel process. Cooking sugar requires a watchful eye; if you leave it unattended for even a minute, it can go from perfect to burnt very quickly. I always stay close and watch the color change closely, which adds excitement to the process.
Also, make sure to properly measure your ingredients; too much or too little baking soda or powder can drastically change the texture and taste of your cake. I know how easy it is to pour without measuring, but I’ve learned through experience that precision is key to getting that perfect rise. If nothing else, keep a measuring cup handy!
Serving Suggestions
When serving my Southern caramel cake, I love to pair it with a scoop of vanilla ice cream or a dollop of whipped cream. The creamy coldness perfectly balances the rich sweetness of the cake and icing. It’s almost like a Southern twist on the classic cake and ice cream combo!
For special occasions, I often decorate the cake with lightly toasted pecans or walnuts, sprinkled on top. They add a lovely crunch and enhance that classic Southern feeling. I usually take a moment to admire my cake before slicing it—it’s just hard to cut into something so beautiful!
Lastly, don’t be shy about serving generous slices. This cake is meant to be shared with love and laughter, so go ahead and pile it on the plates. It’s always a hit at gatherings, and watching everyone enjoy it brings me so much joy.
Variations & Customizations
Though I adore the classic Southern caramel cake, I’ve experimented with various flavors as well. One of my favorites is adding a hint of espresso powder to the cake mix, which gives a lovely depth and pairs beautifully with the caramel. It adds an unexpected twist that my friends and family can’t get enough of!
Also, feel free to swap out buttermilk with whole milk or even almond milk, depending on what I have on hand. Just remember, it slightly alters the richness, but still keeps that wonderful moisture we all love.
If you’re feeling particularly adventurous, try adding a layer of lemon curd between the cake layers. The tangy brightness of the lemon will contrast beautifully with the sweet caramel, elevating the entire dessert. It’s like a little surprise that makes it even more special!
How to Store, Freeze & Reheat
After making this glorious cake, if you happen to have any leftovers (which I hope you do!), be sure to store them in an airtight container. I usually keep it in the fridge for up to five days—though it rarely lasts that long in my house! If you have a cake dome, that works beautifully to keep it fresh as well.
If I ever make a cake ahead of time, I generally freeze it for later. To do this, I allow it to cool completely and then wrap it tightly in plastic wrap, followed by aluminum foil to minimize freezer burn. It can be frozen for up to three months. When I’m ready to enjoy it, I let it thaw in the fridge overnight or on the counter for a few hours before icing.
To reheat, I slice a piece and warm it in the microwave for about 15 seconds—just enough to warm up the cake without overdoing it. The aroma that fills my kitchen is absolutely delightful! It’s a cozy treat that’s always worth the wait.
Conclusion
In the end, Southern caramel cake is not just a dessert; it’s a slice of nostalgia infused with love and sweetness. I hope you enjoyed my journey of bringing together all these wonderful flavors and memories, and I can’t wait for you to try it out in your own kitchen. I promise this cake will warm your heart and bring a little Southern charm to your table, just as it does in mine. Happy baking!