
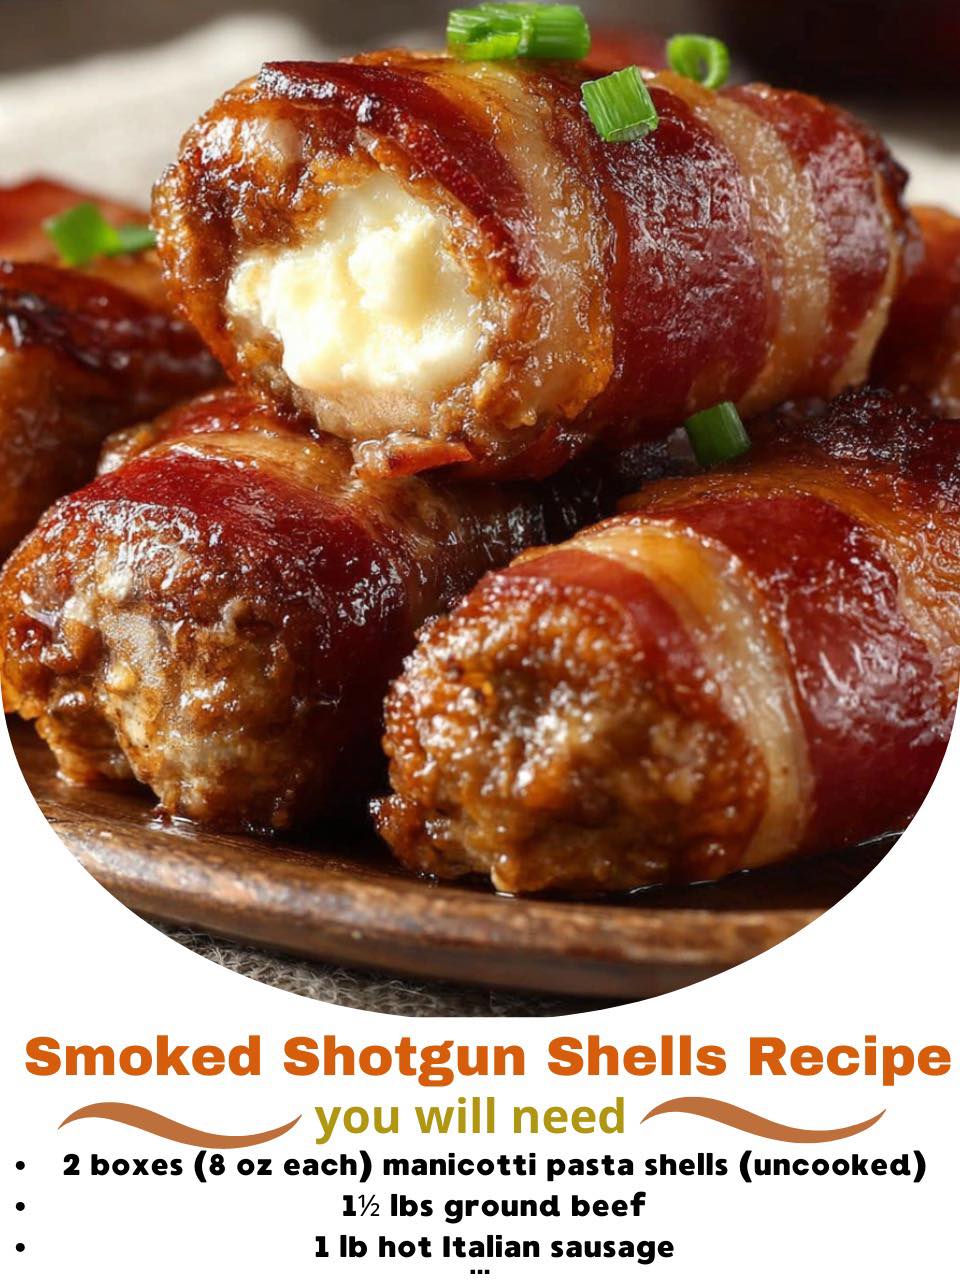
Smoked Shotgun Shells are the ultimate backyard barbecue showstopper: manicotti tubes stuffed with a smoky, cheesy meat filling, wrapped in bacon, glazed in BBQ sauce, and smoked until every bite is tender, juicy, and caramelized. They look impressive lined up on a platter and disappear fast at game days, cookouts, and tailgate parties. This version leans into bold flavor with seasoned sausage, ground beef, cream cheese, cheddar, and a sweet-heat barbecue finish that keeps everyone reaching for “just one more.”
Equipment You Will Need
- Pellet smoker, offset smoker, or kettle grill set up for indirect heat
- Large mixing bowl
- Cutting board
- Sharp knife
- Small spoon or piping bag (for stuffing shells)
- Wire rack or jerky tray (fits inside your smoker)
- Baking sheet or tray (for transporting shells)
- Tongs
- Basting brush
- Instant-read thermometer
Ingredients List
For the stuffed shells
- 12–16 manicotti shells (dry, uncooked)
- 1 lb ground beef (80/20 or 85/15)
- 1 lb pork sausage (mild, hot, or Italian, casings removed)
- 4 oz cream cheese, softened
- 1½–2 cups shredded cheddar or Colby Jack cheese
- 1 small onion, finely diced (optional but flavorful)
- 1 jalapeño, finely diced (seeds removed for mild)
- 2 teaspoons garlic powder
- 2 teaspoons onion powder
- 2 teaspoons BBQ rub or all-purpose grilling seasoning
- ½ teaspoon smoked paprika
- ½ teaspoon black pepper
- ½ teaspoon salt (adjust depending on how salty your rub and sausage are)
For wrapping and glazing
- 16–24 slices thin-cut bacon (about 1–1½ slices per shell)
- ½–1 cup BBQ sauce (sweet, smoky, or spicy, your choice)
- 1–2 tablespoons additional BBQ rub for sprinkling
Step-by-Step Instructions
Start by mixing the filling so the flavors have a chance to come together while you prep everything else. In a large mixing bowl, combine the ground beef, sausage, softened cream cheese, shredded cheese, onion, jalapeño, garlic powder, onion powder, BBQ rub, smoked paprika, pepper, and salt.
Use clean hands to work everything together until you have a cohesive mixture with no big pockets of plain meat or cream cheese. The filling should be firm but spreadable, almost like a thick sausage-cheese dip.
Lay your dry manicotti shells out on a tray or cutting board. These go into the smoker uncooked; the moisture from the meat and the low-and-slow cook will soften them. T
o stuff them, either pinch off small amounts of the meat mixture and push it through the shell with your fingers, or load the filling into a piping bag (or sturdy zip-top bag with the corner cut off) and pipe from one end until the shell is completely full.
Flip and pipe from the other side as needed to be sure there are no air gaps in the center. Packed, solid filling helps the shells cook evenly and slice cleanly later.
Once all the shells are filled, it’s time to give them that signature bacon jacket. Lay out strips of thin-cut bacon on your board. Wrap each stuffed manicotti with 1–2 slices of bacon, starting at one end and spiraling around to the other so the pasta is mostly or completely covered.
Thin bacon works best because it renders and crisps in the smoker without taking forever. Place each wrapped “shotgun shell” seam-side down on a wire rack that’s set over a baking sheet to make transferring easy.
After the shells are wrapped, sprinkle them lightly with a bit more BBQ rub. This extra seasoning on the bacon helps create a flavorful crust as the fat renders and the smoke works its magic. At this point, you have two options: you can smoke them right away, or you can let them rest in the refrigerator for a few hours (or even overnight).
A short rest time allows the pasta to start absorbing moisture from the filling and bacon, which can help with tenderness and flavor.
When you’re ready to cook, preheat your smoker to 250°F (about 120°C). Use your favorite hardwood pellets or chunks—hickory, apple, cherry, or a blend all pair beautifully with bacon and BBQ flavors.
Once the smoker is holding steady at temperature, place the wire rack with the shotgun shells directly onto the grates, or transfer the shells individually to the grates with tongs. Make sure they’re arranged in a single layer with space between each one so the smoke and heat can circulate evenly.
Let the shells smoke at 250°F for about 1½ hours. During this time, the meat will cook through, the bacon will begin to crisp, and the pasta will gradually soften as it absorbs juices from the filling and the gentle heat.
You don’t need to flip them if your smoker’s heat is fairly even, but you can rotate the rack front to back halfway through for more uniform browning if your cooker has a hot side.
After around 90 minutes, check one shell. Give it a gentle squeeze with tongs; the bacon should be rendered and fairly firm against the meat, and the pasta inside should feel tender rather than hard.
If you want a crisper bacon exterior, you can bump the smoker temperature up to about 300–325°F for the last part of the cook. This higher heat will help tighten and crisp the bacon without drying out the filling.
When the shells are nearly done, it’s time to glaze. Warm your BBQ sauce slightly so it brushes easily. Using a basting brush, coat each shell on all sides with a generous layer of sauce.
Return them to the smoker for another 10–20 minutes, just long enough for the sauce to tack up and turn sticky and glossy. Keep an eye on the bacon to avoid burning the sugars in the sauce; you want deep color and shine, not char.
Use an instant-read thermometer to confirm doneness: the center of the meat filling should be at least 165°F. Once everything is fully cooked, carefully transfer the shells to a clean tray and let them rest for about 10 minutes. This rest helps the juices redistribute and allows the cheese inside to firm slightly, so the shells hold together better when you bite or slice into them.
Serve the Smoked Shotgun Shells whole or cut them into halves or thick slices on a bias for easy sharing. Each slice will show off that gorgeous cross-section of smoky meat, melted cheese, tender pasta, and mahogany bacon, all glazed in BBQ sauce and ready to devour.
Expert Tips for Success
Choosing thin-cut bacon is one of the biggest keys to success. Thick-cut slices can stay rubbery by the time the pasta is tender, forcing you to overcook the shells to get the bacon right.
Thin bacon renders nicely and crisps up in the same window where the filling and pasta reach perfection. If you only have thicker bacon, slice it lengthwise into thinner strips so it cooks more quickly.
Filling consistency matters just as much. Make sure your meat mixture is fully blended, with cream cheese and shredded cheese evenly incorporated.
If it feels extremely loose, chill it briefly to firm it up before stuffing so it stays in place inside the shells. Fully packed shells with no air pockets cook more uniformly and are less likely to split open on the smoker.
If your smoker tends to run hot on one side, rotate the rack halfway through cooking. This simple step promotes even browning and prevents one end from getting overly dark while the other lags behind. And always give the shells a little rest after glazing so the sauce sets and the interior has a moment to settle. That patience pays off in cleaner slices and an overall better eating experience.
Variations and Substitutions
The beauty of Smoked Shotgun Shells is how customizable they are. Swap the ground beef for all sausage if you want bolder, more pronounced spice and pork flavor, or go half pork, half chorizo for a smoky, slightly spicy twist.
Ground turkey or chicken sausage can also work if you prefer a leaner filling, though adding a bit of extra cheese or a small amount of oil helps keep things juicy.
Play with the cheese and mix-ins to match your crowd. Use pepper jack or a spicy cheddar for extra heat, or a blend of mozzarella and cheddar for a stretchier, pizza-like pull.
Diced pickled jalapeños, roasted red peppers, green chiles, or even finely chopped cooked bacon can all be folded into the filling for layered flavor. For a sweeter barbecue profile, choose a honey or brown sugar BBQ sauce; for something with more bite, go for a vinegar-forward or chipotle-style sauce.
You can also change the smoke profile. Apple and cherry woods are great if you want a slightly sweeter, lighter smoke that won’t overpower the sauce.
Hickory or oak deliver a stronger, more traditional barbecue note. If you’re cooking on a charcoal grill, set it up for indirect heat with a drip pan under the rack of shells and toss in a few wood chunks to mimic smoker conditions.
Serving Suggestions
Smoked Shotgun Shells shine as an appetizer or hearty party snack, but they can just as easily anchor a full meal.
Arrange them on a large platter, drizzle with a little extra warmed BBQ sauce, and sprinkle with chopped parsley or green onions for a pop of color. Serving them sliced on a bias makes them bite-sized and perfect for game-day grazing, while whole shells feel more like an entrée portion.
Pair them with classic barbecue sides like creamy coleslaw, potato salad, mac and cheese, or baked beans for a full-on cookout spread. A crisp green salad with a tangy dressing also balances the richness beautifully.
For dipping, set out ramekins of extra BBQ sauce, ranch, or a spicy mayo so guests can customize each bite. Leftover shells make fantastic late-night snacks and can be tucked into toasted rolls or served over cheesy grits for a next-day mashup meal.
Storage, Freezing, and Reheating
If you have leftovers, let the shells cool to room temperature before storing. Place them in an airtight container in the refrigerator, layering with parchment if you need to stack them, and refrigerate for up to 3–4 days.
To reheat, arrange them on a wire rack over a baking sheet and warm in a 300°F oven or smoker until heated through and the bacon re-crisps. A quick brush of extra BBQ sauce before reheating can refresh the glaze.
Smoked Shotgun Shells also freeze well, making them a great make-ahead option for parties. You can freeze them fully cooked: cool completely, wrap individually or arrange in a single layer in a freezer-safe container, and freeze for up to 2–3 months.
Reheat from frozen at a lower oven temperature, around 275–300°F, until hot in the center, then finish with a brief blast of higher heat to re-caramelize the bacon and sauce. Alternatively, assemble them (stuffed and wrapped but un-smoked), freeze on a tray until solid, then transfer to a bag or container. Thaw overnight in the fridge, then smoke and glaze as usual for fresh-off-the-smoker flavor with all the prep work already done.