
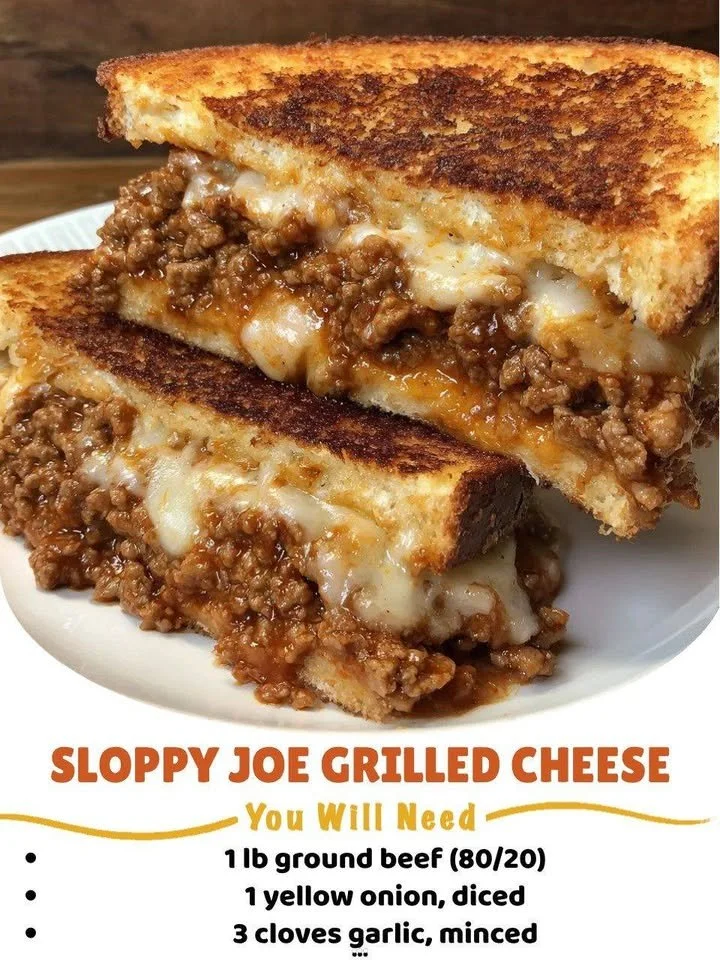
When I first thought about combining two of my favorite comfort foods, I couldn’t resist the idea of making a Sloppy Joe Grilled Cheese. I mean, who wouldn’t love the savory, spicy goodness of a Sloppy Joe sandwiched between two slices of melty, buttery grilled cheese? In my kitchen, this dish quickly became a go-to for those busy weeknights or cozy weekends. With the aroma of seasoned beef sizzling away, you’re in for a treat that’s just as fun to make as it is to eat!
Why You’ll Love This Recipe
This Sloppy Joe Grilled Cheese is not just a meal; it’s an experience. It’s the perfect blend of textures: gooey melted cheese meets the rich, slightly tangy meat mixture, all toasted to perfection. I love how easy this dish is to whip up, and it always brings a smile to my face (and my family’s too!). Plus, it’s highly customizable, so whether you like it spicy or mild, there’s room to play! (See the ingredients in the next page below…)
Ingredients
- 1 pound ground beef (or ground turkey for a lighter option)
- 1/2 cup onion, finely chopped
- 1/2 cup bell pepper, finely chopped
- 1 cup ketchup
- 1 tablespoon Worcestershire sauce
- 1 teaspoon garlic powder
- 1/2 teaspoon smoked paprika
- Salt and pepper to taste
- 8 slices of bread (I like sourdough or whole wheat)
- 4 slices of cheese (American, cheddar, or your favorite)
- Butter for grilling
Equipment Needed
- Large skillet
- Spatula
- Cutting board
- Sharp knife
- Measuring cups and spoons
- Griddle or frying pan for grilling
Step-by-Step Instructions
To start, heat a large skillet over medium heat and add the ground beef. As the meat begins to brown, I like to break it up with my spatula, allowing it to cook evenly. Once it’s about halfway cooked, I toss in the chopped onions and bell peppers. The smell of those sautéing veggies with the beef is simply divine! Cook everything together until the meat is fully browned and the onions are translucent. (See the next page below to continue steps…)
Next, stir in the ketchup, Worcestershire sauce, garlic powder, and smoked paprika. Allow this mixture to simmer on low for about 5-7 minutes. This ensures all those amazing flavors meld together beautifully. You’ll know it’s ready when it has thickened up a bit and the smell fills your kitchen, making my mouth water in anticipation!
While that’s happening, I heat up my griddle or a frying pan on medium-low. Butter one side of each slice of bread. When the pan is hot, place buttered bread on the griddle and add a slice of cheese on top. Don’t be shy with the cheese; we want it gooey! After a couple of minutes, I spoon the Sloppy Joe mixture directly onto the cheese, and then top it with another slice of cheese and another slice of buttered bread, butter side up.
Grill for about 3-4 minutes until the bread is golden brown. Carefully flip the sandwich and grill the other side until it’s perfectly toasted and the cheese has melted. When both sides are crisp and golden, I take them off the heat, slice in half, and serve. Believe me, you’ll want to dig in immediately!
Pro Tips for Best Results
I tested this three ways: using ground turkey, beef, and even a plant-based meat alternative. All three were delicious, but I found that the beef provides a richer flavor that pairs perfectly with the savory sauce. Whichever meat you use, just make sure to drain excess grease after browning to avoid a too-greasy sandwich.
When it comes to cheese, I tried several combinations, and my absolute favorite is a mix of sharp cheddar and creamy American. The sharpness of the cheddar contrasts wonderfully with the savory Sloppy Joe mix, while the American adds that melty factor we all crave. Don’t be afraid to experiment with your favorites!
Lastly, I always toast my bread lightly before assembling the sandwich—this helps prevent sogginess from the Sloppy Joe mixture later on. It ensures that you get that perfect crunch every time you take a bite.
Common Mistakes to Avoid
One of the most common mistakes I made in my first few attempts was adding too much liquid to the Sloppy Joe mixture. While you want it to be juicy and delicious, too much ketchup or sauce can make it runny and cause the sandwich to fall apart. A good rule of thumb is to let it simmer until it’s thickened, as mentioned previously. (See the next page below to continue…)
Another thing to keep in mind is the heat level when grilling. It’s easy to get impatient and crank up the heat to speed up the cooking, but that often results in burnt bread and unmelted cheese. Trust me; low and slow is the way to go for the perfect grilled cheese.
Lastly, don’t forget to keep an eye on your cheese! If you’re using multiple types, make sure to choose ones that melt well together. If too much time passes between cooking and eating, you’ll risk losing that gooey, yummy texture we all love.
Serving Suggestions
These Sloppy Joe Grilled Cheese sandwiches are delightful on their own, but I love pairing them with a side of crunchy pickles or sweet potato fries. The salty crunch of the pickles complements the messy richness of the sandwich perfectly! Sometimes I even serve them with a side salad to add a little freshness to the meal.
For a fun twist, why not whip up a simple tomato soup to accompany it? The classic duo of grilled cheese and tomato soup never disappoints. Dipping these cheesy sandwiches into a warm bowl of soup just takes the comforting factor up a notch!
And let’s not forget about the drinks! A nice cold soda or a refreshing lemonade balances the savory flavor and makes it a meal to remember.
Variations & Customizations
While I adore the classic Sloppy Joe style, there are so many ways to customize this dish! Sometimes I spice things up by adding jalapeños or hot sauce right into the meat mixture. The extra kick adds a whole new dimension, and it’s perfect for those days when I’m craving something with a punch.
Another great variation is to include additional toppings inside. Think sautéed mushrooms, spinach, or even caramelized onions for a gourmet twist! You could also swap cheeses based on your mood; a pepper jack can give it a nice zing.
For a healthier approach, I’ve even made this sandwich using whole grain bread, and it’s just as tasty! Plus, using leaner meats or even black beans can create a delicious vegetarian version that still satisfies that Sloppy Joe craving.
How to Store, Freeze & Reheat
If you’re lucky enough to have leftovers (which is rare in my house), you can store the Sloppy Joe mixture in an airtight container in the fridge for up to 3 days. Just make sure to reheat it slowly on the stove to keep it from drying out.
For longer-term storage, you can freeze the filling. I portion it out into freezer-safe bags and label them with the date. When I’m ready to enjoy it again, I simply thaw it overnight in the fridge. Then, I can make fresh grilled cheese sandwiches any time I want.
Reheating is a breeze, and I usually just toss the mixture in a skillet. Just like this, I can enjoy the deliciousness of Sloppy Joe Grilled Cheese weeks after my initial cooking spree!
Conclusion
I truly hope you enjoy making and devouring this Sloppy Joe Grilled Cheese as much as I do! It’s not just a meal; it’s an experience that brings my family together. Trust me when I say that the sweet and savory blend, along with the ooey-gooey cheese, makes for an unforgettable dish that will have your loved ones coming back for seconds. Happy cooking!