
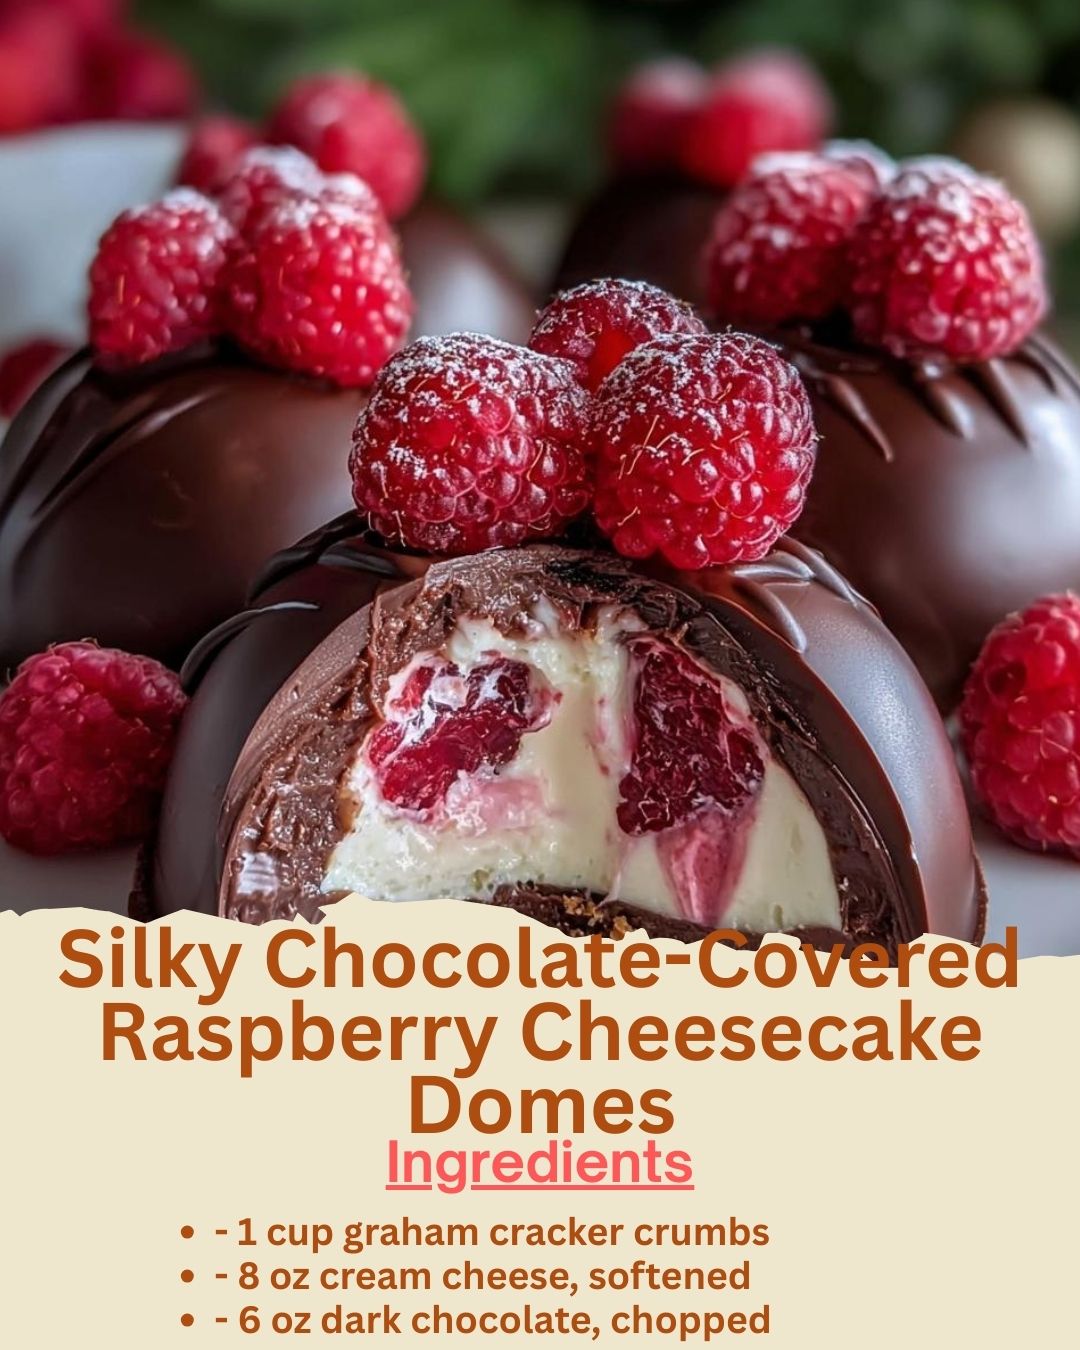
The moment I unmolded the first of these little domes and saw its perfect, glistening chocolate shell, I felt like a chocolatier in my own kitchen. The air was rich with the scent of dark chocolate and a hint of raspberry—a sophisticated, promising aroma. But the real magic was the first bite. The crisp snap of the chocolate gave way to a silky, tangy cheesecake filling, followed by the sweet-tart burst of a fresh raspberry center. It was an explosion of texture and flavor, elegant and playful all at once. These domes aren’t just a dessert; they’re a miniature experience, a luxurious treat that makes any occasion feel special.
Why You’ll Love This Recipe
You will adore this recipe because it transforms simple ingredients into a stunning, professional-looking dessert that’s surprisingly approachable to make. They are the perfect individual portions of decadence, combining the creamy joy of cheesecake with the indulgence of a chocolate truffle. They’re ideal for dinner parties, Valentine’s Day, or when you want to treat yourself to something extraordinarily special without the fuss of a full-sized cheesecake. The combination of rich chocolate, creamy filling, and bright raspberry is simply irresistible.
Ingredients
For the Graham Cracker Base:
- 1 cup graham cracker crumbs (from about 8 sheets)
- 3 tablespoons unsalted butter, melted
- 1 tablespoon granulated sugar
For the Raspberry Cheesecake Filling:
- 8 oz (one brick) full-fat cream cheese, softened to room temperature
- 1/4 cup powdered sugar
- 1/2 teaspoon pure vanilla extract
- 1/3 cup seedless raspberry jam or preserves
- 12-14 perfect fresh raspberries (for the center)
For the Chocolate Shell:
- 6 oz high-quality dark chocolate (60-70%), finely chopped
- 1 tablespoon coconut oil or refined cocoa butter
For Garnish (Optional):
- Freeze-dried raspberries, crushed
- Edible gold leaf or sprinkles
- A few whole fresh raspberries (See the next page below to continue…)
Equipment Needed
- Silicone hemisphere molds (about 2-inch diameter is perfect)
- Small saucepan or double boiler
- Mixing bowls (medium and small)
- Hand mixer or stand mixer
- Spatula
- Small spoon or melon baller
- Baking sheet lined with parchment paper
- Pastry brush (optional, for molds)
Step-by-Step Instructions
My adventure always starts with the molds. I take my silicone hemisphere molds and use a pastry brush to give each cavity a very light, even coating of melted coconut oil or butter. This isn’t always necessary with flexible silicone, but it guarantees a flawless release later. Next, I make the tiny graham cracker bases. In a small bowl, I mix the crumbs with the melted butter and sugar until it feels like wet sand. I press a small, compact amount (about a teaspoon) into the bottom of each mold cavity, creating a thin, firm layer. I use the back of a small spoon to really press it down. Then, I place the whole mold tray in the freezer to set solid while I make the filling.
Now for the creamy heart of the dome. In my mixing bowl, I beat the softened cream cheese with the powdered sugar and vanilla extract until it’s completely smooth and creamy, with no lumps. This is where I learned the hard way: the cream cheese must be truly soft. If it’s cold, you’ll get tiny lumps that ruin the silky texture. Once smooth, I gently fold in the seedless raspberry jam. I don’t fully mix it; I just swirl it a few times to create a beautiful marbled effect of white and bright pink. Overmixing will turn the whole filling pink, which is fine, but I love the visual surprise of the swirl.
The assembly is my favorite, almost meditative part. I pull the mold from the freezer. Using a small spoon or a piping bag, I fill each cavity halfway with the cheesecake mixture. Then, I gently press one perfect fresh raspberry into the center of each. I cover the raspberry completely with more cheesecake mixture, filling the mold right to the top and smoothing it flat with my spatula. It’s crucial the raspberry is completely encased to prevent moisture from seeping into the chocolate shell. I gently tap the mold on the counter to remove any air bubbles, then place the entire tray in the freezer for at least 4 hours, or ideally overnight. The filling must be frozen solid for the chocolate dip.(See the next page below to continue…)
For the grand finale—the chocolate shell—I finely chop my dark chocolate and melt it gently with the coconut oil in a heatproof bowl set over a pot of barely simmering water (a double boiler). I stir until it’s utterly smooth, then remove it from the heat and let it cool for 5-10 minutes until it’s just warm, not hot. Working quickly, I pop one frozen cheesecake dome out of its mold. Holding it by the base (the flat graham cracker side) with two forks or dipping tools, I submerge it into the chocolate, lift it out, let the excess drip off, and place it on the parchment-lined sheet. I immediately sprinkle with crushed freeze-dried raspberries before the chocolate sets. I repeat with each dome, returning the tray to the fridge for 15 minutes to fully set the shell.
Pro Tips for Best Results
The temperature of your components is everything. I tested dipping domes that were merely chilled versus frozen solid. Only the frozen ones worked. A semi-frozen dome will start to melt in the warm chocolate, creating a messy, misshapen disaster. Freezing them rock-solid is the only way to get that perfect, clean chocolate coating and maintain the distinct layers inside.
Using seedless raspberry jam is non-negotiable for the filling. I tried blending fresh raspberries once, and the seeds and extra moisture made the filling too soft and prevented it from setting properly. The concentrated flavor and smooth texture of a good-quality seedless jam give you the perfect raspberry punch without compromising the structure.
Letting the melted chocolate cool slightly before dipping is a game-changer. If the chocolate is too hot, it will melt the outer layer of your frozen dome, creating a thick, uneven shell and risking a leak. Chocolate that is just warm to the touch creates a thin, delicate, professional-looking shell that sets with a satisfying snap.
Common Mistakes to Avoid
My biggest first-time mistake was not pressing the graham cracker base firmly enough. I just sprinkled it in, and when I unmolded the domes, the base crumbled and fell apart. Don’t do what I did! You need to compact that crumb mixture with real pressure. Think of it as creating a solid, edible foundation for your entire dessert. (See the next page below to continue…)
Do not try to soften cream cheese in the microwave. It’s tempting to rush, but even 10 seconds can start to melt it unevenly, leading to a runny, greasy filling that won’t set. True room-temperature softening (leaving it out for 2-3 hours) is the only way to achieve that perfectly smooth, spreadable consistency essential for a silky texture.
Avoid using chocolate chips for the shell if you can. Chocolate chips contain stabilizers that help them hold their shape in cookies but can prevent them from melting smoothly and setting with a crisp snap. A good bar of baking chocolate, finely chopped, will give you a far superior texture and flavor for coating.
Finally, don’t skip the coconut oil in the chocolate. A tablespoon might seem trivial, but it thins the chocolate to the perfect dipping consistency and gives the finished shell a beautiful, glossy sheen and a cleaner break when you bite into it. It’s the secret to that professional “tempered” chocolate look without the fuss.
Serving Suggestions
I love serving these domes on a stark white plate or a black slate board. I’ll arrange them like little precious jewels, perhaps with a dusting of powdered sugar around the plate and a few fresh raspberries and mint leaves scattered artfully. The contrast makes the glossy chocolate and colorful garnish truly pop.
For an extra-special presentation, I’ll sometimes drizzle a tiny bit of leftover melted white chocolate over the dark chocolate shells after they’ve set, or place each dome on a delicate edible gold leaf. Serving them slightly chilled, but not ice-cold, allows the filling to be creamy yet firm, and the chocolate to have its perfect snap.
These are the ultimate dinner party finale. I’ll bring them out on a platter after coffee is served. They’re elegant, not too heavy, and the fact that they’re individual portions makes everyone feel wonderfully catered to. They pair beautifully with a glass of port, a dessert wine, or a rich, black coffee.
Variations & Customizations
For a “Chocolate Truffle” version, you can omit the raspberry jam and add 2 tablespoons of cocoa powder to the cream cheese filling. Instead of a fresh raspberry center, press in a chocolate-covered espresso bean or a toasted hazelnut before freezing.
If you love different fruit, the possibilities are endless. Try using strawberry jam with a fresh strawberry center, or mango puree with a small cube of fresh mango. For a citrus twist, use lemon curd and a tiny spoonful of lemon zest in the filling.
For a nutty crunch, you can mix finely chopped toasted almonds or hazelnuts into the graham cracker base. You can also roll the finished, chocolate-dipped domes in crushed nuts before the shell sets for a different look and texture.
How to Store, Freeze & Reheat
To store these domes, I keep them in a single layer in an airtight container in the refrigerator. They will stay perfect for 4-5 days. The chocolate shell protects the filling beautifully. Let them sit at room temperature for 5-10 minutes before serving for the best texture.
Yes, you can freeze them after they are fully assembled and coated. Place them in a single layer on a parchment-lined tray until solid, then transfer to a freezer-safe container. They will keep for up to 1 month. Thaw in the refrigerator overnight before serving.
There is no need to reheat these. They are meant to be enjoyed cool. The only “reheating” needed is taking them out of the fridge a few minutes early to take the deep chill off the filling, allowing its silky creaminess to shine.
Conclusion
These Silky Chocolate-Covered Raspberry Cheesecake Domes are my little masterpieces of joy. They’ve taught me that with a bit of patience and attention to detail, I can create stunning desserts that feel like they came from a patisserie window. I hope this recipe inspires you to play in the kitchen and create your own moments of edible elegance. Now, go grab that silicone mold—your bite-sized journey to decadence is waiting.