
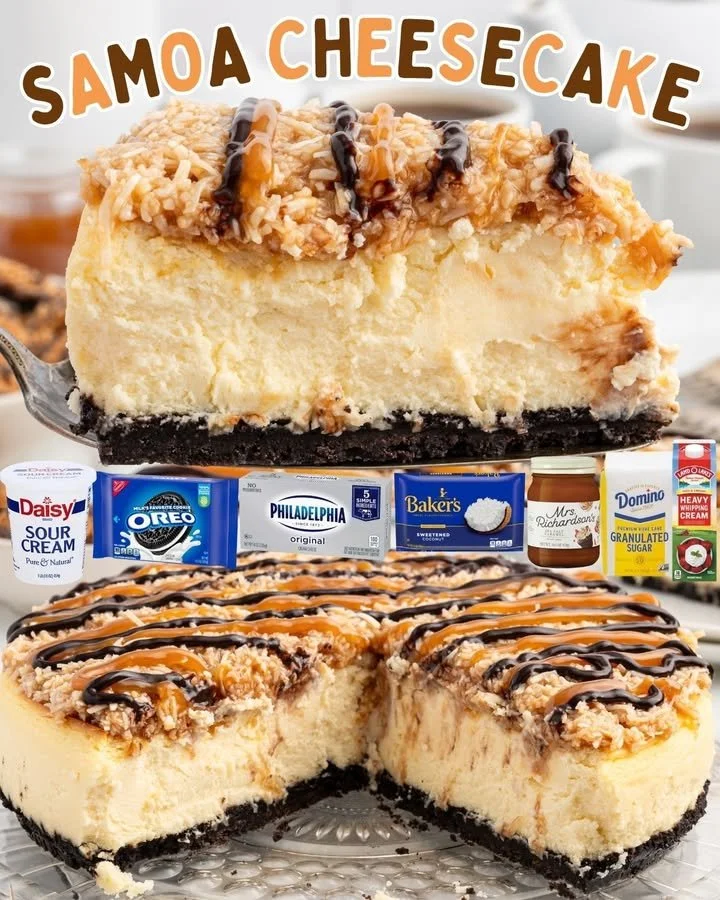
There’s something truly special about desserts that bring back warm, nostalgic memories, and for me, Samoa cheesecake does just that. Every time I whip up this indulgent treat, I’m taken back to childhood days filled with the delightful flavors of caramel, coconut, and chocolate. The combination creates a creamy, dreamy cheesecake that’s simply irresistible. Today, I’m excited to share my well-loved recipe for Samoa cheesecake, so you can create the same sweet memories in your kitchen!
Why You’ll Love This Recipe
This Samoa cheesecake is a decadent twist on the classic dessert, combining the richness of cheesecake with the beloved elements of a Samoa cookie. It’s a crowd-pleaser and perfect for any occasion, whether it’s a birthday party, family gathering, or just a cozy night at home. I guarantee that each bite of this creamy cheesecake will transport you straight to cookie heaven! (See the ingredients in the next page below…)
Ingredients
– 1 ½ cups crushed shortbread cookies
– ½ cup unsweetened shredded coconut
– ⅓ cup unsalted butter, melted
– 2 (8-ounce) packages cream cheese, softened
– ¾ cup granulated sugar
– 2 large eggs
– 1 teaspoon vanilla extract
– ¼ cup sour cream
– ½ cup chocolate chips
– ½ cup caramel sauce (plus extra for drizzling)
– Extra shredded coconut for topping
Equipment Needed
– 9-inch springform pan
– Mixing bowls
– Electric mixer or whisk
– Rubber spatula
– Oven
– Baking sheet
– Parchment paper
Step-by-Step Instructions
To get started, preheat your oven to 350°F (175°C) and grease your springform pan with a little butter. In my kitchen, I love using crushed shortbread cookies mixed with melted butter and shredded coconut for the crust. Combine these ingredients in a bowl until they resemble wet sand, then press the mixture firmly into the bottom of the pan to create a solid base. It’s really important to pack it tightly! I often use a measuring cup to keep it even. (See the next page below to continue steps…)
Next, in a clean mixing bowl, beat together your softened cream cheese and sugar until it’s nice and smooth. The texture should be creamy and inviting; trust me, you’ll be tempted to taste it! After ensuring there are no lumps, add the eggs one at a time, mixing well after each addition. Then, toss in the vanilla extract and sour cream, and gently fold these in to maintain the airy texture of the cheesecake batter. This part always fills my kitchen with a lovely aroma.
Pour about half of this glorious mixture over your crust, followed by a layer of caramel sauce, and then the remaining batter. Use a knife to swirl the remaining caramel sauce through the top layer for an artful finish. You’ll want to bake this beauty for about 50 to 60 minutes until the cheesecake is set but still has a slight jiggle in the center. The smell of baking cheesecake is nothing short of heavenly!
Once baked, let the cheesecake cool on a wire rack for at least an hour before transferring it to the fridge for a minimum of 4 hours (or overnight, if you can wait). Just before serving, sprinkle extra shredded coconut on top and drizzle with more caramel and melted chocolate. The combination of flavors and textures is truly a celebration for the senses!
Pro Tips for Best Results
When I first discovered this recipe, I tested it three ways: with regular cream cheese, light cream cheese, and even coconut cream for a dairy-free version. To my surprise, the original cream cheese version provided the richest flavor and best texture, so I recommend going for the full-fat version.
Additionally, allowing your cheesecake to cool slowly is crucial. I let it sit in the oven for about 30 minutes after turning off the heat to prevent cracking. I’ve found that this gentle cooling makes a huge difference in the final presentation!
Lastly, if you’re feeling adventurous, try adding a tablespoon of coconut extract for an even stronger coconut flavor. It’s a small tweak, but it can elevate the experience from delicious to utterly delightful!
Common Mistakes to Avoid
One common mistake I made when I first started making cheesecakes was not allowing the cream cheese to soften completely. This resulted in a chunky batter rather than the silky smooth texture I was aiming for. I highly advise taking the cream cheese out of the fridge at least an hour before you start mixing. (See the next page below to continue…)
Another pitfall I encountered was overbaking. The first few times I made this cheesecake, I let it go too long because I was nervous about it being undercooked. Remember, the center should be slightly wobbly—it will firm up as it cools!
Finally, be cautious with the crust. I once skipped the packing step, thinking it wouldn’t matter, but I ended up with a crumbly cheesecake. A good, firm crust will support the filling beautifully, so don’t skip that pressing step!
Serving Suggestions
I love serving my Samoa cheesecake chilled, garnished with extra caramel and chocolate drizzle. A dollop of whipped cream on the side complements its richness beautifully! For gatherings, I recommend slicing it into small portions—this cheesecake is so decadent that a little goes a long way.
Pairing it with a light fruit salad made of berries or mango can also add a fresh contrast to the richness of the cheesecake. The sweetness of the fruit will balance perfectly with the caramel and chocolate notes.
If you want to impress your guests, consider serving it on a decorative platter, perhaps with a few Samoa cookies on the side for that extra touch of nostalgia. It will make for a stunning centerpiece at any dessert table!
Variations & Customizations
While I adore the classic Samoa flavors in this cheesecake, I’ve experimented with different nut toppings and found that toasted pecans or walnuts adds a lovely crunch! Just sprinkle them on top along with the shredded coconut before serving for enhanced texture.
Another variation I tried was infusing the cheesecake batter with a hint of espresso powder. It added an incredible depth of flavor that nicely balanced the sweetness. If you’re a coffee lover, give this a go!
For those who prefer an even simpler take, you can skip the chocolate and just focus on the caramel and coconut. This bare-bones version still delivers amazing flavors without all the layers, making it a quick option when you’re short on time.
How to Store, Freeze & Reheat
To store your cheesecake, simply cover it well with plastic wrap or transfer it to an airtight container, and keep it in the refrigerator for up to a week. I often find that the flavor deepens after sitting in the fridge for a day or two, as the ingredients meld together beautifully!
If you want to extend its life, you can freeze the cheesecake. Just make sure it’s well-wrapped in plastic wrap and aluminum foil, and it should be good for about 3 months. When you’re ready to enjoy it, simply let it defrost in the fridge overnight.
Reheating is not necessary! I recommend serving it chilled, as that’s how I feel you get the best texture. But if you do want to warm it up a bit, you can use a microwave in short bursts of 10-15 seconds—just be careful not to overheat it.
Conclusion
So there you have it! My love for Samoa cheesecake runs deep, and I hope you find this recipe just as delightful as I do. Whether you’re baking for a special occasion or simply to brighten up your day, this cheesecake is sure to bring smiles all around. I can’t wait for you to try it and create your own sweet memories in your kitchen! Happy baking!