
Next comes the caramel layer, which looks absolutely gorgeous when it’s poured on. I melt the soft caramels with cream in the microwave, stopping every 30 seconds to stir. Once it becomes a glossy, smooth mixture, I stir in flaky sea salt. This salty-sweet contrast is what makes these trees taste truly gourmet. I pour the caramel over the peanut butter base and tilt the pan slightly until the layer spreads evenly. As it cools, the caramel thickens into a chewy, buttery layer that complements the peanut butter perfectly.
The chocolate layer is the final step before chilling. I melt the chocolate chips with a little vegetable oil, which keeps the chocolate smooth and prevents it from cracking too sharply when cut. The shine on freshly melted chocolate is one of my favorite sights in the kitchen—it feels like an instant upgrade to any dessert. I spread the chocolate evenly over the caramel, being careful not to disturb the soft layer underneath. At this point, I sprinkle the top with green and white sprinkles and a touch of flaky sea salt. The contrast between the rich chocolate and the bright sprinkles is absolutely beautiful.
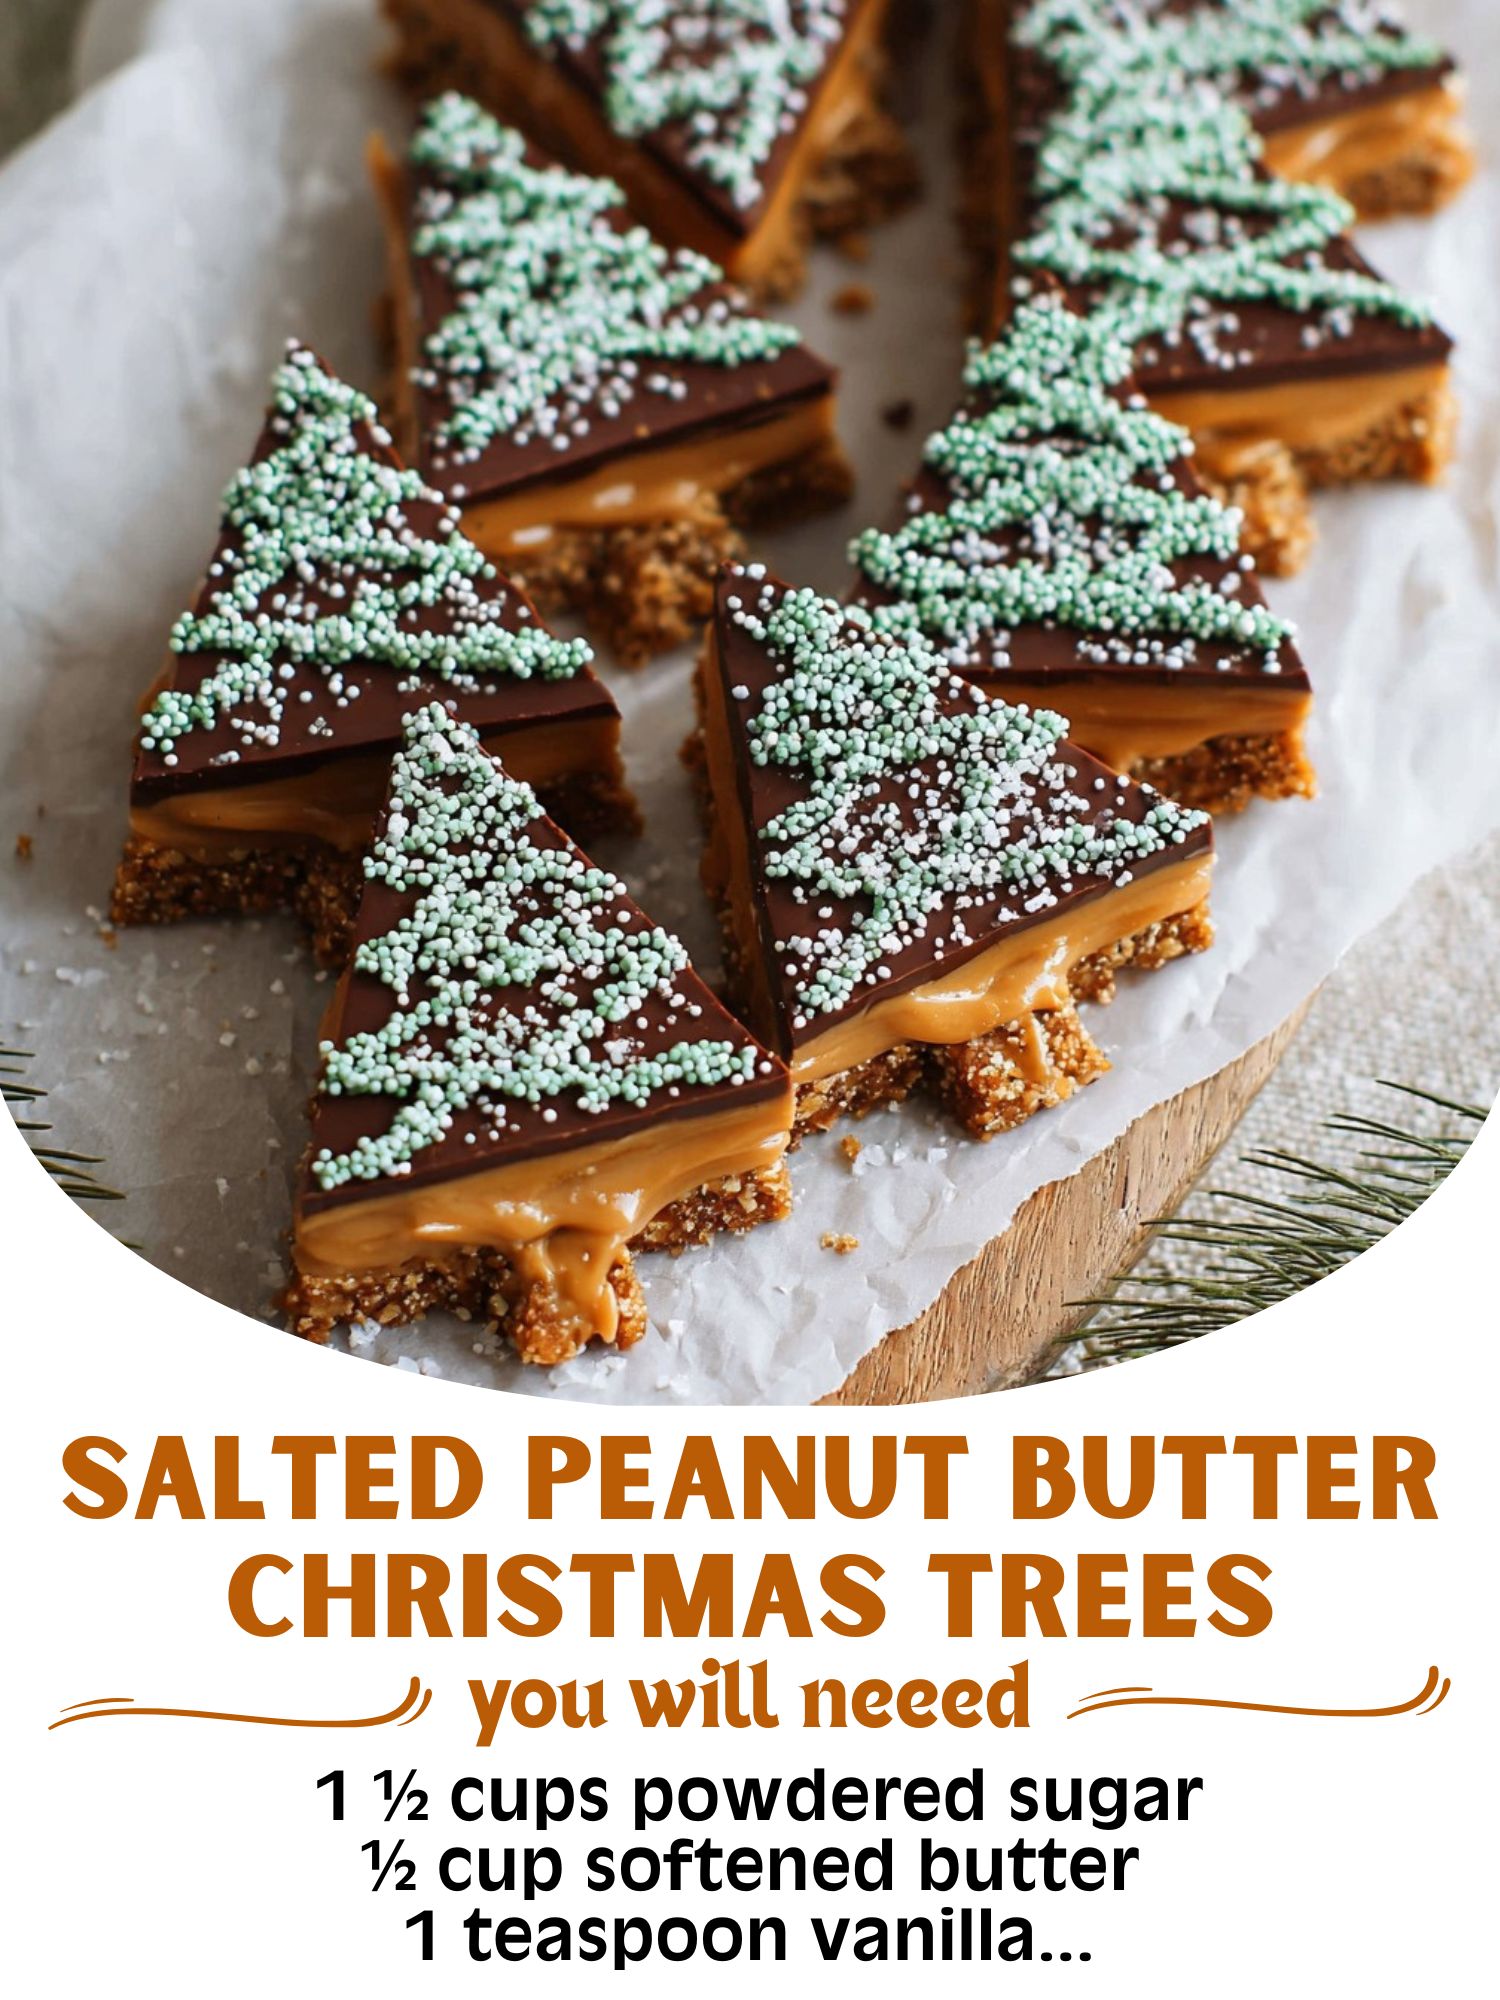
Once everything is assembled, I chill the pan until the layers firm up. After chilling, I lift everything out using the parchment and place it on a cutting board. Cutting into the bars always reveals the stunning layers—golden graham-peanut butter base, glossy amber caramel, and rich chocolate. Whether I use a tree-shaped cookie cutter or hand-cut triangles, each piece looks festive and fancy, like something from a holiday bakery counter.
Pro Tips for Best Results
I tested this recipe three times—once without chilling between layers, once chilling partially, and once chilling fully—and trust me, fully chilling between each step gives the cleanest layers. When I didn’t chill the peanut butter base before adding caramel, the caramel sank slightly into the layer. It still tasted amazing, but the trees looked less crisp in design. So chill time is your friend.
Another tip I learned the hard way is to melt the caramel slowly. The first time I rushed it, I overheated the caramels and they turned grainy and stiff. Low heat and patience make all the difference. Stirring frequently helps create that smooth, pourable caramel that spreads beautifully.
When cutting tree shapes, use a warm knife or warm the cookie cutter under hot water and wipe it dry before each cut. This keeps the cuts clean and prevents the chocolate from cracking. Cold chocolate tends to shatter unless your tools are warm—this little trick changed everything for me.
Lastly, keep your hands cool when handling the finished shapes. The chocolate layer can soften quickly with body heat. When I was shaping them with warm hands, some of the edges softened and lost their clean lines. Running my hands under cold water before working helped keep everything neat and picture-perfect.
Common Mistakes to Avoid
I made this mistake the first time—trying to cut the trees before the chocolate had fully set. The chocolate smeared, the caramel oozed, and the peanut butter base crumbled in spots. It taught me quickly that patience is essential for this recipe. Letting everything firm completely ensures gorgeous, clean layers.
Another common mistake is skipping parchment paper. Without parchment, the peanut butter base sticks stubbornly to the pan, and getting neat shapes becomes nearly impossible. Even greased pans don’t compare to the ease of lifting out parchment-lined bars.(See the next page below to continue…)
Don’t use natural peanut butter. I love natural PB for everyday eating, but for desserts like this, the oil separation ruins the texture. The base becomes too soft and greasy, and the layers don’t hold together well. Classic creamy peanut butter (like Jif or Skippy) gives the best structure.
Finally, avoid storing these at room temperature. The caramel softens too much, and the chocolate gets streaky. Keeping them chilled maintains their shape and makes each bite firm but wonderfully creamy.
Serving Suggestions
I like serving these on a holiday dessert platter with peppermint bark, gingerbread cookies, and chocolate-dipped pretzels. The tree shapes add such a charming touch, and the mix of textures—crunchy chocolate, chewy caramel, soft peanut butter—makes them stand out.
For a truly festive presentation, I sometimes drizzle extra melted chocolate in zigzags across the trees before adding sprinkles. This makes them look even more decorated, almost like they have tinsel on them. Kids especially love this version, and honestly, so do adults.
If I want to elevate them even more, I sprinkle a delicate pinch of flaky sea salt on top right before serving. The salty crunch against the rich chocolate is irresistible and keeps the sweetness from feeling overwhelming.
These treats also make wonderful edible gifts. I wrap them individually in small cellophane bags with ribbon or place them in holiday cookie tins lined with parchment. Every time I’ve gifted them, people ask for the recipe before they even finish eating the first one.
Variations & Customizations
One variation I’ve tried involves using white chocolate instead of dark chocolate. White chocolate creates a snowy, winter-wonderland look, and with green sprinkles on top, the trees look extra whimsical. The flavor becomes sweeter and creamier, which some people absolutely love.
Another fun twist is adding chopped pretzels into the peanut butter base. The salty crunch adds an unexpected but delightful texture that pairs perfectly with the smooth caramel and chocolate. This version tastes like a combination of a peanut butter bar and a chocolate-covered pretzel.
If you want a richer, deeper flavor, you can add two tablespoons of cocoa powder to the peanut butter layer. It creates a chocolate-peanut butter base that tastes like a Reese’s candy bar turned into a Christmas dessert.
For a caramel alternative, you can melt peanut butter chips with a tablespoon of coconut oil to create a peanut-butter-fudge middle layer. This variation creates a softer, silkier tree that melts beautifully in your mouth.
How to Store, Freeze & Reheat
Storing these trees is simple. I keep them in an airtight container lined with parchment and store them in the refrigerator. They last up to a week and taste just as delicious on day seven as they did on day one. The cold air keeps the chocolate firm and the caramel chewy without becoming sticky.
Freezing these treats works beautifully too. I always freeze them on a baking sheet first until solid, then transfer them to a freezer bag. This prevents them from sticking together and allows me to grab just one or two when cravings strike or when unexpected guests arrive. They can stay frozen for up to three months without any loss of flavor.
To thaw, I place them in the fridge—not on the counter. Room-temperature thawing tends to soften the caramel too quickly and can cause condensation to form on the chocolate, which isn’t pretty. Fridge-thawing keeps the texture perfect.
These treats aren’t meant to be reheated, but if you accidentally freeze them too long and they feel overly firm, placing them at room temperature for 5–8 minutes softens them just enough without making the chocolate melt.
Nutrition Information
These treats fall comfortably into the indulgent holiday dessert category—rich, sweet, and delightfully satisfying. But they also offer a nice balance of textures and ingredients that make each piece feel worth it. Peanut butter provides healthy fats and protein, graham crumbs add whole-grain texture, and dark chocolate brings antioxidants and richness.
The caramel layer adds natural sweetness and chew, while the flaky sea salt enhances flavor without needing excessive sugar. Though they are definitely a treat, they’re surprisingly filling thanks to the peanut butter base, which means you enjoy a smaller portion and still feel satisfied.
If you want a slightly lighter version, you can use low-fat graham crackers or reduce the powdered sugar in the base by a quarter cup. Dark chocolate with 70% cocoa adds a richer but less sweet profile that balances everything beautifully. But truthfully, even the original recipe is well-balanced for a holiday dessert.
FAQ Section
Can I use crunchy peanut butter instead of creamy?
Yes! It adds a wonderful texture. Just make sure it isn’t natural peanut butter, since the oils separate and affect the structure.
How do I prevent the chocolate from cracking when cutting shapes?
Warm your knife or cookie cutter under hot water, dry it off, and cut while the bars are firm but not rock-hard.
Can I use caramel sauce instead of melting caramels?
I don’t recommend it. Caramel sauce is too soft and won’t set properly. Melted soft caramels work best.
Do I have to cut them into tree shapes?
Not at all! You can cut squares, diamonds, triangles—anything you want. The recipe works beautifully in any shape.
Can I make these ahead for a party?
Absolutely. They hold up perfectly for days when stored in the fridge, making them ideal for holiday prep.
Conclusion
Every single time I make these Salted Peanut Butter Christmas Trees, I’m reminded of how magical holiday baking can be. They’re festive, fun to assemble, easy to customize, and absolutely delicious—salty, sweet, crunchy, creamy, and full of that cozy Christmas charm. Whether you make them for a party, a gift, or just to bring a little holiday joy into your kitchen, I hope these become a yearly tradition for you the same way they have for me.