
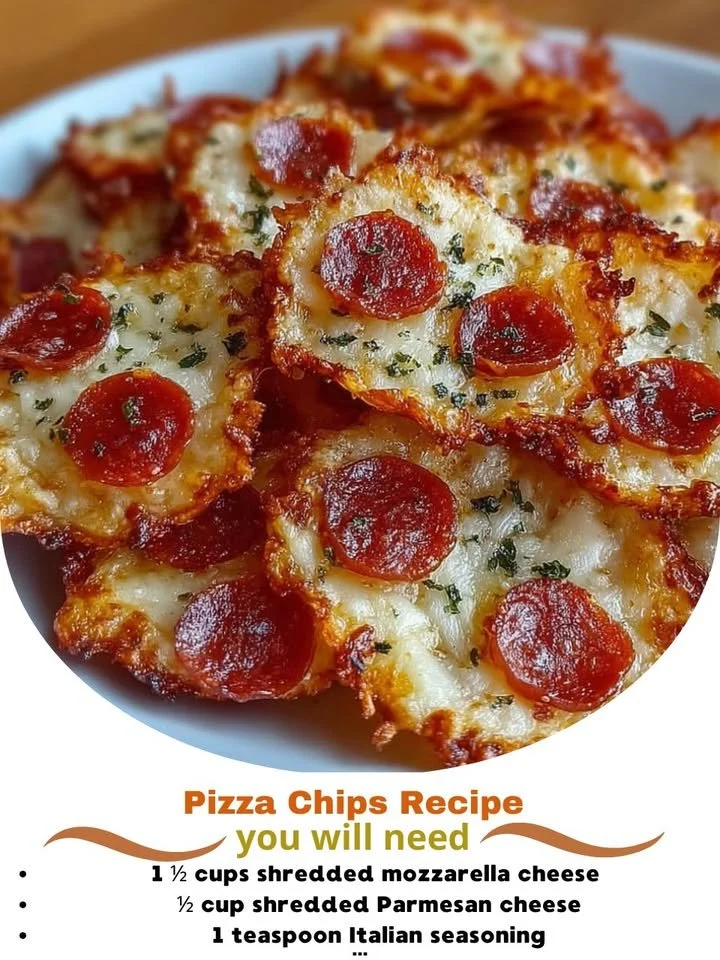
I don’t know about you, but when I think of snacking, pizza is always at the top of my list. It’s cheesy, savory, and just downright comforting. But what if I told you that you could enjoy all that pizza goodness in a crunchy, bite-sized form? That’s where my recipe for Pizza Chips comes in. These little delights are perfect for munching on while watching a movie, entertaining guests, or just indulging in a little late-night snack. Let me take you on a tasty journey through my kitchen as I show you how to whip up these irresistible pizza-inspired chips!
Why You’ll Love This Recipe
Not only are these Pizza Chips super easy to make, but they also pack a punch of flavor that will leave you wanting more. The combination of crispy edges, melty cheese, and aromatic herbs makes each chip a treat. They’re perfect for dipping in marinara sauce or enjoying on their own. Plus, you can customize them to match your favorite pizza toppings! Those flavors I love so much in pizza are now conveniently available in this chip form. What’s not to love? (See the ingredients in the next page below…)
Ingredients
– 1 large tortilla (flour or corn, your choice)
– ½ cup shredded mozzarella cheese
– ¼ cup grated Parmesan cheese
– 1 tablespoon olive oil
– 1 teaspoon dried oregano
– 1 teaspoon garlic powder
– ¼ teaspoon crushed red pepper flakes (optional)
– Salt and pepper to taste
Equipment Needed
– Baking sheet
– Parchment paper
– Mixing bowl
– Sharp knife or pizza cutter
– Oven
Step-by-Step Instructions
First, preheat your oven to 400°F (200°C). While that’s heating up, you’ll want to cut your tortilla into bite-sized triangles; I usually get about eight pieces out of one large tortilla. Now, in a mixing bowl, combine the shredded mozzarella, grated Parmesan, olive oil, oregano, garlic powder, and any additional spices you fancy. The aroma of these ingredients mixed together really gets my taste buds excited! (See the next page below to continue steps…)
Next, gently toss your tortilla pieces in the cheese mixture until they are well coated. I find it’s best to do this in batches to make sure every chip gets an equal amount of cheesy goodness. Line your baking sheet with parchment paper and arrange the tortilla pieces in a single layer, ensuring that they don’t overlap—this way, every chip will crisp up beautifully. Now, sprinkle a pinch of salt and some pepper over them for that extra burst of flavor before popping them into the oven.
Bake the chips for about 10-15 minutes, but keep an eye on them. You want them to be golden and crispy but not burnt. Trust me; I learned that lesson the hard way after offering my friends “charcoal chips!” Once they’re done, let them cool on the baking sheet for a few minutes to finish that crisping process. Believe me, you’ll want to resist the urge to dive in immediately, even though it smells so delicious!
Once cooled, those crunchy Pizza Chips are ready to be served. You can enjoy them right away or even store them in an airtight container for later. Just be warned; if you make a big batch, they may disappear faster than you think with everyone around!
Pro Tips for Best Results
After testing this recipe several times, I’ve found that using a flour tortilla gives you a softer texture on the inside while still maintaining that crunch on the outside. If you’re a fan of crunchier chips, don’t hesitate to use a corn tortilla instead—it really adds a nice, robust flavor! Also, make sure to coat the chips evenly in the cheese mixture; otherwise, some may turn out bland while others are bursting with flavor. I promise you won’t want any bland chips in the mix!
To really elevate the flavor, consider adding a sprinkle of Italian seasoning or some fresh basil if you have it on hand. I remember the first time I made these with added herbs; they practically transported me to Italy with each bite! It’s those little touches that make all the difference, turning a simple snack into something truly special.
Lastly, don’t skip out on the marinara dipping sauce. A side of warm marinara transforms these chips into a delightful appetizer. It’s like the cherry on top of a delicious pizza sundae, just a bit more savory! Plus, it balances out the richness of the cheese beautifully.
Common Mistakes to Avoid
One common mistake I made when I first made these Pizza Chips was overcrowding the baking sheet. The chips need space to breathe, so if they’re too close together, they won’t crisp up as well as they should. I was disappointed when half of them turned out soggy instead of crispy, and now I always give them room to shine! (See the next page below to continue…)
Another thing to watch out for is the baking time. Ovens can vary, and my first batch went from perfectly golden to burnt in a matter of seconds! Set a timer and check on them around the 10-minute mark. It’s much better to take them out early than risk having them charred.
Be careful with the toppings! It’s easy to get excited and load too much cheese or seasoning on your chips, but that can lead to uneven cooking and some seriously messy chips. A light hand will give you better results. I once had to pick the gooey melted cheese off the bottom of my oven because I went a bit crazy on one batch. Learning experiences, right?
Serving Suggestions
These Pizza Chips are super versatile when it comes to serving. They make an excellent stand-alone snack, but they also shine as a party appetizer. Set them out alongside a bowl of warm marinara sauce for dipping, and watch them disappear! I love serving them at gatherings because they add a fun twist to traditional chips and salsa.
If you’re hosting a pizza night, serve these alongside a variety of toppings and sauces. Guests can create their own chip-and-dip combos, making for a unique snacking experience. You could even lay out an assortment of cheeses, fresh basil, and diced tomatoes for a mini pizza-chip creation station. It’s a hit every time!
For a satisfying meal, I often turn these chips into a nacho-style dish. After baking, I layer them with a generous amount of cheese, pepperoni, and any veggies I have on hand before quickly popping them back in the oven. Cheese drips over the sides, and you’ve got yourself a decadent Pizza Chip platter that’s sure to impress!
Variations & Customizations
The beauty of Pizza Chips lies in their adaptability! If I’m in the mood for something spicy, I’ll include jalapeños alongside the cheese—and let me tell you, the heat really brings the chips to life! Other toppings that work well include cooked sausage or even some diced bell peppers for a tiny veggie kick. I love playing around with different flavors, and I encourage you to do the same!
For a healthier twist, consider using whole grain or spinach tortillas. You’ll still get that crispy goodness, but with a boost of nutrients that you might not get from regular tortillas. I’ve made these swaps before, and they taste just as amazing—maybe even better because I don’t feel guilty about snacking!
Lastly, you could try using different cheese combinations. Feta with herbs can give you that Mediterranean flair, while cheddar can lend a sharper flavor. Mix and match—I’ve had some of my best (and most surprising!) combinations come from simply experimenting with what I already had in my fridge. Don’t be afraid to think outside the pizza box!
How to Store, Freeze & Reheat
If you have any leftover Pizza Chips (though I doubt it!), you can store them in an airtight container at room temperature. They’ll last for about 2-3 days—if they last that long in my house! Avoid the fridge, as that can make them lose their crunch, and nobody wants soggy chips!
To freeze Pizza Chips, let them cool completely and then place them in a freezer bag. Make sure to squeeze out the excess air—this helps to keep them fresh. They can be stored in the freezer for up to a month. When you’re ready to enjoy them, simply bake them straight from the freezer at 400°F until they’re heated through and crispy again. I love how convenient they are for spontaneous snack cravings!
Reheating can also be done in the oven or toaster oven to maintain that delicious crunch. Just a few minutes at a high temperature is all you need. I often make extra batches specifically for later snacking because they freeze and reheat so well—it’s like having a fabulous, homemade snack at my fingertips whenever I want!
Conclusion
I hope you’re as excited as I am about making these delicious Pizza Chips! With their delightful crunch, cheesy flavor, and endless customization options, they truly are the perfect snack for any occasion. Whether you enjoy them solo or share them with friends, these delightful chips are sure to become a staple in your kitchen. Happy cooking, and enjoy every crunchy bite!