
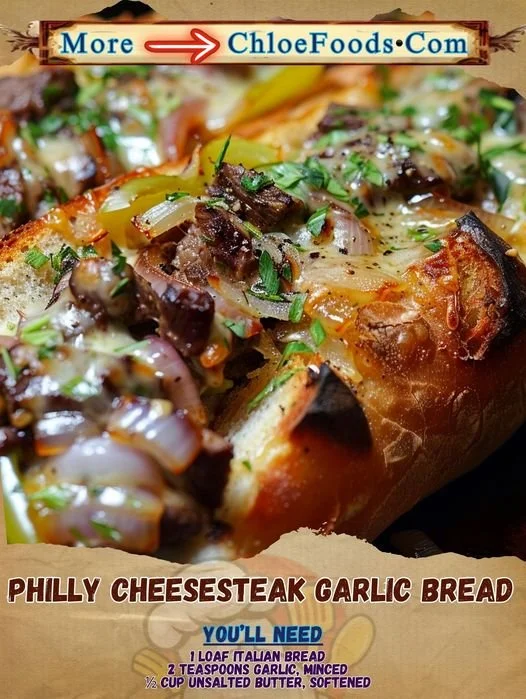
Hey there! If you’re anything like me, you love the comforting feel of a delicious hoagie paired with that satisfying crunch of garlic bread. Today, I’m thrilled to share my recipe for Philly Cheesesteak Garlic Bread. It’s a delightful cross between two classics, and trust me, it’s as tasty as it sounds! All those savory cheesesteak flavors melt together beautifully over crusty garlic toast, making this dish a real crowd-pleaser for any get-together or cozy night in. Let’s jump right into it!
Why You’ll Love This Recipe
This Philly Cheesesteak Garlic Bread is a flavor explosion that brings the richness of cheesesteaks to the crispy warmth of garlic bread. Picture this: savory steak mixed with melted cheese, sautéed onions, and a touch of garlic, all resting on a crunchy, buttery base. It’s a heavenly combination that will have you coming back for seconds… or thirds! Plus, it’s relatively easy to whip up, which is always a win in my kitchen. (See the ingredients in the next page below…)
Ingredients
– 1 large loaf of Italian or French bread
– 1 lb ribeye steak or sirloin, thinly sliced
– 1 medium onion, thinly sliced
– 1 green bell pepper, thinly sliced
– 3 cloves garlic, minced
– 1 cup provolone cheese, shredded
– 1 cup mozzarella cheese, shredded
– 1/4 cup unsalted butter, softened
– 2 tablespoons olive oil
– Salt and pepper to taste
– Fresh parsley, chopped (optional for garnish)
Equipment Needed
– Large skillet
– Baking sheet
– Aluminum foil
– Spatula
– Knife
– Cutting board
Step-by-Step Instructions
To start, preheat your oven to 375°F (190°C). While the oven is warming up, I like to begin by sautéing the onions and peppers. Heat a tablespoon of olive oil in a large skillet over medium heat. Add the sliced onions and bell peppers, cooking them until they become soft and slightly caramelized, which usually takes about 7-10 minutes. It’s such a wonderful smell that fills the kitchen at this stage! When the veggies are done, remove them from the skillet and set them aside. (See the next page below to continue steps…)
Next, I like to add the remaining tablespoon of olive oil to the same skillet and crank up the heat to medium-high. Add the thinly sliced steak and season it with salt and pepper to your liking. Cook for about 4-5 minutes, stirring occasionally, until it’s browned and cooked through. The sound of sizzling meat is music to my ears, and that aroma is just divine! After the steak is ready, return the sautéed onions and peppers to the skillet, mixing everything together well.
Now, let’s prepare the garlic bread! Grab your loaf of Italian or French bread and slice it in half lengthwise. In a small bowl, mix the softened butter with minced garlic and a pinch of salt. Spread this delicious buttery garlic mixture evenly over both halves of the bread. Then, it’s time to pile on the steak and veggie mixture. Make sure to distribute it evenly for every bite to be packed with flavor. Finally, sprinkle the provolone and mozzarella cheese on top, and place the loaves on a baking sheet lined with aluminum foil.
Cover the bread with another sheet of aluminum foil and bake in the preheated oven for about 15 minutes. After that, remove the top foil and let it bake uncovered for another 5-10 minutes until the cheese is melted and bubbly. When you take it out, the gooey cheese and the crunchy edges will be calling your name! Let it cool slightly before slicing—trust me, it’s worth the wait.
Pro Tips for Best Results
I tested this recipe three ways, and the secret to getting perfectly sautéed veggies is in the timing! If you add the onions first and let them caramelize a bit, and then throw in the bell peppers, you’ll get that lovely sweet flavor from the onions. But don’t overcook the peppers, or they’ll lose their vibrant color and crunch!
Also, using thinly sliced ribeye or sirloin makes a huge difference in tenderness. I learned this from a couple of less-than-ideal attempts where the meat was a bit too chewy. Trust me, a good butcher or the deli counter can help you get the right cut for a melt-in-your-mouth experience.
Lastly, don’t shy away from experimenting with the cheeses! While provolone and mozzarella are my favorites, I once tried it with a mix of cheddar and gouda, and let’s just say it was a hit in my house. It’s all about finding that perfect cheesy delight that makes your heart sing!
Common Mistakes to Avoid
One common mistake I made the first time around was not slicing the bread all the way through. It’s tempting to just cut it partially for presentation, but trust me, it makes serving a bit of a hassle. Full slices not only look better but ensure everyone can dig in easily! (See the next page below to continue…)
Another mistake is not letting the garlic butter mixture sit for a few minutes. I once mixed it up and spread it immediately, but I found that letting the garlic infuse into the butter for just 10 minutes made a world of difference in flavor.
I also recommend avoiding overly watery veggies. If you sauté them too quickly over high heat or with too much oil, they can become soggy and mushy when baked. Drain any excess liquid before piling them onto the bread to keep everything nice and toasty.
Lastly, don’t skip the foil covering during the first part of the baking. This helps keep the inside moist and gooey. If you bake it uncovered from the start, the bread can dry out before the cheese melts perfectly.
Serving Suggestions
This Philly Cheesesteak Garlic Bread is perfect as a main dish or as a scrumptious appetizer to share with friends. I love to serve it alongside a fresh green salad tossed with a light vinaigrette, which provides a nice contrast to the richness of the garlic bread. It’s like a match made in culinary heaven!
For those cozy movie nights, you can’t go wrong with a side of marinara or ranch dressing for dipping. Just picture that cheesy bread dipped in creamy ranch—it’s pure indulgence! Sometimes, I’ll even whip up some crispy fries on the side to complete the ultimate comfort food experience.
Lastly, don’t forget to sprinkle some fresh parsley over the top before serving. It adds a touch of color and freshness, making this dish even more inviting—and let’s be honest, we eat with our eyes first!
Variations & Customizations
One of the best parts about this recipe is how easy it is to customize! If you’re not a fan of green bell peppers, you can easily swap them out for mushrooms or even jalapeños for a fun twist. On those days when I crave something spicy, I toss in some banana peppers for an extra kick.
You can also experiment with the cheeses! While provolone and mozzarella are classic choices, I love the creamy texture of fontina or the sharpness of aged cheddar. Each variation brings out a new layer of flavor that can change the whole vibe of the dish.
For a vegetarian option, simply replace the steak with sautéed mushrooms, zucchini, or even spiced tempeh. The key is to ensure your veggies are flavorful and well-seasoned, so don’t forget to spice them up a bit!
How to Store, Freeze & Reheat
If you have leftovers (which I often do because it’s so rich!), you can store them in an airtight container in the fridge for up to three days. Just make sure to let the garlic bread cool completely before sealing it up, to avoid any sogginess.
For long-term storage, I’ve found that this garlic bread freezes quite well. Just wrap it tightly in plastic wrap or aluminum foil and place it in a freezer-safe bag. It can last up to three months; just make sure to label it so you know what you have on hand.
When it’s time to enjoy leftovers, simply reheat it in the oven at 375°F (190°C) for about 10-15 minutes. This will help revive that crunchy texture while melting the cheese back to gooey perfection. You can also pop it in a toaster oven if you’re reheating a smaller portion. Just watch it closely to avoid burning!
Conclusion
I hope you enjoy this recipe for Philly Cheesesteak Garlic Bread as much as I do! It’s the perfect blend of comforting flavors and textures, and I can’t wait for you to share it with your loved ones. Enjoy every delicious bite, and don’t forget to experiment with your own twists along the way. Happy cooking!