
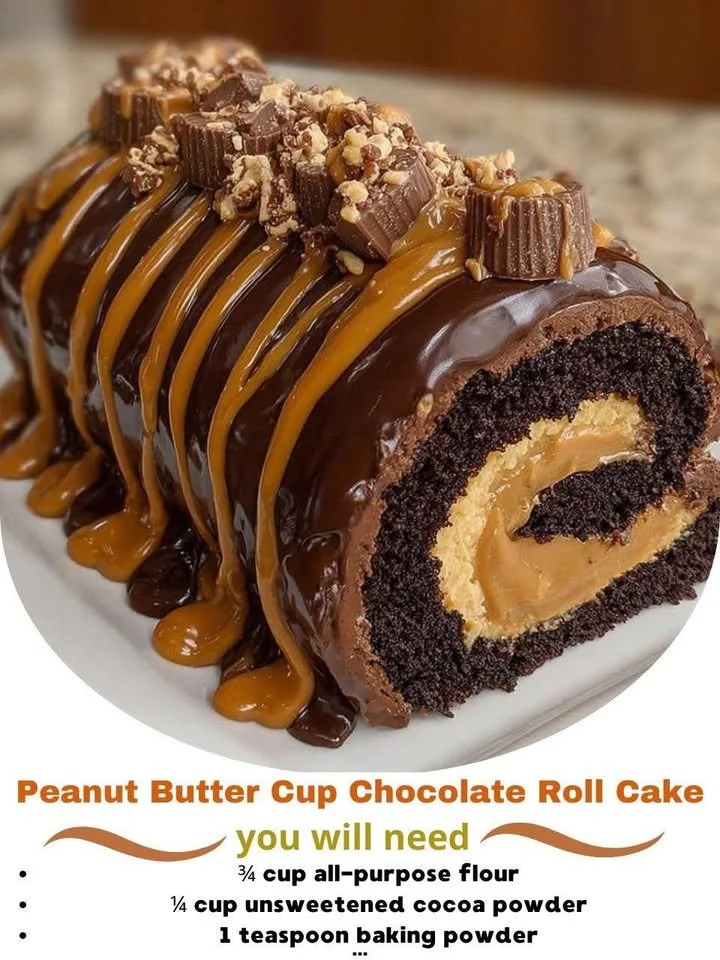
I have to tell you about my latest obsession: Peanut Butter Cup Chocolate Roll Cake. Imagine soft, chocolatey sponge cake rolled up with cream and peanut butter, all wrapped up in a rich and luscious chocolate ganache. It’s the kind of dessert that makes my heart skip a beat every time I walk into my kitchen and see it sitting there, just waiting to be enjoyed. Whether it’s for a birthday celebration, a cozy family dinner, or just a sweet craving, this dessert is sure to impress.
Why You’ll Love This Recipe
This recipe brings together two of my favorite flavors: chocolate and peanut butter. The combination is irresistible! I love how the light, airy cake pairs beautifully with the creamy filling and rich ganache, creating a dessert that’s not only beautiful but also incredibly delicious. Plus, the roll cake might sound intimidating, but trust me, it’s easier than it looks, and the wow factor is totally worth the little effort it takes. I can’t wait for you to try it! (See the ingredients in the next page below…)
Ingredients
– 4 large eggs
– 1 cup granulated sugar
– 1 teaspoon vanilla extract
– 1 cup all-purpose flour
– 1/3 cup unsweetened cocoa powder
– 1 teaspoon baking powder
– A pinch of salt
– 1 cup heavy cream
– 1/2 cup peanut butter
– 1 cup powdered sugar
– 1 cup semi-sweet chocolate chips
– 1/2 cup heavy cream (for ganache)
Equipment Needed
– Mixing bowls
– Electric mixer or whisk
– Rubber spatula
– Baking sheet (15×10 inches)
– Parchment paper
– Clean kitchen towel
– Saucepan
– Heatproof bowl (for ganache)
Step-by-Step Instructions
First, preheat my oven to 350°F and line a baking sheet with parchment paper. In a mixing bowl, I start whisking the eggs and granulated sugar together until it’s light and frothy, which takes about 3-4 minutes with my electric mixer. Slowly, I add in the vanilla extract. In another bowl, I combine the flour, cocoa powder, baking powder, and salt. Soon, I fold this dry mixture into the egg mixture until just combined. It’s already smelling delightful! (See the next page below to continue steps…)
Next, I pour the batter into the prepared baking sheet, spreading it out evenly with a spatula. I pop it into the preheated oven and bake for about 12-15 minutes, keeping a close eye so it doesn’t overbake. Once it’s done, I remove it from the oven and immediately place a clean kitchen towel over it. After a quick 5 minutes, I flip the cake onto the towel, peel off the parchment paper, and then roll it up tightly from the shortest side. I let it cool completely while it’s rolled up to help it maintain that lovely shape.
Meanwhile, I whip up the filling by combining the heavy cream, peanut butter, and powdered sugar in a mixing bowl. I like to beat it until I achieve lovely, fluffy peaks. Once my cake has cooled, I carefully unroll it, spread the peanut butter filling evenly, and then roll it back up once more. The smell is to die for at this point! Now for the ganache; I heat the heavy cream in a saucepan and pour it over my chocolate chips in a heatproof bowl. After letting it sit for a minute, I stir until it’s all melted and smooth.
Pro Tips for Best Results
The first time I made this recipe, I forgot to sift the cocoa powder, and it made for some clumpy batter. Trust me, taking that extra step to sift your dry ingredients really helps create a smooth and even mixture. It also makes the cake fluffier!
I also learned that letting the cake cool properly while rolled up is crucial. If you try to unroll it too soon, it might crack. I give it at least 30 minutes to cool after rolling it in the towel. This step may seem tedious, but it makes all the difference in how well the cake holds its shape.
Lastly, I like to let my ganache cool a bit before pouring it over the cake. If it’s too hot, it will slide off rather than settle beautifully on the cake. Let’s be honest—nobody wants to waste delicious chocolate ganache!
Common Mistakes to Avoid
One common mistake I encountered the first time was not properly greasing the baking sheet. Even with parchment paper, the edges of the cake stuck a little, making it hard to roll. To prevent this, I always line the pan with parchment and spray a bit of non-stick spray on top before pouring the batter in. This ensures a smooth release every time! (See the next page below to continue…)
Another pitfall is overbaking the cake. It’s easy to let it go an extra minute or two, but this can lead to a dry cake that’s hard to roll. I check it at the 12-minute mark and keep a close eye on it until it springs back when pressed gently.
Lastly, don’t rush the cooling process. If you roll the cake when it’s still warm, cracks are pretty much guaranteed. Trust me; sitting patiently is part of the fun—plus, it enhances the flavors, making it even more delicious.
Serving Suggestions
When it comes to serving this delicious roll cake, I love to slice it into neat little pieces that showcase the beautiful swirls inside. You can serve it as a show-stopping centerpiece at a gathering or simply treat yourself to a slice after a long day. Drizzling some extra ganache on the plates adds a lovely touch, too.
For a little extra flair, I often sprinkle some crushed peanuts on top. They add a nice crunch and a pop of color, making the dessert look even more appealing. If I’m feeling a bit fancy, a dollop of whipped cream or a scoop of vanilla ice cream on the side elevates the experience to pure bliss.
Lastly, nobody can resist a stellar dessert presentation, so I love to serve it on a beautiful cake stand. It adds elegance and makes me feel like a true culinary artist!
Variations & Customizations
One fantastic variation I’ve tried is swapping out the peanut butter for almond butter. The flavor is just as delicious, and it gives a slightly different nutty profile that I absolutely adore. If you’re looking for a nut-free option, sunflower seed butter works well too, and it’s a great choice for allergy-friendly gatherings.
For chocolate lovers, why not fold in some mini chocolate chips into the filling? It’s a delightful surprise when you bite into the cake, giving it an extra chocolate punch that pairs beautifully with the peanut butter.
I also love experimenting with flavors in the ganache. Adding a hint of espresso powder really deepens the chocolate flavor and can take this dessert to another level. Just a teaspoon will do—it’s amazing what a little tweak can do!
How to Store, Freeze & Reheat
If I have any leftovers (which is rare!), I like to store the Peanut Butter Cup Chocolate Roll Cake in an airtight container in the fridge. It keeps wonderfully for about three days, though I can’t promise it will last that long in my house!
For longer storage, this roll cake can be frozen. I wrap it tightly in plastic wrap and then in aluminum foil for added protection against freezer burn. When I’m ready to enjoy it again, I let it thaw in the fridge overnight. It’s just as fabulous after freezing, which is a total win for meal prep!
If I decide to reheat a slice, I pop it into the microwave for about 10-15 seconds. This gives the cake a warm, fresh-out-of-the-oven vibe that makes it even more comforting.
Conclusion
I hope this Peanut Butter Cup Chocolate Roll Cake finds a cherished spot in your recipe collection like it has in mine! It’s a fun dessert that never ceases to impress both visually and flavor-wise. Baking it has become one of my favorite ways to express love through food, and I can’t wait for you to experience the joy it brings. Happy baking, friends!