
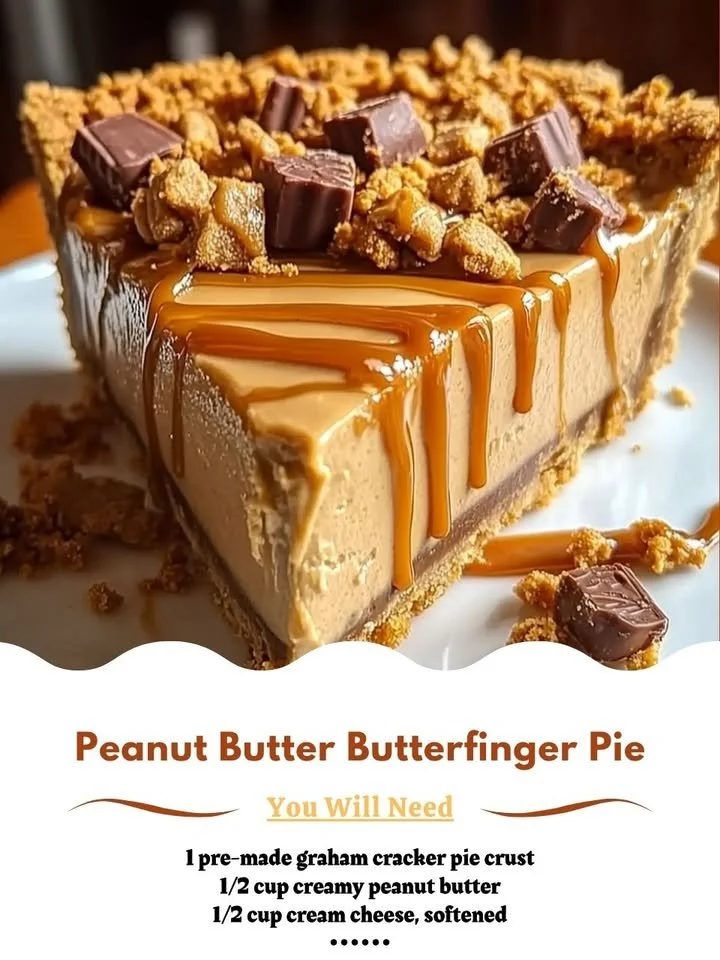
There’s something simply magical about desserts that combine chocolate and peanut butter, and one of my absolute favorites is Peanut Butter Butterfinger Pie. As a lifelong lover of both sweets, this pie has a way of making me feel like a kid again every time I take a bite. The creamy peanut butter filling paired with crunchy Butterfinger bars creates such an indulgent experience, it’s no wonder this pie has become a staple in my kitchen. Whether it’s a family gathering or a simple weeknight treat, I guarantee you’ll want to keep this recipe close at hand.
Why You’ll Love This Recipe
This Peanut Butter Butterfinger Pie is not only irresistibly delicious, but it’s also incredibly easy to whip up! With minimal effort, you can create a dessert that looks and tastes like it came from a bakery. The mix of textures from the creamy filling and crunchy candy topping will have everyone asking for seconds. I truly love how it brings smiles to the faces around my table. Trust me, you’re going to want this pie in your life! (See the ingredients in the next page below…)
Ingredients
– 1 pre-made graham cracker pie crust
– 1 cup creamy peanut butter
– 1 cup heavy whipping cream
– 8 oz cream cheese, softened
– 1 cup powdered sugar
– 1 tsp vanilla extract
– 2 medium Butterfinger candy bars, crushed
– Additional Butterfinger bits for garnish (optional)
Equipment Needed
– Mixing bowls
– Electric mixer
– Rubber spatula
– Pie dish
– Measuring cups and spoons
– Knife and cutting board
Step-by-Step Instructions
To start off, I gather all my ingredients and equipment, which makes the process so much quicker. First, I combine the softened cream cheese and powdered sugar in one bowl using my electric mixer until it’s nice and smooth. This step is critical because you want to ensure there are no lumps before adding the peanut butter. Once the mixture is smooth, I incorporate the creamy peanut butter and vanilla extract, continuing to mix until it’s all beautifully combined and fluffy. The aroma is just heavenly at this stage! (See the next page below to continue steps…)
Next, I whip the heavy cream in another bowl. I love using heavy cream because it provides that lovely lightness in the filling. I beat it until soft peaks form, which usually takes just a few minutes. When it looks perfect, I gently fold it into the peanut butter mixture with a spatula. This keeps the texture light and whipped, making it feel like biting into a cloud of peanut butter goodness.
Once the filling is ready, I pour it into the prepared graham cracker crust, smoothing it out so that it’s evenly distributed. Then comes the fun part—sprinkling the crushed Butterfinger bars on top! I love how the chocolate and wafer bits add a delightful crunch and a pop of color to the pie. After they’re evenly distributed, I pop it in the fridge for at least four hours, but overnight is ideal if you can wait. Trust me, it’s worth it when it’s set perfectly!
The moment finally arrives when I can take that first slice, and let me tell you, it’s pure bliss! I love serving it with a dollop of whipped cream and an extra drizzle of chocolate sauce. It’s always a hit and never lasts long. There’s something incredibly satisfying about sharing this pie with friends and family, and that first bite is an experience in itself!
Pro Tips for Best Results
During my recipe testing, I tried using crunchy peanut butter to see if it would enhance the texture, and while it was tasty, I found that creamy peanut butter created a smoother filling that pairs perfectly with the crunch of the Butterfingers. I strongly recommend sticking with creamy for this one, especially if you want that fluffy mouthfeel!
I also experimented with different toppings and noticed that a sprinkle of sea salt over the Butterfinger bits really elevates the flavors. The salty-sweet combo is absolutely delightful! Just a pinch can make all the difference, so don’t skip it if you love that flavor contrast.
Lastly, I found that letting the pie set overnight is the real magic moment. It allows the flavors to meld beautifully, making each slice even more irresistible the next day. If you can be patient, go for the overnight chill!
Common Mistakes to Avoid
One common mistake I made the first time I tried making this pie was adding the powdered sugar too quickly to the cream cheese. It clumped up and took a bit more work to smooth out. To avoid this, I recommend sifting the powdered sugar before mixing or adding it gradually while mixing. This keeps it super smooth and avoids that grainy texture. (See the next page below to continue…)
Another misstep was not letting my cream cheese soften enough. If it’s too cold, it won’t blend well, leading to lumps in your filling. I usually take it out about 30 minutes before I start prepping, so it’s soft enough to whip right up.
Sometimes, folks worry about the heavy cream and don’t whip it enough, leading to a heavy filling. You want soft peaks, not stiff peaks! If you whip it too long, it can become over-whipped and turn grainy. This fluffy texture is key to the lightness of the pie.
Lastly, don’t skip the chill time! I know it’s tough to wait, but allowing it to set in the fridge is crucial for the pie to hold its shape. Plus, the flavors deepening with time really enhances the whole experience, and I promise, the wait is worth it.
Serving Suggestions
When it’s finally time to serve my Peanut Butter Butterfinger Pie, I love to cut generous slices and garnish each with an extra dollop of whipped cream. Sometimes, I’ll even drizzle a little chocolate sauce over the top—because, why not make it a little extra indulgent?
For a fun touch, I like to put out some mini Butterfinger bits or chocolate sprinkles that guests can add on top for a little DIY flair. It’s a fun way to let everyone customize their slice exactly how they like it!
Lastly, I find that this pie pairs beautifully with a nice cup of coffee or a tall glass of milk. The richness of the pie combined with a warm beverage creates a comforting moment that is perfect for any gathering, whether it’s casual or a special occasion.
Variations & Customizations
If you’re like me and love experimenting, there are plenty of ways to customize this recipe! One variation I’ve tried is adding a layer of chocolate pudding beneath the peanut butter filling. It adds another layer of flavor that chocolate lovers will appreciate. I just spread the pudding in the crust before pouring in the peanut butter mixture, and it turns into a delightful surprise with each slice.
Another twist I’ve enjoyed is mixing in some crushed Oreos or graham crackers with the Butterfinger topping. It adds an interesting texture that goes perfectly with the creamy filling. Plus, who doesn’t love Oreos?
For those who prefer a healthier spin, you could swap out the heavy cream for whipped coconut cream. The flavor is somewhat different but still tasty, and it reduces some of the calories while keeping it delicious. It’s a lovely option for those dairy-free guests!
How to Store, Freeze & Reheat
Storing this Peanut Butter Butterfinger Pie is super easy—just cover it tightly with plastic wrap and keep it in the fridge. It will stay fresh for up to five days, but let’s be real: it rarely lasts that long in my house!
If you have leftovers or want to make it ahead of time, you can freeze the pie as well. Just make sure to wrap it tightly with plastic wrap, then aluminum foil, to prevent freezer burn. It can be frozen for up to three months. When you’re ready to enjoy it again, let it thaw in the fridge overnight before slicing.
Reheating is not typically necessary, as this pie is best served chilled. However, if you prefer a warm treat, I recommend microwaving a slice for about 10-15 seconds until it’s just slightly warm. Just be cautious, as you don’t want the filling to get too warm and lose its lovely texture!
Conclusion
I hope you give this delightful Peanut Butter Butterfinger Pie a try! It’s one of those recipes that always brings joy, whether you’re serving it at a party or enjoying it on a cozy night at home. The combination of flavors and textures has a way of making anyone’s day a little brighter, and it’s sure to become a cherished recipe in your family as much as it is in mine. Happy baking!