
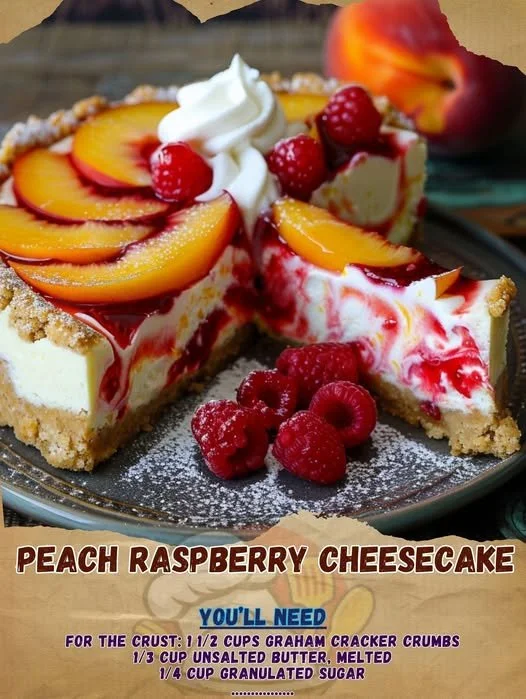
Welcome to my kitchen! Today, I’m excited to share one of my all-time favorite desserts: Peach Raspberry Cheesecake. This delightful treat brings together the sweetness of ripe peaches with the tangy burst of fresh raspberries, all nestled atop a creamy, dreamy cheesecake. As the weather warms up, there’s nothing better than enjoying a slice of this luscious dessert, perfectly chilled and ready to impress family and friends.
Why You’ll Love This Recipe
This Peach Raspberry Cheesecake is not just visually stunning; it’s also incredibly tasty! The buttery crust complements the smooth cheesecake filling and the fruit topping so harmoniously. I love how every bite delivers a delightful mixture of flavors and textures, from the crunch of the crust to the creamy cheesecake and juicy fruit. I can’t wait for you to try it! (See the ingredients in the next page below…)
Ingredients
– 1 ½ cups graham cracker crumbs
– ½ cup unsalted butter, melted
– 2 tablespoons sugar
– 16 ounces cream cheese, softened
– ¾ cup granulated sugar
– 1 teaspoon vanilla extract
– 3 large eggs
– 2 cups fresh peaches, peeled and sliced
– 1 cup fresh raspberries
– ¼ cup peach preserves
– 1 tablespoon lemon juice
Equipment Needed
– 9-inch springform pan
– Mixing bowls
– Electric mixer
– Rubber spatula
– Measuring cups and spoons
– Knife and cutting board
– 9×13 baking dish (for a water bath, optional)
Step-by-Step Instructions
To start, I preheat my oven to 325°F (162°C). While it’s warming up, I prepare the crust by combining the graham cracker crumbs, melted butter, and sugar in a mixing bowl. After thoroughly mixing everything, I press the mixture firmly into the bottom of my springform pan. I find that using the bottom of a measuring cup helps create a nice, even layer. Now, let’s get that crust baking! I pop it in the oven for about 10 minutes until it’s lightly golden—a perfect base for our cheesecake. (See the next page below to continue steps…)
Next, while the crust is cooling, I work on the cheesecake filling. In another mixing bowl, I beat the softened cream cheese until it’s smooth and creamy. I gradually add in the granulated sugar and vanilla, making sure everything is well combined. Then, I crack in the eggs, one at a time, mixing just until incorporated. Overmixing can lead to cracks in the cheesecake, so I try to keep it gentle. Once it’s all mixed, I pour the cheesecake filling over the cooled crust and spread it out evenly.
Now comes the fun part! I love adding my fruit layer. I place those beautiful peach slices and fresh raspberries on top of the cheesecake filling. But wait, let’s not forget to add some peach preserves! I gently warm them in a small saucepan with lemon juice until melted, then drizzle this mixture over the fruit-topped cheesecake. It adds an extra shine and sweetness, making it absolutely irresistible.
Finally, I bake my cheesecake in a water bath for about 60 to 70 minutes. The water bath helps keep the cheesecake moist and prevents cracks from forming. Once it’s done, I turn off the oven and leave the cheesecake inside for an additional hour. This gradual cooling process helps set the filling just right. After it cools to room temperature, I chill it in the fridge for at least four hours—or overnight if I can resist!
Pro Tips for Best Results
I tested this cheesecake three ways, and I found that using room temperature ingredients, especially the cream cheese, is key to a smooth filling. It makes the mixing process so much easier and helps the cheesecake turn out creamy and luscious.
Moreover, I love experimenting with different fruit ratios. The combination of peaches and raspberries is divine, but I’ve also tried adding blueberries and blackberries. Each variation brings a unique flavor profile that you might enjoy just as much—or even more!
Lastly, I can’t stress enough how important it is to chill the cheesecake thoroughly before serving. It truly transforms the texture, making it so much easier to slice while keeping that creamy goodness intact.
Common Mistakes to Avoid
One mistake I made early on was not properly greasing my springform pan. I ended up with a lovely cheesecake but one that would not come out in one piece! A little bit of butter or cooking spray works wonders and ensures a clean release. (See the next page below to continue…)
Another pitfall is overmixing the cheesecake batter. No one wants a rubbery cheesecake, so I learned to mix just until combined, especially after adding the eggs. It may seem tempting to whip it till fluffy, but that can lead to cracks later.
Also, be cautious with the baking time. I learned that every oven is different, so keeping an eye on my cheesecake is crucial. If it jiggles slightly in the center when I pull it out, that’s usually the perfect sign to turn off the oven and let it cool gradually.
Lastly, don’t skip the water bath! It’s a game-changer that helps in achieving that creamy texture without cracks. I remember my first cheesecake without it—it tasted great, but the texture just wasn’t the same!
Serving Suggestions
This Peach Raspberry Cheesecake shines on its own, but I love serving it with a dollop of freshly whipped cream on the side. It adds an airy lightness that contrasts beautifully with the rich cheesecake. Sometimes, I’ll toss a few extra raspberries on the plate too, making it look even more inviting!
For a fun twist, I’ve also paired slices with a scoop of vanilla ice cream. It’s a simple way to elevate the dessert and make it feel extra special. The warmth of the ice cream melting against the cool cheesecake creates a delightful experience for the taste buds.
I like to serve this cheesecake at family gatherings and potlucks, and it never fails to get rave reviews. People love taking those first bites and getting surprised by the perfect balance of sweet and tangy flavors.
Variations & Customizations
If you’re feeling adventurous, consider swapping out the fruit entirely! Fresh strawberries, cherries, or even a mixed berry medley would be delightful in place of the peaches and raspberries. Each fruit will bring its own charm to the cheesecake.
You could also add a touch of spice by incorporating cinnamon or nutmeg into the crust. It transforms the flavor profile into something comforting, reminiscent of a cozy pie.
For those with dietary restrictions, fear not! I’ve made this cheesecake gluten-free by substituting the graham cracker crust with gluten-free cookies. And for a dairy-free option, using cashew cream can create a beautiful, creamy texture that’s both delicious and accommodating to different diets.
How to Store, Freeze & Reheat
Once my cheesecake is set and chilled, I store it in an airtight container in the fridge where it can stay fresh for about five days. Although I must admit, it rarely lasts that long at my house!
If I want to make it ahead of time, I often freeze leftover slices. I wrap them tightly in plastic wrap and then place them in a freezer bag. This way, I can enjoy a slice whenever I get a cheesecake craving! Just remember to thaw it in the fridge overnight before serving.
Reheating cheesecake isn’t something I usually do, since I prefer it chilled, but if you want to soften it slightly, I recommend letting it sit at room temperature for about 20 minutes before serving. That way, you still get to experience that wonderful creamy texture, without compromising flavor.
Conclusion
I hope you give this Peach Raspberry Cheesecake a try—it’s one of my favorites! It brings joy to my family table, and I’m sure it will delight everyone who gets a slice. Happy baking, and enjoy the sweet moments shared around the table!