
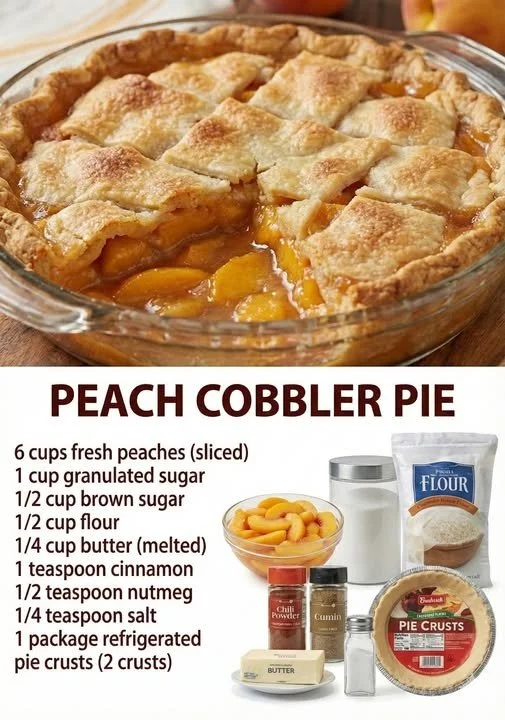
There’s something undeniably magical about the scent of a fresh peach cobbler wafting through my kitchen. The buttery aroma mingles with the sweetness of ripe peaches and just the right hint of spice, creating an atmosphere that beckons everyone to gather around. Old Time Oven Peach Cobbler is a classic dessert that never fails to bring a smile to my face, reminding me of lazy summer afternoons spent with family. With each scoop, I feel a wave of nostalgia wash over me, as the warmth of home and love envelops me.
Why You’ll Love This Recipe
This Old Time Oven Peach Cobbler is incredibly simple yet irresistible, allowing the natural sweetness of the peaches to shine through while enveloped in a light, golden crust. The beauty of this recipe lies in its straightforwardness, making it accessible for both seasoned bakers and those just starting out. Plus, it’s perfect for making memories with friends and family as you bake together. I can already envision the laughter and stories we’ll share over this delightful dessert! (See the ingredients in the next page below…)
Ingredients
– 4 cups fresh peaches, sliced (about 6-8 medium peaches)
– 1 cup granulated sugar
– 1 cup all-purpose flour
– 1 cup milk
– 1/2 cup unsalted butter, melted
– 1 tablespoon baking powder
– 1 teaspoon ground cinnamon
– 1/2 teaspoon salt
– 1 teaspoon vanilla extract
– Optional: whipped cream or vanilla ice cream for serving
Equipment Needed
– 1 large mixing bowl
– 1 9×13-inch baking dish
– Measuring cups and spoons
– Whisk or wooden spoon
– Knife for slicing peaches
– Oven mitts
Step-by-Step Instructions
To start, preheat your oven to 350°F (175°C). While it’s warming up, I like to prepare my peaches. If they’re fresh and juicy, just peeling and slicing them is enough, but if I’m using canned peaches, I drain them well. Next, in a large mixing bowl, I combine the granulated sugar, flour, baking powder, salt, and cinnamon. I mix them together until they’re well blended. Then, I add the milk, melted butter, and vanilla extract, stirring until just combined. You want it slightly lumpy—that’s where the magic happens! (See the next page below to continue steps…)
Now, pour the batter evenly into the prepared baking dish. It’s okay if it doesn’t look perfect; the cobbler will come together in the oven. Next, I gently spoon the sliced peaches over the top of the batter, making sure to distribute them evenly. The anticipation starts to build here; just looking at the layers is enough to make my mouth water! Then, I pop the baking dish into the preheated oven and let it bake for around 45 minutes, or until the edges are golden brown and bubbly.
When it’s finally done, and I pull it out of the oven, the glorious aroma fills my kitchen, making it feel warm and inviting. I let it cool for a few minutes before serving, but let’s be real; I always take a small spoonful right away because I can’t resist! This cobbler is best enjoyed warm, either on its own or topped with a swirl of whipped cream or a scoop of creamy vanilla ice cream.
Pro Tips for Best Results
Through my own experience, I’ve learned that the quality of peaches makes a huge difference. I’ve tried this recipe with both ripe fresh peaches and frozen peaches, and while both are delicious, fresh ones truly take the cake! If you’re using frozen peaches, be sure to thaw and drain them well to avoid excess moisture in your cobbler.
Also, I tested this recipe three ways when it comes to sugar. While I love traditional granulated sugar for that sweet balance, substituting half with brown sugar adds a lovely depth of flavor and a hint of caramel! It’s a simple tweak, but one that elevates this old classic to a new level.
Lastly, I’ve found that letting the cobbler rest for at least 10 minutes allows it to set a bit more, making it easier to serve. So, while the sweet aroma calls to you, just practice a bit of patience—it’s worth it for that perfect scoop!
Common Mistakes to Avoid
One mistake I made early on was using a baking dish that was too small. The batter expands while baking, and if it doesn’t have enough room, you’ll end up with a messy oven and a less-than-ideal texture for your cobbler. Trust me; stick to the 9×13-inch size, and you’ll have more than enough space for that delicious cobbler to rise and shine. (See the next page below to continue…)
Another pitfall is forgetting to preheat the oven. I can tell you from experience that this can affect the baking time and the overall results. Nobody wants to wait extra long for those golden edges, so get that oven going first!
One crucial detail to keep in mind is the freshness of your baking powder. I always do a quick test by adding a teaspoon to some warm water; if it bubbles up, it’s good to go! Stale baking powder can lead to a flat cobbler, and we definitely want those lovely peaks.
Lastly, don’t be tempted to skip the cinnamon (unless you really dislike it). It adds warmth and complexity to the flavor profile. My first cobbler was just peach and batter, but once I started adding spices, it took on a whole new level of deliciousness that I can’t resist!
Serving Suggestions
When it comes to serving my Old Time Oven Peach Cobbler, I love to keep things simple yet delightful. A scoop of cold vanilla ice cream on a hot slice is my absolute favorite way to go. The melting ice cream slowly blends with the warm cobbler, creating a delicious contrast that brings everything together in every scrumptious bite.
I also like to keep the presentation rustic; sometimes, I’ll serve it directly from the baking dish. It feels warm, inviting, and truly homey, reflecting the love that went into making it. For added flair, I might sprinkle some extra cinnamon or a dusting of powdered sugar right before I serve it.
Lastly, don’t forget about the whipped cream! Light, airy whipped cream dolloped on top can elevate this dessert into something feeling a bit more sophisticated and special. I’ll make a homemade version sometimes, but store-bought works just as well for those busy evenings when I want to keep it quick.
Variations & Customizations
If you’re looking to change things up, I’m all for experimenting with the recipe. One of my favorite variations is to mix in different fruits along with the peaches. Blueberries or blackberries add a nice tartness that beautifully contrasts the sweetness. I’ve even made a mixed berry cobbler when I have leftover fruit laying around—a delightful surprise!
Another fun twist is to infuse the batter with flavors. Adding a sprinkle of nutmeg, or even some lemon zest, can bring an exciting citrusy brightness to the dish that compliments the peaches wonderfully. Don’t be shy about experimenting with what you have; baking is an art!
Lastly, consider making this cobbler gluten-free. Using a one-to-one gluten-free baking mix in place of all-purpose flour is an easy swap that still delivers that beloved cobbler taste. Personally, one of my dear friends is gluten intolerant, and this variation has become a staple during our gatherings!
How to Store, Freeze & Reheat
Storing any leftovers from this delightful dessert is easy—simply cover it with plastic wrap and place it in the refrigerator. It keeps well for about 3-4 days, making it a fantastic treat to enjoy throughout the week. Although, if you’re like me, leftovers tend to vanish quickly!
If you plan to make a big batch or want to save some for later, freezing is a great option. After the cobbler cools completely, I like to slice it up and place individual servings in airtight containers. This way, when I have a craving, I can just grab a piece and heat it up without defrosting the whole dish!
When it comes time to reheat, I usually pop a slice in the oven at 350°F (175°C) for about 15-20 minutes, or until it’s warmed through and the edges are crispy again. The microwave can work in a pinch, but I find that the oven retains the lovely texture that makes this cobbler so enjoyable.
Conclusion
I hope you give my Old Time Oven Peach Cobbler a try! There’s nothing quite like the comfort of homemade desserts, and this peach cobbler has a special place in my heart. It’s become a cherished recipe that brings family and friends together, filling my kitchen with warmth and love. I can’t wait for you to experience the joy of making it and, of course, sharing it with your loved ones! Happy baking!