hit counter

OLD-FASHIONED PEANUT BRITTLE

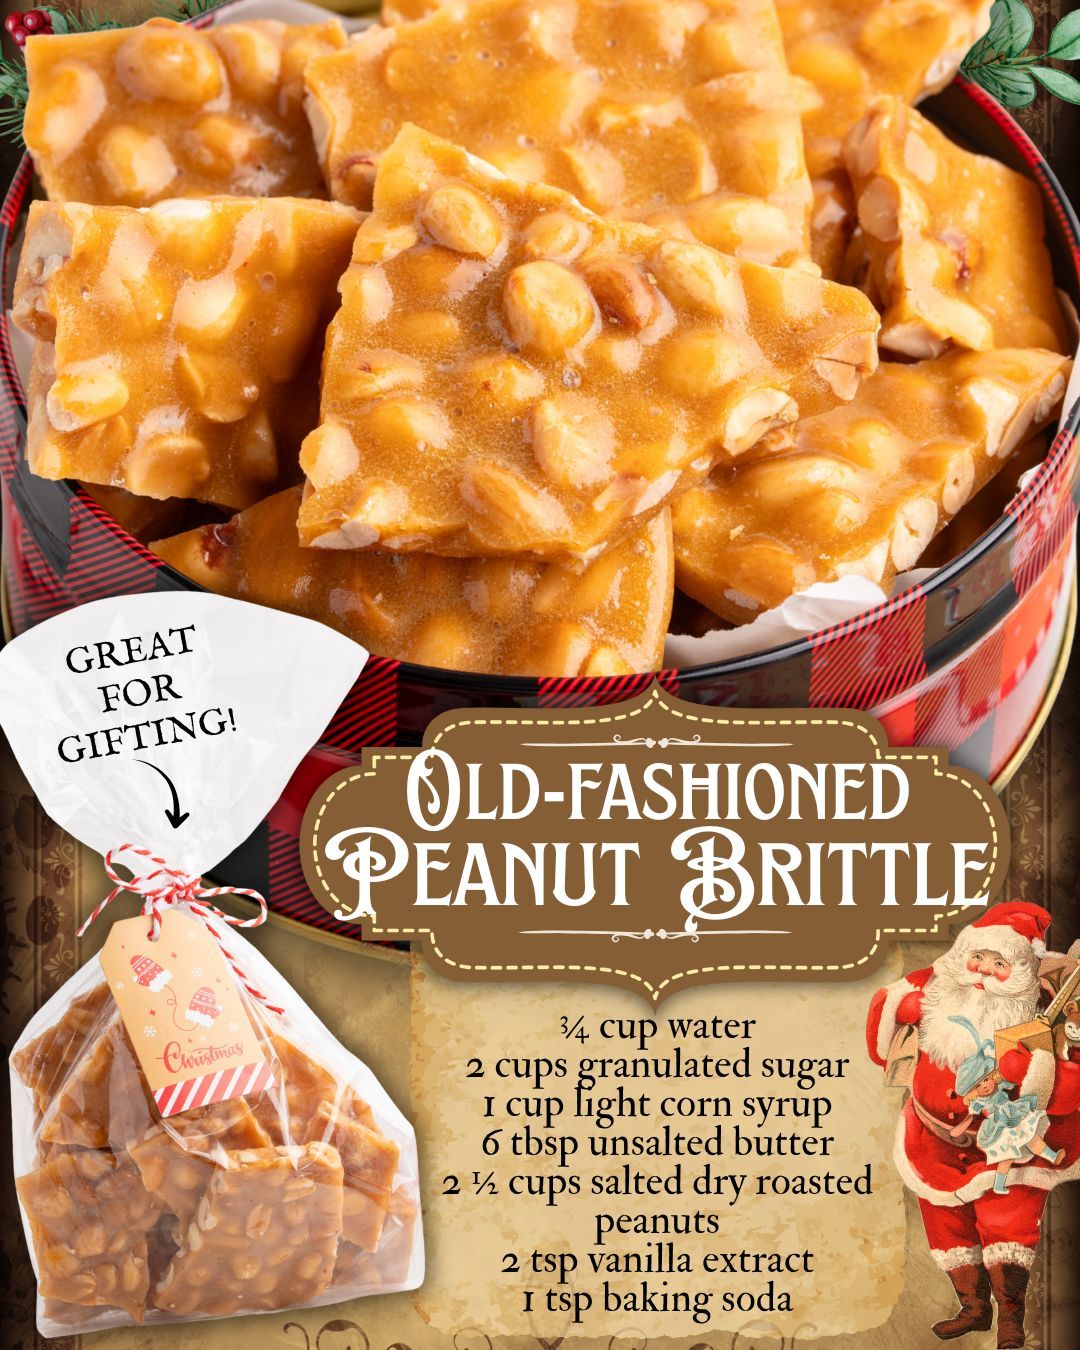
The first time I made OLD-FASHIONED PEANUT BRITTLE, my entire kitchen filled with that unmistakable caramel aroma that instantly reminded me of holiday candy shops and childhood treat tins. As the sugar melted into a golden, bubbling syrup, I felt that mix of excitement and nerves that always hits when working with hot candy. The peanuts toasted themselves right in the mixture, releasing a warm, nutty scent that blended perfectly with the buttery caramel. When I finally spread the brittle onto the baking sheet and watched it harden into a shiny, crackly sheet, I knew I had created something special—something nostalgic, simple, and irresistibly crunchy.

Why You’ll Love This Recipe

You’ll love this recipe because it captures everything wonderful about old-fashioned candy making—rich caramel flavor, crisp texture, and that satisfying snap—with ingredients you probably already have and a process that feels surprisingly doable once you get into the rhythm.

Ingredients

  • 1 cup granulated sugar
  • ½ cup light corn syrup
  • ¼ cup water
  • 1 cup raw peanuts (shelled)
  • 2 tablespoons unsalted butter
  • 1 teaspoon vanilla extract
  • 1 teaspoon baking soda
  • ¼ teaspoon salt

When choosing your peanuts, make sure they’re raw—not roasted or salted—because they toast perfectly in the hot syrup without burning. I’ve tried roasted peanuts before, and they darkened too quickly. The corn syrup keeps the sugar from crystallizing, and the baking soda is what gives the brittle its bubbly, airy crunch. Butter adds richness, while vanilla deepens the caramel flavor. These simple ingredients come together to create magic, but the quality matters—fresh peanuts and pure vanilla extract make a surprisingly big difference.

Equipment Needed

  • Heavy-bottomed saucepan
  • Heatproof spatula or wooden spoon
  • Candy thermometer
  • Baking sheet
  • Parchment paper or silicone baking mat
  • Measuring cups and spoons
  • Oven mitts

A heavy-bottomed saucepan is essential because candy heats quickly and can scorch easily; lighter pans create hot spots. I rely heavily on a candy thermometer to get the sugar mixture to the exact temperature—it removes all guesswork. Parchment paper or a silicone mat keeps the brittle from sticking, and oven mitts are a must because everything gets incredibly hot. When I’m prepared with the right tools, the process feels controlled instead of chaotic.

Step-by-Step Instructions

Whenever I make OLD-FASHIONED PEANUT BRITTLE, I start by prepping my baking sheet with parchment paper. This recipe moves fast once the sugar reaches temperature, so I always set everything up before I even turn on the stove.

Then I combine the sugar, corn syrup, and water in a heavy saucepan and stir gently over medium heat. The mixture begins clear and glossy, and as it warms, it thickens just slightly. I keep stirring until the sugar dissolves completely—any undissolved grains can cause crystallization later on.

Once the sugar is fully dissolved, I bring the mixture to a boil and add the raw peanuts. As the syrup boils, the peanuts start to cook and turn slightly golden, and the smell is incredible—sweet caramel mixing with warm, toasting nuts.

I clip on my candy thermometer and keep stirring constantly; this helps the peanuts toast evenly and prevents the sugar from burning. I wait patiently for the mixture to reach 300°F (hard crack stage), which usually takes several minutes. This step always feels like the longest part, but watching the syrup deepen to a rich amber color makes it worth it.

When the thermometer hits 300°F, I remove the pot from the heat and quickly stir in the butter, vanilla, salt, and baking soda. This is my favorite moment because the mixture foams up dramatically when the baking soda hits—it’s like watching candy come alive.

The bubbles are what create the airiness inside the brittle, making it easy to bite instead of rock hard. I stir just until everything is evenly incorporated; working quickly is key because the candy starts to set almost immediately.

Finally, I pour the hot brittle onto the prepared baking sheet and spread it out gently. I learned early on not to press or flatten it too aggressively—letting it spread naturally creates a lighter, crispier texture. After about 20 minutes, it hardens into a glossy golden sheet. I break it into pieces with my hands, listening for that satisfying crack, and each piece gleams with caramelized sugar and toasted peanuts. It’s pure candy perfection every time.

Pro Tips for Best Results

One thing I tested multiple times was the exact temperature. I tried pulling the mixture off the heat early at around 290°F, thinking it would lead to a softer brittle, but it turned sticky instead of crisp. At 300°F, the brittle turns out perfectly every time—crunchy, glossy, and stable. Trust me on this: the thermometer is your best friend here.

Another tip I learned is to warm the baking sheet slightly before pouring on the brittle. I pop it in the oven for a minute or two. A warm sheet helps the brittle spread more evenly and prevents it from setting too quickly in clumps. It’s such a small trick, but it really does make the surface smoother.

I also discovered that adding the butter and vanilla right off the heat distributes them more evenly and prevents burning. If you add them too soon, the vanilla flavor evaporates, and the butter can separate. Adding them at the end keeps the flavor strong and the texture silky.

Lastly, don’t skip the baking soda. I know it seems like a strange ingredient in candy, but it’s absolutely essential. Without it, the brittle turns rock hard and nearly impossible to bite. With it, the brittle gets those beautiful air bubbles that give it that perfect shatter when you break it. (See the next page below to continue…)

Common Mistakes to Avoid

I made the mistake once of stirring the brittle too much after adding the baking soda. Over-stirring knocks out the bubbles and creates a dense, hard texture. Just fold everything together gently and pour it out immediately.

Another common mistake is using roasted or salted peanuts. I tried salted once without thinking, and the finished brittle tasted overwhelmingly salty. The peanuts roast perfectly in the syrup, so always start raw. It makes a huge difference in both flavor and color.

A third mistake is not dissolving the sugar completely at the beginning. Undissolved sugar crystals can cause the entire batch to crystallize, turning the brittle grainy instead of smooth. I always stir until the mixture is completely clear before letting it boil.

Lastly, handling the candy without care can lead to burns; the mixture reaches extremely high temperatures. Early on, I accidentally touched a drip of hot brittle while cleaning up, and it stuck to my skin like glue. Oven mitts and careful movements are critical here.

Serving Suggestions

I love serving OLD-FASHIONED PEANUT BRITTLE in little bowls during holiday gatherings. The shiny golden pieces catch the light beautifully, and guests always reach for them as soon as they sit down. The crunch is addictive, and the sweet-and-salty flavor makes it hard to stop at just one piece.

Another way I like serving it is alongside chocolate desserts. Peanut brittle pairs beautifully with dark chocolate truffles or brownies. The contrast of crunchy brittle and soft chocolate is unbelievably satisfying. I’ve even crushed brittle and sprinkled it over ice cream—it adds the perfect buttery crunch.

Peanut brittle also makes wonderful edible gifts. I pack it into decorative tins or clear cellophane bags tied with ribbon. It keeps well for weeks, so it’s ideal for holiday gifting. Friends and family always comment on how “old-fashioned” and nostalgic it feels.

For a fun twist, I sometimes chop it into smaller chunks and mix it into cookie dough. The brittle melts slightly while baking, creating caramelized pockets throughout the cookies. It’s unexpected and delicious.

Variations & Customizations

One variation I enjoy is adding a pinch of cinnamon to the mixture right after adding the vanilla. Cinnamon gives the brittle a warm, cozy flavor that feels perfect in the fall and winter. I tried it once on a whim and loved how it brought a subtle spiced note.

Another fun twist is using different nuts. Almond brittle, cashew brittle, or mixed-nut brittle all work beautifully. I’ve made almond brittle several times, and it feels a bit more elegant with its smooth, mellow flavor. Cashew brittle is buttery and rich.

For a spicy version, I’ve added a tiny pinch of cayenne pepper. It may sound unusual, but the heat blends with the sweetness in a way that’s bold and exciting. Just don’t overdo it—a little goes a long way.

You can also drizzle melted chocolate over the top of the finished brittle. Dark chocolate works especially well and turns the brittle into a show-stopping dessert. I sometimes drizzle white chocolate for a festive look.

How to Store, Freeze & Reheat

Storing peanut brittle is incredibly easy. I keep it in an airtight container at room temperature, and it stays fresh and crisp for up to three weeks. Moisture is the enemy of brittle, so make sure the lid is tight. I never store it in the refrigerator because the humidity causes it to soften.

Freezing peanut brittle is possible, but only if you wrap it extremely well. I wrap it in parchment, then foil, then place it in a freezer-safe container. It keeps for up to two months this way. To thaw, I simply bring it to room temperature while still wrapped so condensation doesn’t form on the candy.

If the brittle softens slightly over time due to humidity, there’s an easy fix: place it in a warm (not hot) oven for a few minutes. I’ve done this several times when the weather was particularly damp, and the brittle crisps right back up.

Peanut brittle shouldn’t be reheated for serving because it’s meant to be eaten at room temperature. But if you’re using it in baking—say, chopped into cookies or on top of brownies—room-temperature pieces work perfectly.

Nutrition Information

OLD-FASHIONED PEANUT BRITTLE is definitely a treat, but it’s also surprisingly satisfying. The peanuts add protein and healthy fats, which balance the sweetness and make each piece feel more filling than many candies. I find that just a small piece satisfies my sweet craving.

The sugar, corn syrup, and butter create the classic caramel flavor, and while they’re indulgent, they’re also what make this brittle so irresistible. I see this candy as a seasonal delight—a little sugary, a little nostalgic, and absolutely worth enjoying in moderation.

What I appreciate is that peanut brittle is portion-friendly. Because it’s rich and crunchy, you naturally eat it slowly and savor each bite. I often enjoy it with a cup of tea or coffee, and one or two small pieces is plenty.

And unlike many modern sweets, homemade brittle has no preservatives or artificial flavors—just simple, old-fashioned ingredients coming together to create something timeless.

FAQ Section

1. Can I make peanut brittle without a thermometer?
You can, but I don’t recommend it. I’ve tried guessing the temperature before, and the results were inconsistent. A thermometer makes the process stress-free.

2. Why did my brittle turn grainy?
That usually means the sugar crystallized. Make sure all sugar is dissolved early on and avoid stirring once the mixture starts boiling.

3. Can I use roasted peanuts?
I don’t recommend it. They darken too quickly and can burn. Raw peanuts toast perfectly in the syrup.

4. Why didn’t my brittle harden?
It didn’t reach the hard crack temperature of 300°F. I’ve made this mistake before—temperature matters more than anything in this recipe.

5. Can I double the recipe?
Yes, but use a large pot and work quickly. I’ve doubled it before, and it turned out great as long as I spread it fast enough.

Conclusion

OLD-FASHIONED PEANUT BRITTLE has become one of my favorite nostalgic candies to make because it’s simple, crunchy, and full of that classic caramel-peanut flavor—and every time I break apart a fresh batch, I’m reminded how incredibly rewarding it is to turn basic ingredients into something so delightful and timeless.

Leave a Comment