
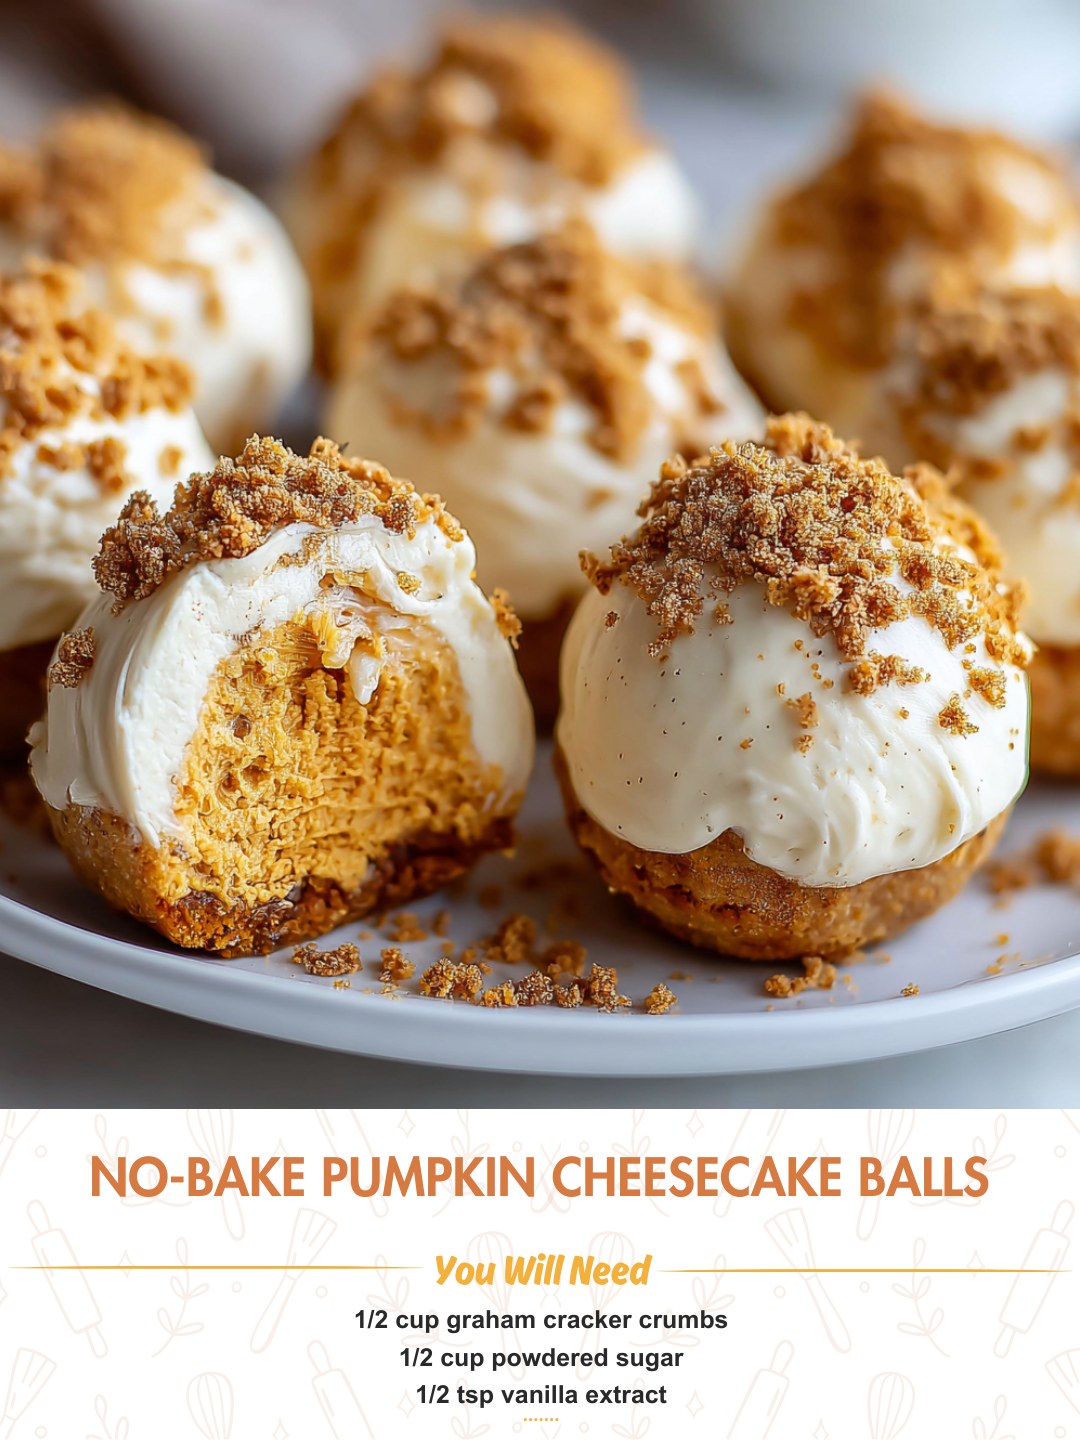
I first dreamed up these No-Bake Pumpkin Cheesecake Balls during a sweltering September day when my craving for fall flavors crashed headfirst into my refusal to turn on the oven. My kitchen was quiet, save for the rhythmic thump of my mixer, as I combined creamy ingredients that promised the essence of my favorite pie without the bake. The scent that rose up—warm pumpkin, cozy spices, and that tangy hint of cream cheese—was pure autumnal magic, even with the windows open to the summer air. Rolling the first velvety ball between my palms felt like shaping a little nugget of holiday joy. That first taste test, a cool, spiced, perfectly sweet bite that melted on my tongue, was an absolute revelation. These bites have been my secret for instant pumpkin spice satisfaction ever since.
Why You’ll Love This Recipe
You will love this recipe because it hands you all the decadent flavor of a rich pumpkin cheesecake in a fun, pop-able, and utterly fuss-free form. There’s no baking, no water bath anxiety, and no waiting hours for a cake to set. In under 30 minutes of active time, you can have a stunning, impressive dessert that tastes like you spent all day in the kitchen. They’re perfect for satisfying a spontaneous pumpkin craving, contributing to a holiday potluck without stress, or making with kids who love to get their hands dirty. Trust me, these little balls deliver a huge payoff for very little effort.
Ingredients
- 8 ounces (one block) full-fat cream cheese, very soft
- 1/2 cup pure pumpkin puree (not pumpkin pie filling)
- 1/2 cup graham cracker crumbs
- 1/2 cup powdered sugar, plus more for dusting if desired
- 1 teaspoon pumpkin pie spice
- 1/2 teaspoon vanilla extract
- 1/4 teaspoon ground cinnamon
- A tiny pinch of salt
- For coating: 1 cup finely chopped pecans, additional graham cracker crumbs, or melted chocolate
Let’s get into the ingredient details, because a few choices here are crucial. First, that block of full-fat cream cheese is non-negotiable for texture and flavor; low-fat varieties will make the mixture too soft and watery. Let it sit out until it’s very soft—this is the key to a smooth, lump-free blend. For the pumpkin, you must use 100% pure pumpkin puree, not the pre-sweetened pumpkin pie filling. I made this mistake once, and the balls were far too sweet and had an odd, cloying spice profile. The graham cracker crumbs add that essential crust-like texture. I like to buy pre-crumbled ones for consistency, but crushing your own from sheets works beautifully, too.(See the next page below to continue…)
Equipment Needed
- Electric hand mixer or stand mixer
- Large mixing bowl
- Spatula
- Measuring cups and spoons
- Baking sheet or large plate
- Parchment paper or wax paper
- Small bowls for coating ingredients
Step-by-Step Instructions
My process always begins with making sure my cream cheese is softer than I think it needs to be. I leave it on the counter for a good two hours. In my large mixing bowl, I combine the incredibly soft cream cheese, the pure pumpkin puree, and the vanilla extract. Using my hand mixer on medium speed, I beat them together until the mixture is completely smooth, creamy, and uniform in color. This usually takes about 2 minutes. Any lumps of cream cheese now will be impossible to get out later, so I take my time here. I once tried to rush this with cool cream cheese, and I ended up with a frustratingly speckled mixture that wouldn’t hold together well.
Next, I add all my dry ingredients directly to the wet mixture: the powdered sugar, graham cracker crumbs, pumpkin pie spice, cinnamon, and that tiny pinch of salt. I start the mixer on low speed to avoid a powdered sugar cloud, then increase to medium until everything is just combined. The mixture will look like a very thick, spiced frosting. This is when I stop and scrape down the sides of the bowl with my spatula to make sure no dry pockets are hiding. The dough should hold together easily when pinched. If it seems too sticky to handle, this is the moment to adjust.
Now, for the chilling stage, which is absolutely essential. I cover the bowl tightly with plastic wrap and refrigerate it for at least 2 hours, and I strongly recommend 3-4. This firms up the fats and allows the graham cracker crumbs to absorb moisture, transforming the dough from sticky to rollable. I learned this timing the hard way; the first batch I tried to roll after just one hour was a frustrating, sticky mess that coated my hands completely. Patience here makes all the difference between a fun process and a frustrating one.(See the next page below to continue…)
Once the mixture is firm, I line a baking sheet with parchment paper. Using a small cookie scoop or a tablespoon, I portion out the dough. Then, with clean, dry hands, I quickly roll each portion into a smooth, tight ball, placing them on the prepared sheet. The key is to work swiftly so the heat from your hands doesn’t melt them. After all the balls are formed, I roll each one in my chosen coating—finely chopped pecans are my personal favorite for that perfect crunch contrast. Then, they go back into the fridge for a final 30-minute chill to set everything perfectly.
Pro Tips for Best Results
I tested the chilling time three different ways: 1 hour, 2 hours, and overnight. One hour was insufficient, and the dough was a nightmare. Two hours was workable but still a bit sticky. Overnight was fantastic for flavor but made the dough almost too firm. The true sweet spot I found is 3-4 hours in the fridge. It yields a dough that’s firm enough to roll cleanly but still pliable. If you’re in a pinch, 30-45 minutes in the freezer can work, but watch it closely so it doesn’t freeze solid.
Here’s what I learned the hard way about the coating: the size of your chop matters immensely. For nuts like pecans or walnuts, they need to be finely chopped. Large pieces won’t adhere well and create a clunky, messy look. I pulse mine in a food processor a few times until they resemble coarse sand. For graham cracker crumb coating, use fresh, fine crumbs. If you’re using melted chocolate for dipping, make sure the balls are very cold, and use a fork to dip and tap off the excess for a smooth shell.
For the most beautiful and uniform balls, I use a small (#60 or 1-tablespoon) cookie scoop. It not only speeds up the process but ensures every cheesecake ball is the same size, which makes for even chilling and a more professional presentation. I scoop all the portions onto the parchment first, then go back and roll them all at once. This keeps my hands cleaner and the process more efficient. Keeping a small bowl of water nearby to dampen my fingertips slightly can also help prevent sticking if the dough starts to warm up.
Common Mistakes to Avoid
My biggest first-time mistake was using cold cream cheese straight from the fridge. It would not incorporate smoothly, no matter how long I mixed. I had stubborn little white lumps throughout my dough, and it never achieved the right silky consistency. Let your cream cheese soften until it spreads like very soft butter. This is the single most important step for a smooth texture, so don’t rush it.(See the next page below to continue…)
Another error is using the wrong pumpkin. I mentioned it before, but it’s worth repeating: pumpkin pie filling is a completely different product. It’s pre-sweetened and spiced. If you use it here, your mixture will be far too sweet, the spice balance will be off, and the texture can become gloppy. The label should say “100% Pure Pumpkin Puree” and nothing else. Trust me, the difference in the final product is night and day.
Do not skip the long initial chill of the mixture in the bowl. I was impatient once and tried to roll the balls after just 45 minutes of chilling. The dough was so sticky it coated my hands like glue, and I had to add nearly a quarter cup more graham cracker crumbs to salvage it, which threw off the perfect creamy-to-crumb ratio. The mixture must be firm to the touch before you even think about rolling.
Finally, avoid rolling the balls too large. They are rich! A one-tablespoon portion is perfect. If you make them too big, they can be overwhelming, and they won’t have that delightful pop-in-your-mouth appeal. They also might not set as firmly in the center. I made my first batch golf-ball sized, and while delicious, they were a mess to eat and didn’t hold their shape as well. Stick to a modest, bite-sized sphere for the best experience.
Serving Suggestions
I love serving these on a elegant platter arranged in a spiral or clustered on a cake stand lined with autumn leaves or a cute napkin. For a simple yet stunning touch, I sometimes dust them lightly with a bit of extra powdered sugar or a sprinkle of cinnamon right before serving. They are the perfect finger dessert for a Halloween party, Thanksgiving appetizer spread, or a Friendsgiving dessert table where people want to sample a little of everything.
For a more composed dessert, I’ll place two or three balls in a small dessert cup or shot glass with a dollop of whipped cream and a drizzle of caramel sauce. It instantly elevates them to a restaurant-style presentation with zero extra work. They also pair wonderfully with a hot drink; serving them alongside a mug of spiced apple cider, strong coffee, or a chai tea latte makes for the coziest afternoon treat.
If I’m bringing them to a gathering, I transport them in a single layer in a container with a tight-fitting lid, keeping them chilled with a small ice pack until serving. I always bring a little extra of whatever coating I used (like extra chopped pecans) in a baggie to refresh any that might have lost a bit in transit. They are always one of the first things to disappear from any potluck table.
Variations & Customizations
The coating is where you can really have fun. While toasted pecans are my favorite, rolling them in crushed gingersnap cookies instead of graham crackers is a phenomenal variation that adds a spicy kick. For a chocolatey twist, you can roll them in cocoa powder, crushed chocolate wafer cookies, or dip them halfway in melted dark or white chocolate. I’ve even seen a version rolled in toasted coconut flakes for a tropical twist on the pumpkin flavor.
You can play with the inner spice profile, too. If you love a stronger ginger note, add 1/4 teaspoon of ground ginger to the mix. For a more complex warmth, a tiny pinch of cardamom or allspice is lovely. If you’re a maple fanatic, you can replace the vanilla extract with pure maple extract, and even use maple sugar in place of some of the powdered sugar for a deeper flavor.
For a lighter version, you can use Neufchâtel cheese (the 1/3 less fat cream cheese), but be prepared for a slightly softer final product that may require a longer chill. I’ve also successfully made these dairy-free by using a high-quality, firm vegan cream cheese alternative. The flavor is slightly different but still delicious, and it makes the treat accessible to more friends.
How to Store, Freeze & Reheat
Storing these is straightforward. Once set, I layer them in an airtight container with parchment paper between layers to prevent sticking. They keep beautifully in the refrigerator for up to 5 days. The flavors actually meld and improve after a day. If you’ve used a nut or crumb coating, it may soften slightly over time, but the taste remains fantastic. Keep them chilled until right before serving for the best texture.
These freeze exceptionally well, making them a fantastic make-ahead dessert. I place the fully coated and set balls in a single layer on a parchment-lined baking sheet and freeze until solid (about 2 hours). Then, I transfer them to a freezer-safe bag or container. They will keep for up to 2 months. This is perfect for getting a head start on holiday baking or always having a treat on hand.
There’s no need to reheat these—they are meant to be enjoyed cold. To serve frozen balls, I simply transfer the desired number from the freezer to the refrigerator and let them thaw for about 1-2 hours. They should be served chilled. Letting them sit at room temperature for more than 20-30 minutes can make them too soft, especially if your kitchen is warm.
Conclusion
These No-Bake Pumpkin Cheesecake Balls are more than just a recipe to me; they’re my little shortcut to autumn joy, a testament to the fact that incredible desserts don’t have to be complicated. They’ve saved me on busy holidays, delighted my guests, and satisfied my pumpkin spice cravings in minutes. I hope this recipe brings a touch of easy, delicious magic to your kitchen and becomes a cherished seasonal tradition for you, too. Now, go roll up some happiness