
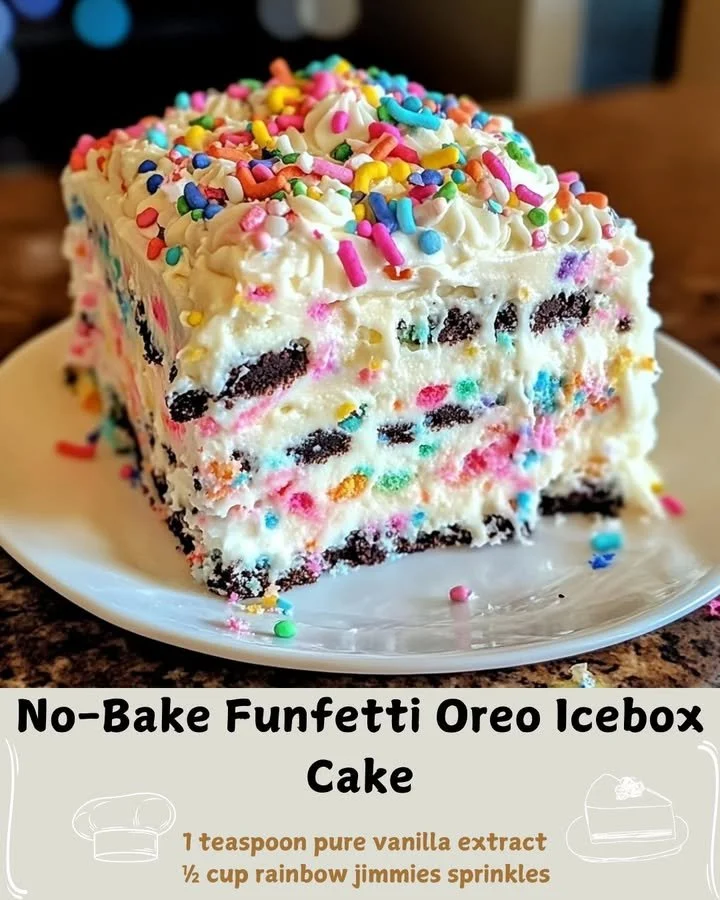
No-Bake Funfetti Oreo Icebox Cake! This dessert is not only easy to whip up but also brings all the flavors of childhood celebrations right into your kitchen. Plus, there’s no baking involved, meaning more time to enjoy the company of friends and family with a big slice of this delightful cake.
Why You’ll Love This Recipe
This No-Bake Funfetti Oreo Icebox Cake has everything you need: rich creamy layers, the crunch of classic Oreos, and a sprinkle of funfetti that makes your heart do a little happy dance. It’s perfect for warm weather, requiring minimal effort and – dare I say – is even more delicious the next day! Trust me, it’s a crowd-pleaser that I often turn to for birthday parties, potlucks, or even just a cozy Sunday afternoon at home. You’ll be amazed at how quickly it comes together, and the best part is watching people’s faces light up as they dig into it! (See the ingredients in the next page below…)
Ingredients
– 1 package of Oreo cookies (regular or double stuff)
– 1 cup of heavy whipping cream
– 1 cup of powdered sugar
– 1 teaspoon of vanilla extract
– 8 oz cream cheese, softened
– 2 cups of whipped topping (like Cool Whip)
– 1 cup of funfetti sprinkles
– 1/4 cup of milk (for dipping cookies)
Equipment Needed
– Mixing bowls
– Electric mixer (hand or stand)
– 9×13 inch baking dish
– Rubber spatula
– Measuring cups and spoons
Step-by-Step Instructions
To start, I gather all my ingredients and equipment, preparing myself for a fun and straightforward baking experience. First, in a large mixing bowl, I whip together the heavy cream, powdered sugar, and vanilla extract until soft peaks form. This is absolutely my favorite part; the sweet, vanilla scent fills my kitchen, making me eager to dive in. I then grab another bowl and mix the softened cream cheese until it’s nice and smooth. Once combined, I gently fold in the whipped topping and sprinkles, creating a vibrant and fluffy filling that truly screams celebration! (See the next page below to continue steps…)
Next, I take my Oreo cookies and dunk them one by one into a shallow bowl of milk, letting them soak just for a second. Too long, and they’ll break apart, which I’ve learned the hard way! I then layer these sweet, milky cookies in the bottom of my 9×13 inch dish, covering the entire base. You want a nice sturdy foundation for this cake! After the first layer is set, I spread half of my creamy funfetti mixture on top of the Oreos, making sure to smooth it out evenly.
I then repeat the process: another layer of dipped Oreos followed by the remaining funfetti cream. To finish it off, I usually reserve some sprinkles to sprinkle on top of the last layer for that extra pop of color and joy. Once it’s all assembled, I cover the dish and pop it in the fridge for at least 4 hours, or preferably overnight, to let it set. The anticipation can be tough, but trust me, the wait is worth it!
Pro Tips for Best Results
One tip that I swear by is to use a mix of regular and double stuff Oreos. The texture and creaminess of the double stuff really elevate the creaminess of the icebox cake. The next time I make this, I’m definitely going to experiment with some flavored Oreos, like mint or pumpkin spice, depending on the season!
Also, pay close attention to how you’re whipping your cream. I’ve found that over-whipping heavy cream can lead to a gritty texture, and nobody wants that. Aim for soft peaks; if you’re unsure, it’s always better to whip a little less than to go overboard!
Lastly, I highly recommend letting this cake sit overnight in the fridge. The longer the cake has to chill, the softer and creamier the layers will become. It really allows the Oreos to absorb the moisture and flavors, creating a perfectly delightful slice!
Common Mistakes to Avoid
While making my No-Bake Funfetti Oreo Icebox Cake, I’ve encountered a few common pitfalls, and I’m here to save you from them! First, don’t skip the chilling time. I once rushed directly to serving after only a couple of hours, and the flavors just didn’t meld together as beautifully. Trust me; every minute in the fridge makes a difference! (See the next page below to continue…)
Another mistake is not properly mixing the cream cheese. You want to make sure it’s nice and creamy before folding in the whipped topping. If you don’t, you could end up with lumps in your filling, and while still delicious, it’s not as visually appealing.
Also, be careful not to soak the Oreos too long in milk. I recommend an abbreviated dunk – just a quick dip! If they are too soggy, they will turn to mush instead of keeping their structure in the colder setting.
Lastly, I’ll say it again: keep the cake sealed while it chills. This will prevent it from absorbing any unwanted smells or flavors from your fridge.
Serving Suggestions
When it comes to serving this delightful cake, I love to keep it simple. Just grab a big spatula and scoop out generous slices topped with extra sprinkles for that festive flair! It pairs wonderfully with some fresh berries, which not only adds a beautiful color contrast but also a refreshing burst of flavor.
If I’m feeling extra indulgent, I like to serve it with a dollop of whipped cream and a sprinkle of crushed Oreos on top. It adds that satisfying crunch and richness that takes this dessert to the next level.
Another fun idea is to serve slices at your next gathering alongside a fun “build your own sundae” bar—add ice cream, chocolate sauce, and whipped cream, so guests can get creative!
Variations & Customizations
One of the beautiful things about this recipe is its versatility. If you’re not a fan of Funfetti, you can swap in chocolate cake mix or peanut butter chips instead of sprinkles for a completely different flavor profile. I even made a version with crushed strawberries folded into the cream mixture once, and wow, it was a hit!
For those who are health-conscious, you can substitute cream cheese and whipped topping for lighter options like Greek yogurt. The outcome has a different texture but remains delicious! Just make sure to adjust the sugar to taste.
Lastly, if you want to make an adult version of this cake, consider adding a splash of vanilla vodka or cake-flavored liqueur. This makes for a fun twist at your next gathering!
How to Store, Freeze & Reheat
This No-Bake Funfetti Oreo Icebox Cake is best stored in an airtight container in the fridge, where it can last for about 3 to 5 days. I usually cover it with plastic wrap or foil to keep it fresh and to protect it from any potential fridge odors.
If you want to make this cake in advance, you can assemble it and freeze it before it sets. Just be sure to thaw it in the fridge overnight before serving. If you freeze it at the right time, it’ll hold its shape beautifully, and you’ll have a delicious dessert ready to go when you need it!
Reheating isn’t really necessary since this cake is intended to be enjoyed cold. However, if you find yourself with leftovers, I suggest bringing it back to room temperature before serving, as the flavors will be even more delightful when they aren’t super chilled.
Conclusion
I hope this No-Bake Funfetti Oreo Icebox Cake will become a staple in your kitchen, just as it has in mine. It’s not only simple to make but also filled with joy, nostalgia, and a sprinkle of fun! Whether you’re enjoying it at a family gathering or just treating yourself on a quiet evening at home, it’s sure to create sweet memories. Happy baking, and don’t forget to share your delicious creations with those you love!