
For the most professional look and easiest handling, I use a small cookie scoop (about 1 tablespoon size) to portion the dough. This ensures every snowball is the same size. Then, I roll them quickly between my palms. Wearing disposable food-safe gloves can also prevent sticking if you have very warm hands.
Common Mistakes to Avoid
My first batch was a sticky, unrollable disaster because my cream cheese was straight from the fridge. I tried to soften it in the microwave and partially melted it. Don’t do what I did. True, patient room-temperature softening is the only way. If you’re short on time, cut the cream cheese and butter into small cubes—they’ll soften faster.
Using cold butter is an equally fatal error. It will not incorporate smoothly and will leave little hard bits throughout your dough. Your butter should press easily with a finger but not be oily or melted. That perfect, pliable texture is key for a smooth mixture.
Skipping the sifting of the powdered sugar seems like a time-saver, but it’s a trap. Those tiny cornstarch lumps in the sugar won’t dissolve and will create gritty pockets in your otherwise perfectly smooth snowballs. Taking two minutes to sift makes a huge difference in the final, luxurious texture.
Not chilling the snowballs long enough before serving is the biggest mistake. They need that full 2+ hours to set up. If you try to eat one right away, it will be delicious but mushy and will lose its shape. The chill time is what gives them that perfect, sliceable, truffle-like consistency. Patience is a key ingredient.
Serving Suggestions
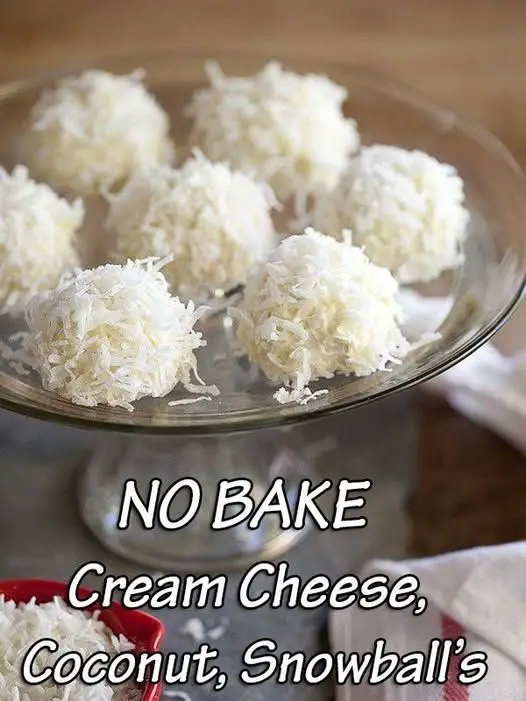
I love serving these snowballs piled high on a elegant white platter or in a festive holiday bowl. They look stunningly simple and beautiful. For a special touch, I sometimes dust the platter with a little extra powdered sugar to mimic a snowy scene.
They are the perfect addition to a cookie swap or dessert charcuterie board. Their white color provides a lovely contrast to darker chocolates and gingerbread. Pair them with a cup of hot coffee, tea, or even a glass of cold milk. The creamy, sweet flavor is a perfect match for bitter beverages.
For a fun holiday presentation, I’ll sometimes stick a mini paper flag or a tiny sprig of edible holly into each one. They also make wonderful homemade gifts when placed in clear cellophane bags tied with a ribbon—a sweet, personal touch that everyone appreciates.
Variations & Customizations
For a citrus twist, add 1 teaspoon of lemon or orange zest to the cream cheese mixture and substitute ½ teaspoon of the vanilla with lemon or orange extract. Roll them in coconut mixed with a little extra zest for a bright, sunny flavor.
If you love chocolate, roll the formed but uncoated balls in sifted cocoa powder, then roll in coconut, or skip the coconut entirely for a chocolate-dusted truffle. You can also stir in ¼ cup of mini chocolate chips into the dough for a chocolate chip surprise inside.
For a “pina colada” version, add ½ cup of very well-drained crushed pineapple (pressed in a paper towel to remove all moisture) to the dough and use 1 teaspoon of coconut extract instead of vanilla. The tropical flavor is incredible.
How to Store, Freeze & Reheat
Store the snowballs in a single layer in an airtight container in the refrigerator. They will keep beautifully for up to 1 week. The coconut may soften slightly, but the flavor will remain excellent. Always serve them chilled for the best texture and consistency.
These snowballs freeze exceptionally well. Place them in a single layer on a baking sheet to freeze solid (about 2 hours), then transfer them to a freezer bag or airtight container. They will keep for up to 3 months. Thaw overnight in the refrigerator before serving.
There is no need to reheat these at all. They are meant to be enjoyed cold, straight from the fridge. Their charm is in their cool, creamy texture. Letting them come to room temperature can make them too soft and sticky.
Conclusion
NO-BAKE Cream Cheese Coconut Snowballs are more than a recipe; they’re a little pocket of cool, creamy joy. They have saved my holiday baking stress, delighted my guests, and proven that the most elegant treats can also be the easiest. They’re a testament to the magic that happens when a few simple ingredients are treated with care. I hope this recipe brings a touch of sweet, snowy magic to your kitchen and becomes a cherished, easy tradition for years to come. Now, go soften that cream cheese and get ready to roll—your new favorite no-bake treat awaits.