
Pouring the chocolate layer onto a warm oat base can cause it to melt and seep into the bottom layer, creating a muddy texture instead of a distinct, fudgy middle. Make sure your pressed oat layer has cooled for at least 5-10 minutes before you add the melted chocolate and peanut butter. This ensures beautiful, defined layers.
Rushing the cooling process by trying to cut warm bars is a recipe for a crumbly mess. The chocolate needs time to set, and the oat layers need to firm up. I was too eager my first time and ended up with a pile of delicious but ugly oat chunks. Patience is the final, most important ingredient for perfect, neat squares.
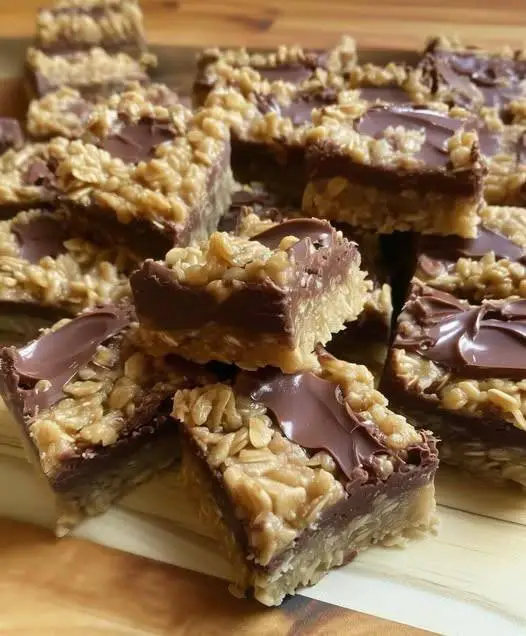
Serving Suggestions
I love presenting these bars on a simple wooden board for a casual gathering. I’ll cut them into different sizes—small squares for a little nibble, and larger rectangles for true chocolate lovers. Arranging them next to a bowl of fresh berries or a pot of coffee makes for an inviting, stress-free dessert spread that always disappears quickly.
For a lunchbox treat or an afternoon pick-me-up, I wrap individual bars in parchment paper and tie them with a bit of twine. They hold their shape perfectly at room temperature, making them the ideal portable snack. My kids love finding these in their bags, and I love knowing they’re eating something homemade.
When I want to dress them up, I’ll drizzle the top with a little melted white chocolate or a simple powdered sugar glaze after they’ve set. A tiny sprinkle of flaky sea salt on top of the chocolate layer before adding the final oat crumble is also a game-changer, balancing the sweetness with a sophisticated salty crunch.
For a decadent dessert, I’ll gently warm a bar for just 10 seconds in the microwave and serve it à la mode with a scoop of vanilla bean ice cream. The contrast of the cold ice cream with the slightly softened, chewy bar is absolutely heavenly. It turns a simple no-bake bar into a restaurant-worthy dessert.
Variations & Customizations
For a nut-free version, you can replace the peanut butter with sunflower seed butter. The flavor is slightly different but still delicious. You can also omit the nuts entirely or substitute with seeds like pumpkin or sunflower seeds. The basic oat-and-butter structure is very forgiving, so feel free to adapt to allergies.
You can play with the chocolate layer endlessly. I’ve used dark chocolate chips for a more intense, less sweet bar, and milk chocolate chips for a kid-friendly version. Swirling in a tablespoon of caramel sauce into the melted chocolate-peanut butter mixture is a fabulous indulgence. A teaspoon of instant espresso powder also adds a wonderful depth.
The add-in possibilities are vast. I love folding 1/2 cup of toasted pecans or walnuts into the oat mixture. Shredded coconut (toasted or plain) adds a lovely tropical twist. For a fruity note, dried cherries or cranberries are fantastic. Mini M&Ms or butterscotch chips can turn them into a fun, colorful treat for parties.
For a different flavor base, try using almond butter or cashew butter instead of peanut butter. You can also infuse the melted butter with a chai spice mix or a pinch of cinnamon and nutmeg for a warm, autumnal version. The recipe is a wonderful blank canvas for your favorite flavor combinations.
How to Store, Freeze & Reheat
Storing these bars is simple. Once fully set, I cut them and store them in an airtight container at room temperature for up to 5 days. I place parchment paper between layers to prevent sticking. They hold up beautifully and actually seem to get chewier and more flavorful by the second day. Avoid the fridge for storage, as it can dry them out.
These bars freeze exceptionally well. I wrap individual bars tightly in plastic wrap and then place them all in a freezer-safe bag or container. They freeze perfectly for up to 3 months. You can thaw them at room temperature for an hour or enjoy them straight from the freezer for a firmer, almost fudge-like texture that I really love.
There’s no need to reheat these bars, as they are meant to be enjoyed at room temperature or cool. If they’ve been in the fridge or freezer and seem too hard, letting them sit on the counter for 20-30 minutes will restore their perfect chewy texture. Do not microwave them to soften, as this can melt the chocolate layer unevenly.
If you’re gifting them or mailing them, they are the perfect treat because they are sturdy and don’t require refrigeration. I pack them in a tin with layers of parchment paper. In warm weather, I might include a small cold pack, but generally, they travel like champions and arrive in perfect, delicious condition.
Nutrition Information
Let’s talk about these bars honestly. They are a rich, energy-dense treat, packed with calories from the butter, sugar, peanut butter, and chocolate. The oats provide a good source of fiber and whole grains, and the nuts (if you add them) offer healthy fats and protein. But ultimately, this is a dessert, meant to be enjoyed in moderation as a sweet indulgence.
You can make some modifications for a slightly healthier profile. Use coconut oil instead of butter (though the flavor changes), a natural peanut butter with no added sugar, and reduce the brown sugar by 1/4 cup. You can also use dark chocolate with a higher cocoa content. The texture will be different, but they will still satisfy a chocolate craving.
A small square is often enough to feel satisfied because they are so rich and flavorful. I find that cutting them into 16 or even 25 smaller pieces helps with portion control. Savoring one piece slowly with a cup of tea or coffee is a wonderful ritual that makes the treat last longer and feel more special.
In my kitchen, this recipe is about more than just ingredients; it’s about the joy of making something quick and delightful from scratch. It’s about having a homemade snack on hand that’s far better than anything from a package. The happiness that comes from sharing these with loved ones is a wonderful part of the experience.
FAQ Section
My bars are too crumbly and fall apart. What went wrong?
This usually means you didn’t cook the butter and sugar mixture long enough, didn’t press the layers firmly enough, or cut them before they were fully set. Ensure you let the butter/sugar simmer for a few minutes, really compact the layers with solid pressure, and allow the bars to cool completely (preferably chilled) before slicing.
Can I use honey or maple syrup instead of brown sugar?
You can, but the texture will be different. Liquid sweeteners like honey make the bars much softer and more prone to sticking. The granulated brown sugar is key for the firm, chewy texture. If you do substitute, reduce the butter by a tablespoon or two, and be prepared for a stickier, softer bar that may need to be kept in the fridge.
Is it okay to use salted butter?
Yes, but then omit any additional salt called for in the recipe. I actually prefer using unsalted butter so I can control the salt level myself. I often add that optional 1/4 teaspoon to balance the sweetness. Salted butter can work perfectly fine, just taste the oat mixture before pressing to see if it needs more.
Can I double this recipe?
Absolutely! Double all the ingredients and press it into a 9×13 inch pan. The process is exactly the same. Just make sure your saucepan is large enough to comfortably hold and stir the doubled oat mixture. This is my go-to move for potlucks or holiday gift-giving. It doubles beautifully.
Why did my chocolate layer get hard and crack when I cut it?
This can happen if the chocolate gets too hot when melting or if you use chocolate chips without any peanut butter. The peanut butter adds fat and helps keep the chocolate layer fudgy. If it does get too hard, simply let the bars come fully to room temperature before cutting, and use a very sharp knife.
Conclusion
These No-Bake Chocolate Oat Bars are my secret weapon for instant kitchen gratification. They prove that you don’t need fancy equipment or hours of time to create something truly special and delicious. I hope this recipe becomes a trusted, joyful staple in your home, ready to rescue any day that needs a little extra sweetness. Now, go grab that saucepan—your perfect, chewy, chocolatey reward is only minutes away.