
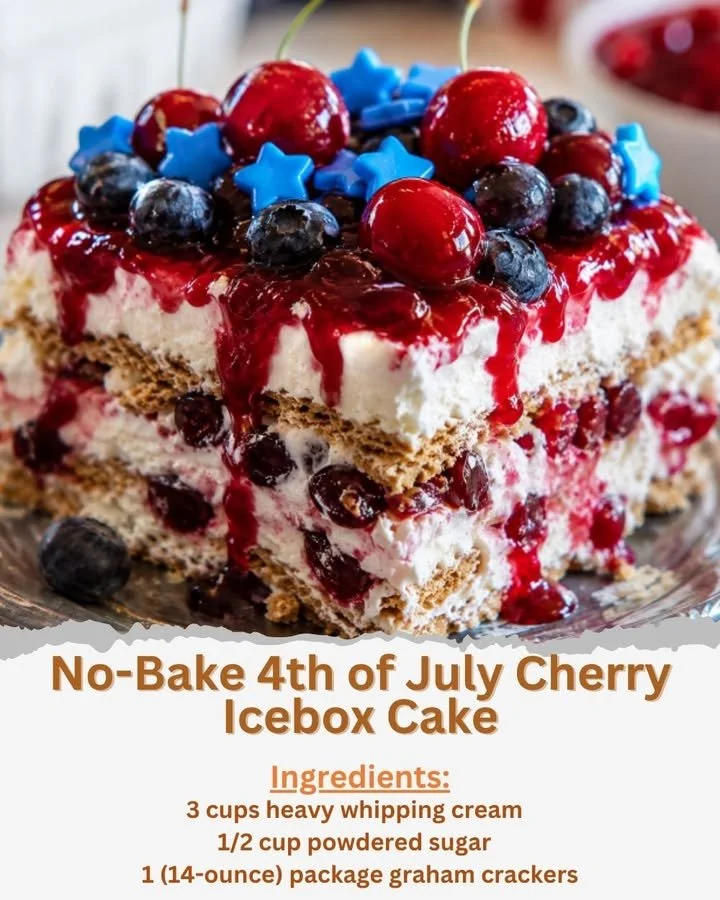
This No-Bake 4th of July Cherry Icebox Cake has become a staple in my kitchen. It’s light, delightful, and visually stunning! Plus, the best part? It requires no baking at all, leaving me free to enjoy the festivities.
Why You’ll Love This Recipe
This cake is perfect for the summer, combining the refreshing taste of cherries with creamy layers that melt in your mouth. It’s incredibly easy to make, and you can prepare it ahead of time, leaving you free to enjoy the festivities with family and friends. Trust me, once you serve this at your 4th of July gathering, you’ll be a hero! It’s a true crowd-pleaser that brings smiles all around. (See the ingredients in the next page below…)
Ingredients
– 2 cups heavy whipping cream
– 1 cup powdered sugar
– 1 teaspoon vanilla extract
– 1 package of graham crackers
– 2 cups cherry pie filling (canned or homemade)
– Fresh cherries for garnish (optional)
– Red, white, and blue sprinkles (optional)
Equipment Needed
– Mixing bowls
– Electric mixer or whisk
– 9×13 inch baking dish
– Spatula
– Plastic wrap
– Optional: piping bag for decoration
Step-by-Step Instructions
First, start by whipping the heavy cream in a mixing bowl until soft peaks form. This is one of my favorite parts because the kitchen begins to smell sweet and creamy as you whip it. Gradually add in the powdered sugar and vanilla extract, continuing to whip until the mixture is light and fluffy. This cream is going to be the heart of your cake! (See the next page below to continue steps…)
Next, it’s time to assemble your cake. In your baking dish, place a layer of graham crackers on the bottom. You want them to be snug but not overlapping too much. Then, spread about one-third of the whipped cream mixture over the graham crackers. This is where things get fun! Spoon a layer of cherry pie filling over the whipped cream, ensuring it covers the cream entirely. The vibrant red color is truly eye-catching!
Repeat these layers—graham crackers, whipped cream, and cherry filling—two more times, ending with a final layer of whipped cream on top. Using a spatula, smooth it out beautifully. For a special touch, I like to add some fresh cherries and red, white, and blue sprinkles on top. Cover the cake with plastic wrap and pop it in the refrigerator for at least 4 hours, or overnight if you can wait that long. The longer it sits, the better the flavors meld together!
Pro Tips for Best Results
I’ve tested this recipe a few ways, and I discovered that using a high-fat content cream makes for a much fluffier whipped cream. If you can find it, go for the freshest heavy cream you can get. It truly makes a difference in texture and flavor.
Also, I like to chill my mixing bowl and whisk ahead of time before whipping the cream. It helps the cream whip up faster and increases the volume, giving you a light and airy result. Plus, it saves you from a bit of elbow grease!
Finally, don’t rush the chilling process. Leaving it overnight makes the difference between a good cake and a great one. During this time, the graham crackers absorb moisture and become soft, blending perfectly with the whipped cream and cherry filling.
Common Mistakes to Avoid
One common mistake when making this cake is not letting it chill long enough. If you serve it too soon, the layers might separate, and the cream won’t set properly. Trust me; it’s worth the wait! It’s a no-bake cake, so a little extra time in the fridge is what transforms this into a heavenly dessert. (See the next page below to continue…)
Another mistake is over-whipping the cream. While we want it fluffy and thick, if it turns grainy or starts to clump together, you’ve gone too far! Always whip on medium speed and stop as soon as you see soft to medium peaks.
Lastly, some people underestimate the importance of layering. Be generous with your cream and cherry filling layers. A thin layer won’t provide the creamy, fruity goodness we’re after! Load it up for a truly decadent and enjoyable bite with every slice.
Serving Suggestions
Serve slices of this gorgeous icebox cake with a dollop of freshly whipped cream on top and maybe a sprinkle of fresh cherries for that extra burst of flavor. It adds a touch of elegance that pairs well with the festive spirit of the 4th of July!
It can also complement a variety of summer dishes. I often serve it after a hearty barbecue meal. The coolness of the cake perfectly contrasts with the smoky flavors of grilled meats and sides. It’s like a refreshing finale that leaves everyone raving!
For an added touch of patriotic flair, I love using decorative plates and serving utensils that showcase red, white, and blue. Presentation is key during holiday gatherings, and this cake is as beautiful as it is delicious!
Variations & Customizations
While cherry is an absolute classic, you can play around with different flavors, too! Strawberries, blueberries, or even mixed berries can give a nice twist. Just switch out the cherry filling for your berry of choice, and maybe even incorporate a layer of homemade berry sauce for extra flavor.
If you want a more indulgent version, consider adding a layer of chocolate ganache or a sprinkle of crushed Oreo cookies in between the layers. Chocolate and cherries are a delightful combination, and it certainly takes this icebox cake to another level if you’re feeling adventurous!
Lastly, for a touch of tanginess, you can mix in some lemon or lime zest into the whipped cream. It adds a refreshing citrus note that balances out the sweetness beautifully.
How to Store, Freeze & Reheat
This No-Bake 4th of July Cherry Icebox Cake can be stored in the refrigerator for up to 5 days. Just be sure to cover it with plastic wrap or keep it in an airtight container to maintain its freshness. But trust me, it won’t last long—it’s that good!
If you want to freeze it, I recommend doing so right after you assemble it, but before the chilling process. Wrap it tightly in plastic wrap and then foil to prevent freezer burn. You can freeze it for up to a month. When you’re ready to enjoy it, transfer it to the refrigerator to thaw overnight before serving.
Reheating isn’t necessary for this dessert, as it tastes best chilled. However, if you’ve frozen it, just choosing to let it thaw in the fridge is the key to maintaining its perfect texture and flavor.
Conclusion
This No-Bake 4th of July Cherry Icebox Cake has become a favorite tradition in my kitchen, and I hope it brings as much joy and delight to your celebrations as it has to mine. It’s bright, festive, and effortlessly delicious, making it the perfect treat for summer gatherings. So go ahead and whip it up for your next event, and I bet you’ll be fielding requests for the recipe in no time! Enjoy the festivities, and happy baking!