
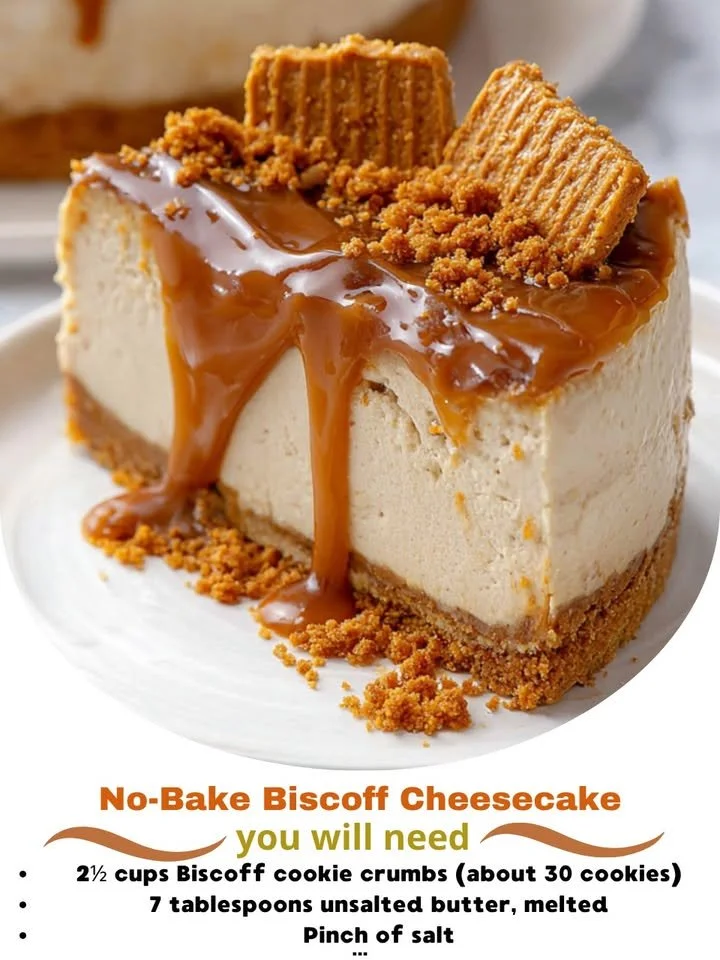
I can’t tell you how many times I’ve found myself daydreaming about a luscious, creamy cheesecake that involves no baking at all. Well, today, I’m thrilled to share my favorite recipe for a No-Bake Biscoff Cheesecake. This dessert combines the delightful flavors of Biscoff cookies with a rich, smooth cheesecake filling that just melts in your mouth. It’s a total crowd-pleaser and the perfect treat for any occasion.
Why You’ll Love This Recipe
What’s not to love about a dessert that is simple, requires no oven, and tastes absolutely divine? The combination of the crunchy Biscoff cookie crust and the velvety cheesecake filling makes my taste buds dance. Plus, this recipe allows me to whip it up in less than an hour, which is a game-changer for busy days! Trust me; once you take that first bite, you’ll be hooked! (See the ingredients in the next page below…)
Ingredients
– 250g Biscoff cookies (crushed)
– 100g unsalted butter (melted)
– 400g cream cheese (softened)
– 200g powdered sugar
– 200ml heavy cream
– 1 teaspoon vanilla extract
– Extra Biscoff cookies for topping
Equipment Needed
– A 9-inch springform pan
– Mixing bowls
– Electric mixer or whisk
– Rubber spatula
– Measuring cups and spoons
– Food processor (optional, for crushing cookies)
Step-by-Step Instructions
To begin with, I love to crush my Biscoff cookies to make that irresistible crust. I often use my food processor for this, but you can also place them in a zip-lock bag and crush them with a rolling pin—just make sure they’re finely crushed! Once that’s done, I mix the cookie crumbs with melted butter until it’s all nice and combined. Then, I firmly press the mixture into the bottom of my springform pan to form a crust. This is where the magic begins! (See the next page below to continue steps…)
Next, it’s time to prepare the creamy cheesecake filling. In a mixing bowl, I whip the softened cream cheese and powdered sugar together until it’s smooth and free of lumps. The sweet aroma that fills my kitchen at this stage is simply heavenly! After that, I gently fold in the heavy cream and vanilla extract, mixing until everything is nicely blended. It’s essential to stop when the mixture is smooth and creamy—overmixing can make the texture off.
Now comes the fun part: pouring the creamy mixture over the crust! I like to use a rubber spatula to spread it evenly, ensuring every corner of the crust gets covered with that luscious filling. Then, I pop the cheesecake into the fridge for at least four hours, but overnight is best if I can stand the wait!
When it’s time to serve, I carefully remove the cheesecake from the springform pan and top it with extra Biscoff cookies for that added touch. Trust me; the presentation is almost as delightful as the taste itself!
Pro Tips for Best Results
I found that letting the cream cheese sit at room temperature for about 30 minutes before mixing makes a big difference. This way, it blends easily with the powdered sugar and becomes super creamy without any lumps. I’ve tested this three ways, and trust me, it’s worth the wait!
Another pro tip is to beat the heavy cream separately until stiff peaks form before folding it into the cream cheese mixture. This gives your cheesecake an airy texture that is just phenomenal. I remember one time I skipped this step, and the cheesecake was still delicious, but it lacked that lightness that makes each bite feel like a cloud.
Lastly, I always recommend tasting the filling before adding it to the crust. This gives you the chance to adjust the sweetness to your liking. Sometimes I add a bit more powdered sugar if I’m feeling adventurous, and you know what? It always turns out fabulous!
Common Mistakes to Avoid
One common mistake I’ve encountered is not pressing the cookie crust down firmly enough. If the crust is too loose, it tends to crumble when you slice the cheesecake. Believe me, I learned this the hard way the first time I made it! Just take a few extra moments to really pack it in, and you’ll be golden. (See the next page below to continue…)
Another thing to avoid is rushing the chilling process. I’ve also made the mistake of trying to serve it too soon. Trust me; patience is key! The cheesecake needs time to set properly, and it will taste infinitely better if you can resist the temptation to dig in right away.
Using cold heavy cream is crucial, too. If it’s too warm, you won’t get those lovely stiff peaks while whipping, which is essential for that light, airy texture of your cheesecake. If you forget to chill it beforehand, just pop it in the freezer for about 15 minutes, and you should be good to go!
Serving Suggestions
Serving this No-Bake Biscoff Cheesecake is as delightful as making it! I like to cut it into small wedges, as the rich flavor means a little goes a long way. You can serve it with a drizzle of caramel sauce or even a dollop of whipped cream for an extra touch of sweetness.
If you’re feeling fancy, adding a sprinkle of crushed Biscoff cookies on top not only looks beautiful but adds an extra crunch that perfectly contrasts with the creaminess of the cheesecake. It’s the kind of dessert that’s both comforting and classy at the same time.
This cheesecake pairs wonderfully with a hot cup of coffee or a cold glass of milk, making it a perfect afternoon treat or after-dinner dessert. Everyone in my family can’t resist coming back for seconds!
Variations & Customizations
One of the things I adore about this recipe is how customizable it is. For a chocolate twist, I’ve used crushed chocolate cookies for the crust instead of Biscoff. It’s a big hit, especially for chocolate lovers! Adding melted chocolate to the cheesecake filling gives it a rich flavor that’s truly decadent.
If you’re looking for a fruity variation, consider adding a layer of fruit compote, like raspberry or strawberry, between the crust and the cheesecake filling. That tartness complements the sweetness of the cheesecake beautifully and adds some color to the presentation.
Lastly, you can experiment with different flavored extracts in the filling. Almond or hazelnut extracts can give a unique flavor profile that makes this cheesecake even more memorable.
How to Store, Freeze & Reheat
Storing your No-Bake Biscoff Cheesecake is super easy. I recommend covering it with plastic wrap or aluminum foil and keeping it in the fridge for up to five days. It stays remarkably fresh, and you can whip it out whenever the craving strikes!
If you’d like to make it ahead of time, this cheesecake freezes surprisingly well. I like to slice it into pieces before freezing for easy servings later. Just wrap each piece tightly in plastic wrap and place them in an airtight container. When you’re ready to enjoy, let it thaw in the fridge for a few hours or overnight.
Reheating isn’t necessary because this cheesecake is best served cold. Just take it out of the fridge, allow it to sit for about 10 minutes at room temperature, and it’s ready to be devoured!
Conclusion
I hope you enjoy making and sharing this No-Bake Biscoff Cheesecake as much as I do! There’s something incredibly satisfying about creating a dessert that brings smiles to everyone’s faces. With its creamy texture and delightful flavors, this cheesecake is sure to be a winning recipe in your kitchen. Happy baking—well, no-baking!