
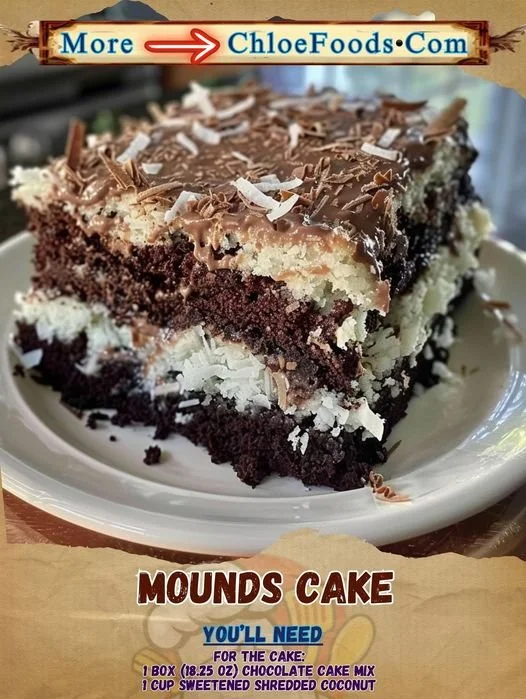
Today, I want to share with you a delightful treat from my kitchen that never fails to impress—Mounds Cake! This rich and indulgent dessert is perfect for any occasion, whether it’s a cozy family gathering or a festive celebration. Trust me, once you take a bite of this chocolate and coconut concoction, you’ll understand why it has a special place in my heart.
Why You’ll Love This Recipe
This Mounds Cake combines the blissful flavors of chocolate and coconut that come together in a way that feels like a warm hug. The moist cake, creamy filling, and luscious chocolate glaze create an irresistible treat that you just can’t resist. Plus, it’s surprisingly easy to make, so you won’t be slaving away in the kitchen for hours. You’ll be amazed at how quickly this cake disappears! (See the ingredients in the next page below…)
Ingredients
– 1 box chocolate cake mix
– 3 large eggs
– 1 cup water
– 1/3 cup vegetable oil
– 1 can (14 oz) sweetened condensed milk
– 2 cups sweetened shredded coconut
– 1 cup heavy whipping cream
– 1 cup semi-sweet chocolate chips
– 1 tablespoon butter
– 1 teaspoon vanilla extract
Equipment Needed
– Mixing bowls
– Electric mixer
– 9×13-inch baking pan
– Rubber spatula
– Saucepan
– Measuring cups and spoons
– Cooling rack
Step-by-Step Instructions
First, I start by preheating my oven to 350°F (175°C) and greasing my trusty 9×13-inch baking pan. In a large mixing bowl, I combine the cake mix, eggs, water, and vegetable oil, using my electric mixer to blend everything until it’s smooth and creamy. The aroma of chocolate fills my kitchen, making me feel excited for what’s to come! Once combined, I pour the batter into the prepared baking pan and pop it into the oven for about 30 minutes, or until a toothpick inserted in the center comes out clean. (See the next page below to continue steps…)
After the cake has baked, I let it cool in the pan for about 10 minutes before transferring it to a wire rack to cool completely. While it cools, I prepare the coconut filling by mixing together the sweetened condensed milk, shredded coconut, and a splash of vanilla extract in a bowl. When the cake is cool, I carefully slice it in half horizontally and spread the coconut mixture evenly over the bottom layer before placing the top layer back on.
Now it’s time for the glaze! In a saucepan, I melt the chocolate chips and butter over low heat until smooth and creamy. I can’t help but steal a little taste—it’s divine! After taking it off the heat, I whip the heavy cream until soft peaks form, then gently fold it into the melted chocolate mixture. This luscious glaze gets spread over the entire cake, bringing everything together beautifully. The final touch is letting the cake set in the refrigerator for at least an hour before slicing.
Pro Tips for Best Results
I’ve tested this cake a few different ways, and I’ve found that using fresh, high-quality chocolate chips really makes a difference in flavor. It elevates the entire dessert! Also, don’t skip the chilling step—allowing it to set in the fridge not only helps the glaze firm up, but it also enhances the flavors as they meld together beautifully over time.
When it comes to the coconut filling, if you prefer a more intense coconut flavor, feel free to add a teaspoon of coconut extract to the mixture. I did this once, and it was like a tropical escape in every bite—so delicious! Lastly, I recommend letting the cake rest for at least 30 minutes out of the fridge before serving, as the flavors shine brightest at room temperature.
Common Mistakes to Avoid
One mistake I made the first time I made this cake was not properly greasing the pan. Trust me, watching your beautifully baked cake stick to the bottom is heartbreaking! Make sure to use either non-stick spray or line the bottom with parchment paper for easy removal. (See the next page below to continue…)
Another pitfall is not letting the cake cool completely before slicing. I know the temptation to dive in is real, but a warm cake won’t hold together as well, and you’ll end up with a messy slice. I once tried to hurry and slice it too early, and my layered cake looked more like a chocolate puddle than anything cohesive!
Lastly, keep an eye on the cooking time. Every oven is a little different, and overbaking can dry out the cake. Make those checks with a toothpick around the 25-minute mark; it should come out clean but not dry.
Serving Suggestions
When it comes to serving my Mounds Cake, I love to top each slice with a dollop of whipped cream and a sprinkle of toasted coconut for that added texture and flavor. It’s a little touch that turns a simple dessert into something truly special. I also enjoy pairing it with a scoop of vanilla ice cream for that perfect contrast of temperatures—warm cake with cold ice cream is pure bliss!
This cake is always a hit at potlucks or family gatherings. The rich flavors and eye-catching presentation make it a showstopper on any dessert table. I sometimes slice it into smaller squares to share, as even a small piece is quite indulgent.
For a more festive touch, try garnishing with chocolate shavings or a drizzle of extra chocolate glaze over the top before serving. It adds a beautiful visual element that will make your guests swoon!
Variations & Customizations
If you want to mix it up, consider swapping out the chocolate cake mix for a vanilla or red velvet cake mix. A vanilla base will allow the coconut flavor to shine even more brightly, while red velvet adds a fun twist and a pop of color. I’ve even tried this cake using a gluten-free cake mix, and it turned out just as decadent and delicious!
For those who prefer a different filling, you could substitute the coconut with homemade whipped cream or even a layer of fruit, such as fresh strawberries or raspberries. This adds a lightness to the cake that balances out the richness beautifully.
I once experimented by adding a hint of orange zest to the coconut filling, and it brought out a subtle citrus flavor that married beautifully with the chocolate glaze. It’s a simple add-in, but it made a world of difference, turning a classic dessert into something unexpectedly delightful.
How to Store, Freeze & Reheat
Storing your Mounds Cake is simple; just keep any leftover cake covered in the fridge. It will last for about 3 to 5 days, although I doubt it lasts that long in my house! The flavors actually deepen the next day, making it even more delicious.
If you have leftover cake and want to freeze it for later, I recommend slicing it and wrapping each piece in plastic wrap, then placing it in an airtight container. It should keep well for up to three months. Just let it thaw in the fridge overnight when you’re ready for a slice of heaven.
Reheating can be done either in the microwave for about 20 seconds or in the oven at a low temperature. I prefer the oven method, as it keeps the cake nice and moist. Just pop it in for about 10 minutes at 300°F (150°C), and you’ll have a warm slice to enjoy!
Conclusion
I truly hope you give this Mounds Cake recipe a try in your kitchen! It’s one of those desserts that not only tastes amazing but also brings people together. I love how a simple slice can spark joy and create memories with loved ones. So, put on that apron, roll up your sleeves, and get ready to create something special. Happy baking!