
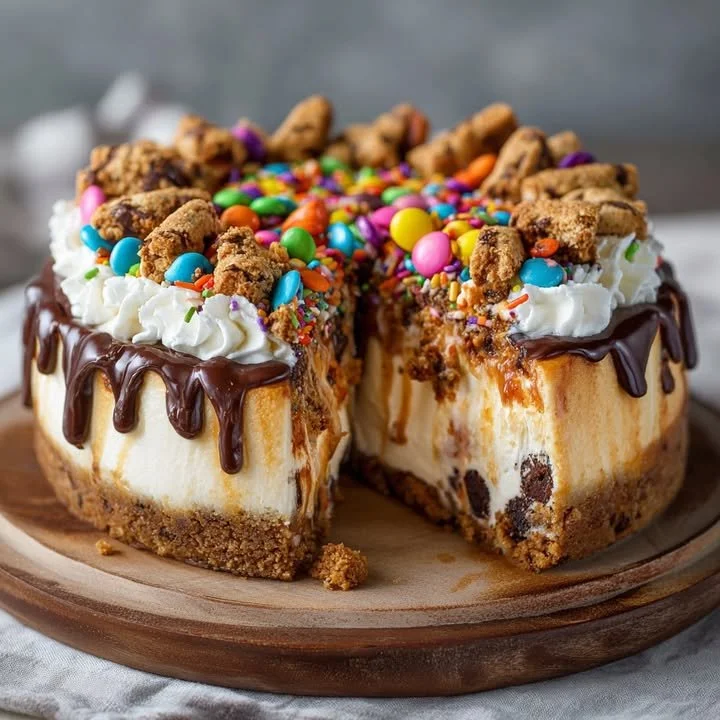
I’m excited to share one of my all-time favorite desserts, Monster Cookie Cheesecake! This delicious concoction is a heavenly blend of two beloved treats—monster cookies and creamy cheesecake—baked together to create a mouthwatering masterpiece. Trust me, once you try this recipe, it will become a staple in your dessert repertoire.
Why You’ll Love This Recipe
This Monster Cookie Cheesecake is a true showstopper, perfect for any gathering or just a cozy night in. With its delightful layers of creamy cheesecake, a chewy cookie crust, and colorful M&M candies, it ticks all the boxes for taste, texture, and visual appeal. Plus, the smell wafting through my kitchen while it bakes is simply out of this world! You will not want to miss out on this incredible treat! (See the ingredients in the next page below…)
Ingredients
– 1 ½ cups graham cracker crumbs
– ½ cup melted butter
– 2 cups cream cheese, softened
– 1 cup sugar
– 3 large eggs
– 2 teaspoons vanilla extract
– 1 cup peanut butter
– 1 cup semi-sweet chocolate chips
– 1 cup M&M candies
– 1 ½ cups oats
– Pinch of salt
Equipment Needed
– 9-inch springform pan
– Mixing bowls
– Electric mixer
– Measuring cups and spoons
– Rubber spatula
– Oven
Step-by-Step Instructions
To start, preheat your oven to 350°F (175°C). Then, grab your springform pan and prepare it by lightly greasing the bottom and sides. I love making the crust first, so in a bowl, combine the graham cracker crumbs with the melted butter and mix until the texture resembles wet sand. Press this mixture firmly into the bottom of the springform pan, then set it aside for a moment. I always find it helpful to chill the crust in the refrigerator while I prepare the cheesecake filling. (See the next page below to continue steps…)
Next, in a mixing bowl, beat the softened cream cheese and sugar together until smooth and creamy. This is the moment when your kitchen starts to smell absolutely divine! Once this mixture is nice and fluffy, add in the eggs, one at a time, mixing well after each addition. Then stir in the vanilla extract and peanut butter until everything is combined. Don’t forget to scrape down the sides of the bowl for good measure!
Now comes the fun part! Stir in the oats, chocolate chips, and M&M candies to the cream cheese mixture, and let that colorful mix brighten up your day. Pour the luscious batter over the prepared crust in your springform pan, spreading it evenly. Bake in the preheated oven for about 50-60 minutes or until the center is set and appears slightly jiggly—this is crucial for that perfect cheesecake texture! Once it’s done, let it cool down on a wire rack and then refrigerate for at least four hours (or overnight for best results) before serving.
Pro Tips for Best Results
When I first tested this recipe, I found that the key to a creamy cheesecake is using room temperature cream cheese. I’ve rushed this step before, and it resulted in a lumpy texture that no one wants in a cheesecake! So take a few minutes to let your cream cheese soften before mixing.
I also recommend letting your cheesecake sit overnight in the refrigerator if you can. This allows all the flavors to meld beautifully and gives you that perfect slice when you cut into it the next day. Trust me; the wait is worth it for the taste explosion!
Lastly, don’t skimp on chilling the crust. It might seem unnecessary, but it really helps keep the crust from becoming too soft and sinking into the cheesecake. So, give it a little extra love by chilling it for at least 30 minutes.
Common Mistakes to Avoid
The first mistake I see people make is overmixing the cheesecake batter. While incorporating ingredients is important, overbeating can introduce too much air, leading to cracks in your cheesecake. I always mix until just combined, and the result has been smooth and crack-free every time! (See the next page below to continue…)
Another mistake is not allowing the cheesecake to cool slowly. I’ve had my share of rushing to put a hot cheesecake in the fridge, only to find it has turned into a rubbery disaster. Allow it to cool on the counter first, and then transfer it to the fridge to set properly.
Also, ensure your oven temperature is accurate. Ovens can be tricky, and if it runs hot, you may end up with a burnt cheesecake. I recommend using an oven thermometer if you’re unsure.
Serving Suggestions
When it comes time to serve your Monster Cookie Cheesecake, I love to accompany it with a drizzle of chocolate sauce or a dollop of whipped cream. You could even add a few extra M&Ms on top for a pop of color! It makes each slice look so inviting and festive; it’s perfect for parties or special occasions.
I also enjoy serving it with a scoop of vanilla ice cream on the side. The combination of warm cheesecake and cold ice cream creates a delightful experience that feels like a special treat after a long day.
Lastly, don’t be shy to experiment with toppings! Fresh fruits like strawberries or raspberries can add a refreshing contrast to the rich cheesecake. I’ve even sprinkled some crushed nuts on top for an added crunch.
Variations & Customizations
One of the greatest things about this Monster Cookie Cheesecake is its versatility! If you’re feeling adventurous, you could swap out the peanut butter for almond or cashew butter for a different flavor profile. It’s amazing how just a simple change in nut butter can create a whole new experience!
Another fun twist I’ve tried is incorporating different candies. Instead of just M&Ms, you could mix in some chopped Snickers, Reese’s Pieces, or even some crumbled Oreos for an exciting flavor combination. The possibilities are endless!
If you want to change the texture, try adding a layer of chocolate ganache on top once it’s completely cooled. Just melt some chocolate with heavy cream for an easy and indulgent topping that takes this cheesecake to another level of delight.
How to Store, Freeze & Reheat
Storing your Monster Cookie Cheesecake is straightforward! Just wrap the cheesecake tightly in plastic wrap or aluminum foil and place it in the refrigerator. It will stay fresh for up to four days, if it lasts that long!
If you want to keep it longer, this cheesecake freezes beautifully. Just slice it into individual servings and wrap them securely in plastic wrap before placing them in a freezer-safe container or bag. It can last up to three months in the freezer. When you’re ready to enjoy a slice, simply thaw it overnight in the refrigerator.
When it comes to reheating, I like to let the cheesecake come to room temperature before serving. You can warm up individual slices in the microwave for about 20-30 seconds, but be careful not to overheat, as you want to preserve that creamy texture!
Conclusion
I hope you feel inspired to try making this delightful Monster Cookie Cheesecake in your own kitchen! It combines nostalgia with creativity, and it always brings a smile to my face (and my friends’ too!). Remember, baking should be fun, so don’t stress if it doesn’t come out perfect on the first try. Enjoy the process, and happy baking!