
The very first time I made these Mint Chocolates, my entire kitchen filled with the most luxurious aroma—a blend of cool peppermint and warm, velvety chocolate that instantly made me feel like I was standing inside a gourmet candy shop. As I swirled the mint layer with the melted chocolate, watching the marbled pattern come to life felt almost therapeutic. When the chocolates finally set and I cut into them, the crisp snap of the layers and the smooth melt-in-your-mouth texture made me fall completely in love. This recipe instantly became one of my go-to holiday treats, and every time I make it, I feel that same little spark of delight.
Why You’ll Love This Recipe
You’ll love this recipe because it delivers that perfect balance between refreshing mint and indulgent chocolate—something store-bought candies try to imitate but rarely achieve. These Mint Chocolates are incredibly easy to make, yet look impressively fancy thanks to the beautiful marbled design. They’re ideal for gifting, holiday trays, or simply keeping in the freezer for those “I need chocolate now” moments. And the best part? The flavor tastes exactly like mint-chocolate heaven, but with a homemade richness you can’t get anywhere else.
Ingredients
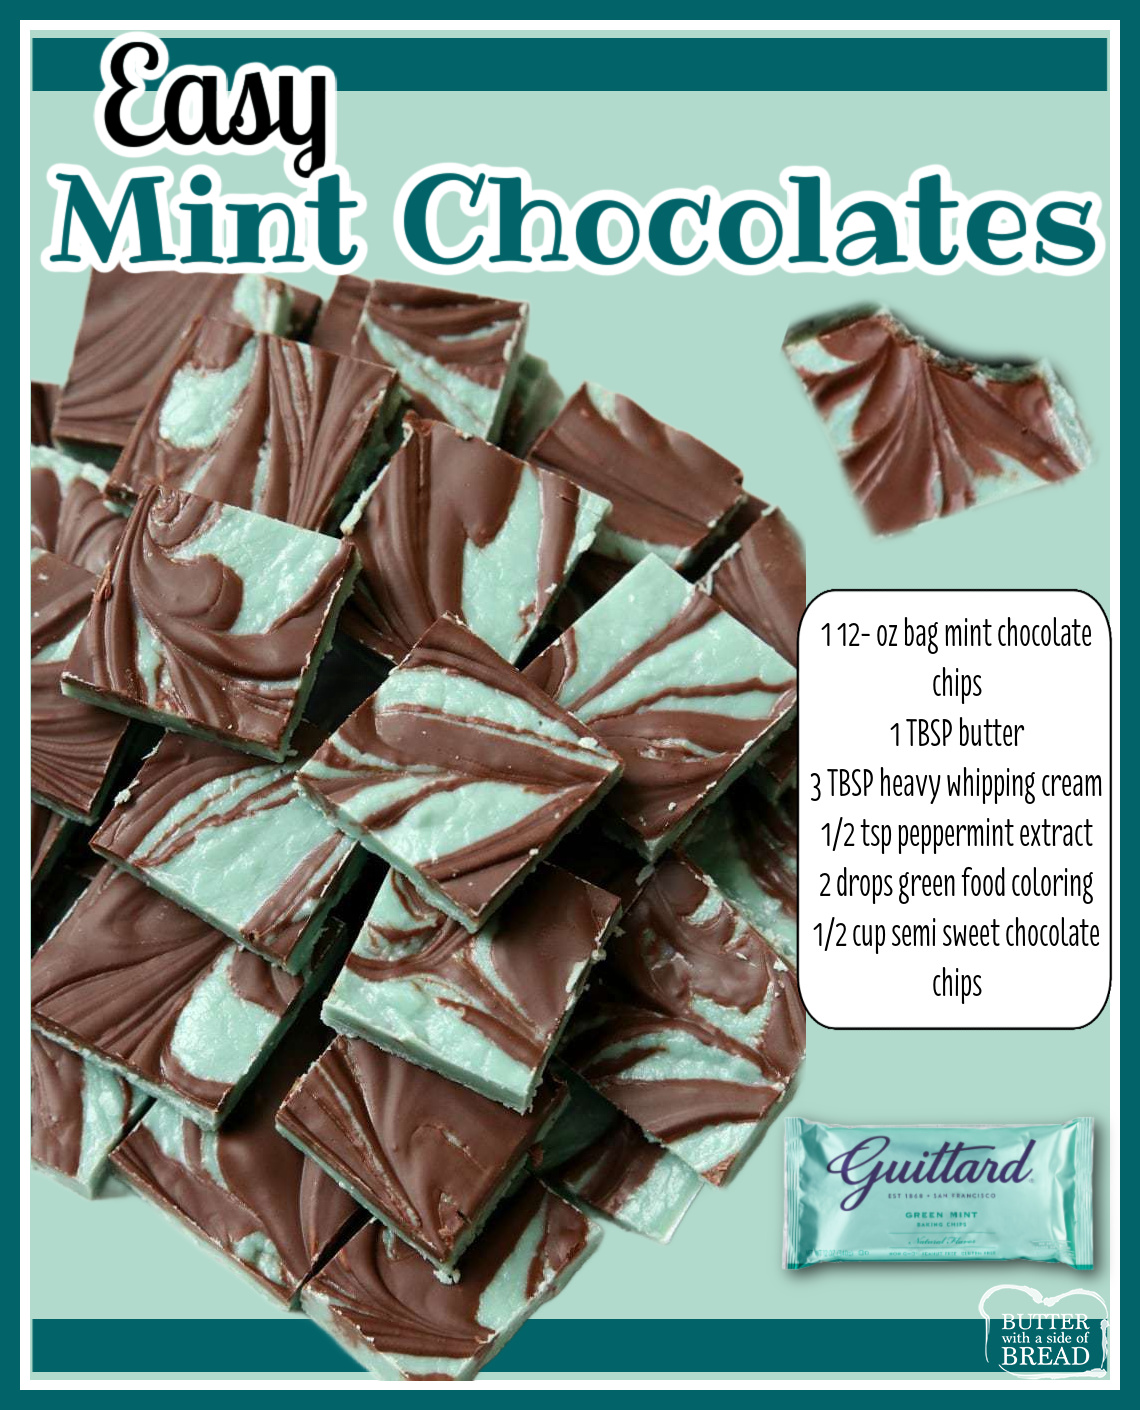
- 1 (12-oz) bag mint chocolate chips
- 1 tablespoon butter
- 3 tablespoons heavy whipping cream
- 1/2 teaspoon peppermint extract
- 2 drops green food coloring
- 1/2 cup semi-sweet chocolate chips
I always use high-quality mint chocolate chips because the flavor truly shines through in this recipe. The butter and heavy cream help create that silky, creamy texture that makes the mint layer smooth instead of chalky. Peppermint extract is essential—it intensifies the flavor without overpowering it, but be careful not to add too much or it can taste medicinal. The green food coloring is optional but adds a fun, refreshing look that makes these chocolates instantly recognizable. And for the swirl layer, semi-sweet chocolate chips melt beautifully and balance out the sweetness.
Equipment Needed
- Microwave-safe bowls
- Silicone spatula
- 8×8 baking pan
- Parchment paper
- Measuring spoons
- Small spoon or toothpick (for swirling)
- Knife for cutting after chilling
A microwave-safe bowl is perfect for melting chocolate in quick, controlled bursts—no double boiler needed unless you prefer it. A silicone spatula really helps scrape every bit of chocolate out so nothing gets wasted. I always use parchment paper in my pan because it lets me lift the whole slab of chocolate out easily once it’s set. A toothpick or the tip of a butter knife works wonderfully for creating the marbled mint-chocolate pattern. And once everything is chilled and firm, you’ll want a sharp knife to slice the chocolates into neat squares.
Step-by-Step Instructions
To begin, I melt the entire bag of mint chocolate chips in a microwave-safe bowl. I do this in 20-second intervals, stirring between each one to keep the chocolate smooth and prevent burning. Once melted, I stir in the butter, heavy cream, peppermint extract, and green food coloring. The mixture transforms into the most gorgeous minty green and already smells like something from a high-end confectionery.(See the next page below to continue…)