
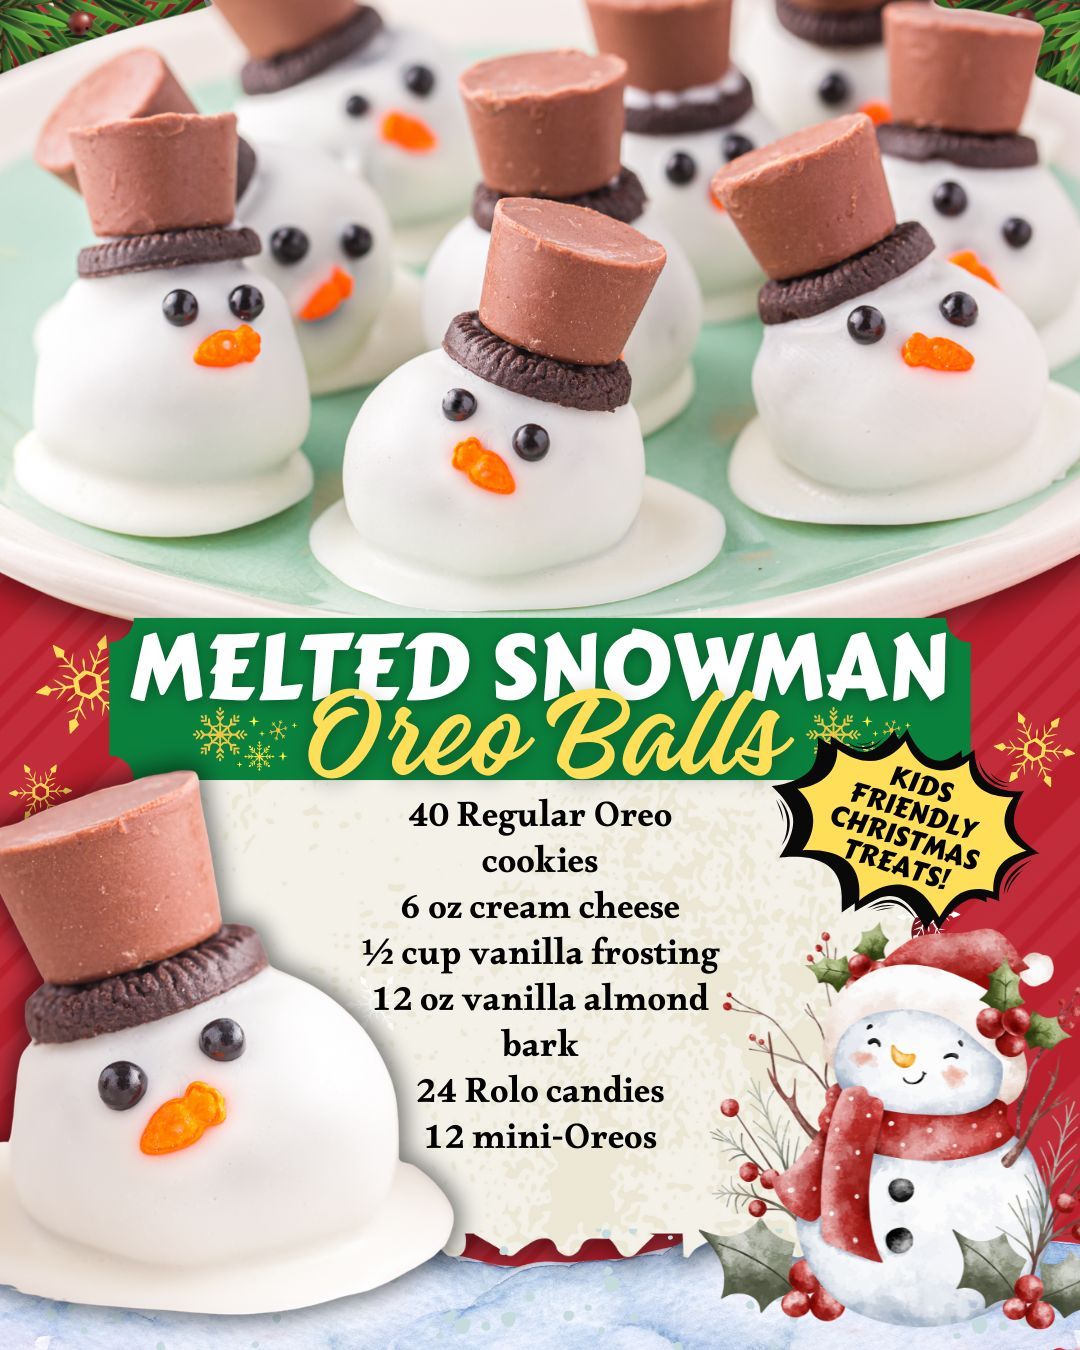
At their core, Melted Snowman Oreo Balls are classic Oreo cookie balls: Oreo cookies are crushed into fine crumbs and mixed with softened cream cheese (and sometimes a bit of vanilla frosting) to form a thick, truffle‑like dough.
This mixture is rolled into 1‑inch balls and chilled until firm, then dipped in melted vanilla almond bark or white baking chocolate. For the “melted” effect, instead of shaking off all the excess coating, you let some of it pool beneath each truffle on the parchment, so they sit in a little white “puddle” that looks like a snowman melting on the ground.
The fun comes from decorating. Mini Oreos and Rolo candies are stacked to make top hats, and sprinkles or decorating gels are used to add eyes, a carrot‑style nose, and buttons on the “puddle.” The result is a dessert that looks like tiny melting Frosties scattered across your dessert platter, but underneath the décor they’re rich cookies‑and‑cream truffles that kids and adults love.
Equipment
- Food processor to crush Oreos into fine crumbs quickly. A zip‑top bag and rolling pin also work if you don’t have a processor.
- Large mixing bowl for combining Oreo crumbs with cream cheese and frosting.
- Spatula or wooden spoon for mixing the truffle filling until smooth.
- 1‑tablespoon or 1‑inch cookie scoop for portioning uniform balls.
- Baking sheets lined with parchment or wax paper for chilling balls and setting the coating.
- Microwave‑safe bowl (or double boiler) for melting vanilla almond bark or white baking chocolate.
- Forks or dipping tools plus a spoon to dip and lift Oreo balls from melted coating and to encourage the “puddle” effect.
- Small knife to split mini Oreos for hat brims.
- Piping bags, squeeze bottles, or toothpicks for applying decorating gels or melted chocolate to make faces.
- Refrigerator space for firming the truffles and setting decorations.
Ingredients (with measurements)
A detailed ingredient list from a popular melted snowman Oreo ball recipe looks like this.
For the Oreo truffle “snowman heads”:
- 40 regular Oreo cookies, crushed into fine crumbs (about 3 cups crumbs; typically 36–40 cookies per batch).
- 6 oz (about ¾ of an 8‑oz block) cream cheese, softened.
- ½ cup vanilla frosting (adds extra sweetness and helps bind; some recipes skip this and just use 8 oz cream cheese).
For the coating:
- 12 oz (about 340 g) vanilla almond bark or white baking chocolate, chopped (often 1½ cups or about 6 squares of almond bark).
- 1–2 teaspoons vegetable shortening or coconut oil (optional, to thin the melted coating if needed).
For the decorations:
- 24 Rolo candies (for top hats).
- 12 mini Oreos (for hat brims; often split in half so one mini Oreo piece per hat).
- Assorted sprinkles for eyes, noses, mouths, and buttons, such as:
- Black confetti sprinkles or mini chocolate chips for eyes.
- Orange jimmies or carrot‑shaped sprinkles for noses.
- Round rainbow sprinkles or mini pearls for buttons.
- Optional black decorating gel and orange icing if you prefer piping faces instead of using sprinkles.
This quantity yields roughly 24 medium Oreo balls, each decorated as a melted snowman.
Instructions and steps
The process begins with making the Oreo truffle base. Whole Oreo cookies (including the filling) are pulsed in a food processor until they form fine, even crumbs with no large pieces remaining. If you don’t have a processor, the cookies can be placed in a sturdy zip‑top bag and crushed with a rolling pin until very fine.
The Oreo crumbs are then combined with softened cream cheese and, in some recipes, vanilla frosting in a large mixing bowl. The mixture is stirred or mixed until fully combined and smooth, with no visible streaks of cream cheese; it should resemble a thick, sticky dough or fudge.
Soft cream cheese at room temperature helps it blend without lumps. Some recipes recommend using a hand mixer for quicker blending, but mixing with a spatula works as well.
Next, the mixture is shaped into balls. Using a small cookie scoop or a tablespoon, portions of about 1 inch in diameter are scooped and rolled between your hands to form smooth balls. These balls are placed on a parchment‑lined baking sheet in a single layer.
The tray then goes into the refrigerator or freezer to chill for 10–30 minutes, until the balls are firm enough to handle and dip without falling apart.
While the Oreo balls chill, the vanilla almond bark or white baking chocolate is melted. The coating is placed in a microwave‑safe bowl and microwaved in 20–30 second intervals at 50% power, stirring between each burst, until fully melted and smooth. If the melted chocolate seems too thick, a teaspoon or two of vegetable shortening or coconut oil can be stirred in to loosen it for easier dipping.
To create the melted snowman look, each chilled Oreo ball is dipped in the melted coating and then set on parchment with purposefully extra coating underneath. Many tutorials recommend using a spoon to roll the ball around in the melted bark, then lifting it out with the spoon or a fork and gently spooning a bit more coating around its base as you set it down. Instead of shaking off all the excess, you allow some of the coating to drip and pool, forming a white “puddle” under the ball.
As you place each coated ball on the parchment‑lined tray, you can nudge the coating with the back of a spoon to spread it into an irregular shape, which adds to the melted effect. Once a few balls are coated and the coating is still wet, it’s time to decorate quickly before it sets.
The snowman hats are assembled using mini Oreos and Rolos. One half of a mini Oreo is placed on top of a coated ball to act as the brim. The narrow end of a Rolo candy is dipped in a bit of melted almond bark and pressed onto the mini Oreo piece as the top of the hat, forming a little top hat structure. Extra melted bark is used like glue to hold the hat in place, if necessary.
Faces and buttons are added with sprinkles or icing. Tiny black sprinkles or mini chocolate chips can be pressed into the still‑soft coating for eyes, an orange sprinkle or carrot‑shaped candy is pushed in as a nose, and small round sprinkles or pearls can be placed on the puddle to represent buttons or scattered coal.
Alternatively, once the coating has set slightly but is not fully hardened, you can pipe eyes, nose, and mouth with black decorating gel and orange icing. Using toothpicks as tools can help position tiny decorations precisely.
This process continues—dip, puddle, decorate—until all the Oreo balls are transformed into melted snowmen. The tray is then transferred to the refrigerator for about an hour or until the coating and decorations are fully set. Once set, the Melted Snowman Oreo Balls can be arranged on a platter, and any stray bits of pooled coating around the edges can be broken off or left on for extra “snow.”
These truffles should be stored in the refrigerator in an airtight container and are best served chilled or slightly cool, as the cream‑cheese‑based centers can soften at warm room temperatures. Many recipes note that they keep well for several days, making them ideal for preparing ahead of Christmas parties or cookie exchanges.
Variations
Melted Snowman Oreo Balls are very flexible, so you can tweak the flavors, decorations, and base cookies while keeping the same look. One simple variation is to swap regular Oreos for flavored ones, like mint Oreos, golden Oreos, or holiday‑themed Oreos; mint makes the truffles more like cookies‑and‑cream with a cool twist, while golden Oreos yield a vanilla‑cheesecake flavor. Some recipes mix Nutella or peanut butter with the cream cheese and Oreo crumbs to add hazelnut or peanut flavor to the filling.
The coating can also change. Vanilla almond bark is popular because it melts smoothly and sets firmly, but white baking chocolate or white candy melts work too. You can even swirl a little blue candy melt into the white to create a frosty, marbled snow effect. Holiday sprinkles or edible glitter can be scattered over the wet coating for a more whimsical, snowy surface.
Hat designs are highly customizable. Instead of mini Oreos and Rolos, some versions use mini peanut butter cups, chocolate buttons, or fondant circles topped with chocolate candies to build hats.
Scarves can be made by wrapping a thin strip of fruit leather or red fondant around the base of the snowman head, adding another festive detail. Candy eyes from the baking aisle can simplify face‑making, especially when cooking with kids.
You can also adjust the “melted” look. If you prefer upright snowmen, you can form two sizes of Oreo balls—one larger, one smaller—and stack them before dipping, then dip and decorate so they stand tall rather than appear melted. For a more dramatic melt, you can use a slightly smaller Oreo ball and a bigger puddle of coating, emphasizing a flat, spread‑out snow shape with the hat and face leaning at a playful angle.
Finally, there are simple, less decorated versions where Oreo balls are just dipped in white coating and a quick snowman face is piped on, skipping hats and puddles entirely. These are faster to assemble but still clearly read as snowmen, making them a good option when time is short.
Across all variations, the core idea remains consistent: blend Oreo crumbs with cream cheese to form rich truffle centers, chill and dip them in white coating, then use clever decorating touches to turn each one into a melted snowman.
This combination of simple ingredients, no‑bake prep, and kid‑friendly decorating makes Melted Snowman Oreo Balls a standout holiday project and a charming addition to any winter dessert spread.