
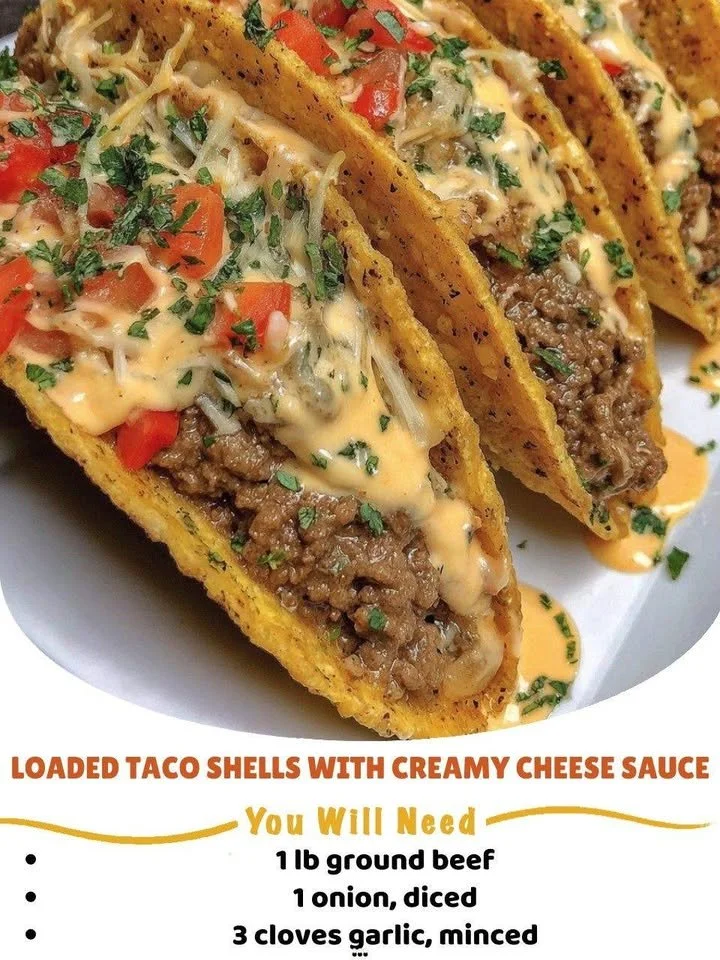
I absolutely love taco nights in my kitchen, and one of my all-time favorite recipes is Loaded Taco Shells with Creamy Cheese Sauce. This dish combines everything I adore about tacos—savory meat, fresh toppings, and a rich cheese sauce that coats every bite in luscious gooeyness. Whenever I serve these loaded taco shells, they disappear faster than I can say “taco Tuesday!” It’s a crowd-pleaser at family gatherings, game nights, and casual dinners alike. Let’s dive into this delicious recipe!
Why You’ll Love This Recipe
What I cherish most about Loaded Taco Shells is how easily they can be adapted to suit your taste preferences. Whether you’re a meat lover or a vegetarian, you can easily customize the filling. Plus, the creamy cheese sauce is a delightful twist that elevates the traditional taco experience. The contrast of the crunchy taco shell with the rich, cheesy goodness is simply irresistible. Trust me when I say you’ll want to devour these again and again! (See the ingredients in the next page below…)
Ingredients
- 10 taco shells
- 1 pound ground beef (or plant-based alternative)
- 1 packet taco seasoning
- 1 cup water
- 1 cup grated cheddar cheese
- 1 cup cream cheese
- ½ cup sour cream
- 1 tablespoon milk
- 1 teaspoon garlic powder
- ½ teaspoon onion powder
- Fresh toppings: diced tomatoes, shredded lettuce, sliced olives, and chopped cilantro
Equipment Needed
- Large skillet
- Mixing bowl
- Whisk
- Baking sheet
- Spoon for serving
Step-by-Step Instructions
First, I start by preheating my oven to 350°F (175°C) because those taco shells need a warm, crispy touch before we load them up. In a large skillet over medium heat, I brown the ground beef until it’s cooked through. The smell of sizzling meat warms my kitchen, making it feel inviting. Once cooked, I add the taco seasoning and water, letting it simmer for about 5 minutes until the mixture thickens. This is when you’ll want to inhale deeply; it smells incredible! (See the next page below to continue steps…)
Next, I whip up the creamy cheese sauce. In a mixing bowl, I combine the grated cheddar cheese, cream cheese, sour cream, milk, garlic powder, and onion powder. I whisk everything until it’s smooth and deliciously creamy. Once the cheese sauce is ready, it becomes the highlight of the dish! After that, it’s time to assemble our taco shells. I spread a layer of the meat mixture in each shell, pouring over the velvety cheese sauce generously as I go. By the time I’m stacking these loaded beauties on a baking sheet, my mouth is watering just imagining how they’ll taste.
Pop them in the preheated oven for about 10 minutes. This allows the cheese to melt harmoniously over the filling, creating an inviting appeal that’s hard to resist. I often find myself sneaking a peek at them through the oven window, watching the cheese bubble and brown. When I finally pull them out, the combination of crispy shells and melty cheese is just perfect. Now, all that’s left is to top them with fresh ingredients like diced tomatoes, lettuce, olives, and a sprinkle of cilantro. They look amazing, and I can’t wait to dig in!
Pro Tips for Best Results
I tested this recipe three ways before I settled on my favorite method. One time, I used low-fat cream cheese and realized the texture wasn’t as creamy. So, I switched back to regular cream cheese for that superior mouthfeel. Trust me, when it comes to cheesy sauces, don’t skimp on quality!
Also, I recommend letting your meat mixture cool slightly before adding the cheese sauce. This way, the cheese doesn’t just slip off and instead clings beautifully to your taco filling. Plus, letting it cool a bit provides a balance of temperature that everyone will appreciate when taking their first bite.
Lastly, I learned the hard way to prepare more taco shells than you think you’ll need. Friends and family seem to have a radar for delicious food, and they tend to come back for seconds (or thirds!).
Common Mistakes to Avoid
One of the biggest pitfalls I’ve encountered is overloading the taco shells. It’s tempting to pile on all the fillings, but too much can lead to messy tacos that make a true mess of your hands. I find that about three tablespoons of meat and cheese sauce per shell is a great balance—enough to satisfy without the risk of everything tipping over!
Another mistake is not warming the taco shells before filling them. Cold shells lead to a less appetizing texture, and who wants that when we’re aiming for crispy goodness? A quick spell in the oven before loading them up makes a world of difference.
I also recommend being cautious with seasoning in your cheese sauce. It can be easy to go a bit overboard with garlic or onion powder. I once made that mistake and ended up overpowering the gentleness of the cheese. It’s all about balance, ensuring the cheese shines through as the star of the dish!
Lastly, don’t forget to add your fresh toppings! It can be easy when you’re so eager to enjoy the taco shells to skip this part, but those toppings add color, crunch, and freshness that enhance the overall experience. (See the next page below to continue…)
Serving Suggestions
When it comes time to serve, I like to lay out a taco bar. It’s always fun to let everyone customize their loaded taco shells with their favorites! I arrange bowls full of fresh toppings from diced tomatoes to zesty pickled jalapeños. Watching my friends and family create their unique combinations adds a personal touch that everyone seems to appreciate.
In addition to the taco shells, I usually prepare a side of Mexican-style rice or black beans to round out the meal. These dishes complement the loaded taco shells beautifully, and they keep the table vibrant and inviting.
To drink, I often go for a light beer or a classic margarita. The citrusy flavors work wonderfully with the richness of the cheesy taco shells. Honestly, it’s the perfect pair!
Variations & Customizations
One of my favorite variations is to swap out the meat for shredded chicken or even a vegetarian protein like lentils. I appreciate how versatile this recipe can be, and it’s easy to find options that work for everyone’s dietary preferences. Just ensure you season your chicken or lentils to make them just as flavorful!
For a spicy kick, you might consider adding diced jalapeños or even a drizzle of your favorite hot sauce in with the cheese sauce. I once added a dash of chipotle powder to the cheese sauce, and the smoky flavor was a delightful surprise!
If you’re feeling adventurous, why not transform these loaded taco shells into a breakfast version? Simply fill the shells with scrambled eggs, crispy bacon or sausage, and top them with the creamy cheese sauce. It’s an unconventional twist that I guarantee breakfast enthusiasts will love!
How to Store, Freeze & Reheat
If you happen to have leftovers (which is rare in my kitchen, but it can happen!), I recommend storing any unfilled taco shells separately from the meat mixture and cheese sauce. Keep everything in airtight containers in the fridge, and they should last about three days.
For longer storage, you can freeze the filling and cheese sauce together. I often portion them into freezer-safe bags, squeezing out any excess air. They can be frozen for up to two months—perfect for a quick meal later! Just remember to label your bags so you know what you’re reaching for!
When it’s time to reheat, just defrost in the refrigerator overnight and then warm the filling and sauce in the microwave. Warm your taco shells in the oven until they’re nice and crispy again, and you’ll have a delicious meal that tastes almost as good as the first time around.
Conclusion
I truly hope you enjoy making and sharing these Loaded Taco Shells with Creamy Cheese Sauce as much as I do. It’s a recipe that never fails to impress, whether I’m cooking for my family or hosting friends. It captures that essence of togetherness and joy that good food brings. So gather your ingredients, get cooking, and relish every gooey, savory bite! Happy cooking!