
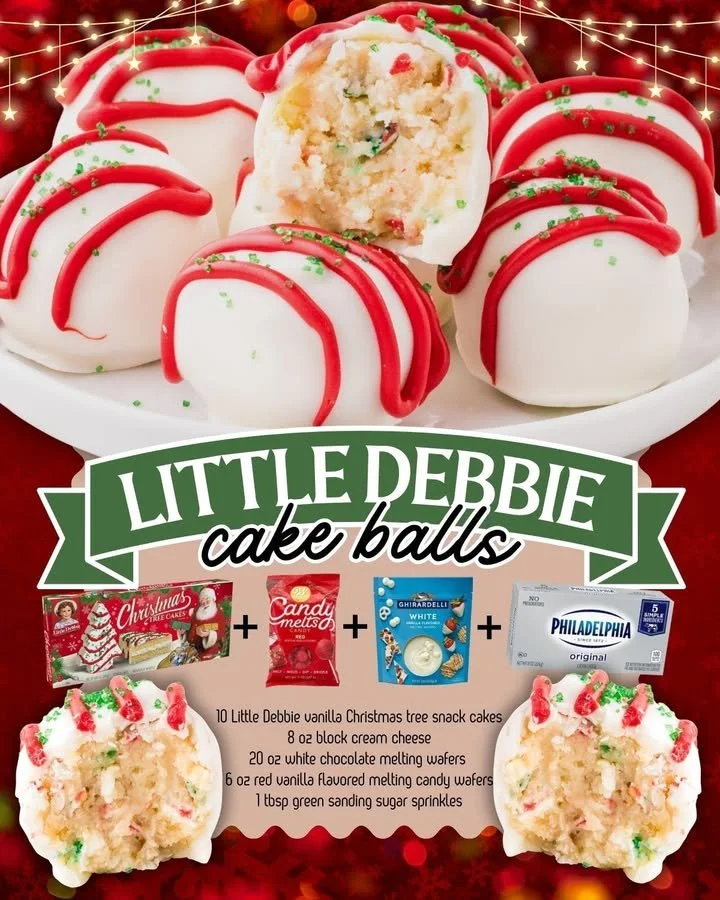
The holiday season always brings a special kind of magic to my kitchen, and one of my favorite treats that embodies that festive spirit is the Little Debbie Christmas Tree Cake. Imagine taking that nostalgic indulgence and transforming it into adorable cake balls; it’s a fun and delicious way to spread holiday cheer! Today, I’m excited to share my recipe for Little Debbie Christmas Tree Cake Balls, which are perfect for holiday gatherings, gift-giving, or simply enjoying with a warm cup of cocoa.
Why You’ll Love This Recipe
These Little Debbie Christmas Tree Cake Balls are not only ridiculously easy to make, but they also capture the creamy, sweet flavor and festive colors we all know and love. Coated in white chocolate and dusted with sprinkles, they’re bound to be a hit at any gathering. Trust me, once you take a bite, you’ll be back for seconds! (See the ingredients in the next page below…)
Ingredients
– 2 boxes of Little Debbie Christmas Tree Cakes
– 8 oz cream cheese, softened
– 1 lb white chocolate (or candy melts)
– Festive sprinkles for decoration
– Optional: peppermint extract for an extra flavor boost
Equipment Needed
– Mixing bowl
– Electric mixer or blender
– Baking sheet
– Parchment paper
– Melting pot or microwave-safe bowl
– Fork or dipping tool for coating
Step-by-Step Instructions
To start, I like to take the Little Debbie Christmas Tree Cakes and crumble them into a mixing bowl. Using my electric mixer, I blend them with the softened cream cheese until I get a smooth, thick batter. The combination of the iconic cake’s flavor with the cream cheese creates a deliciously rich base! Once everything is mixed, I chill the batter in the fridge for about 30 minutes. This will make it easier to scoop into balls. (See the next page below to continue steps…)
After chilling, I take the batter out and roll it into bite-sized balls, about one inch in diameter. I find that using a cookie scoop helps keep them consistent in size. As I shape each ball, I can’t help but think about how cute they’ll look coated in white chocolate! Once rolled, I place them back on the baking sheet lined with parchment paper and pop them in the fridge for another 15 minutes to firm up a bit.
Next, it’s time for the fun part: melting the white chocolate! In my melting pot (or microwave-safe bowl), I gently melt the chocolate until smooth and creamy. I always make sure to stir it well, as a silky texture is crucial for dipping. After that, I dip each chilled cake ball into the white chocolate, fully coating it. I love how it glides on, creating a perfect, shiny finish. Immediately after, I sprinkle on my festive colors, which makes them look extra festive!
Finally, I let them cool on the parchment-covered baking sheet until the chocolate sets. Once set, I can store these delightful cake balls in an airtight container and enjoy them throughout the holiday season. They practically disappear at parties, leaving everyone asking for the recipe!
Pro Tips for Best Results
One of my biggest tips is to ensure the cream cheese is truly softened before mixing. I’ve tested this recipe with cold cream cheese, and it just doesn’t blend as well, which affects the smooth texture of the cake balls. Trust me, soft cream cheese makes a world of difference!
I also recommend using high-quality white chocolate or candy melts for coating. I tried several brands, and some just didn’t melt properly or left a weird texture. The best ones give that lovely shine and snap once they set, making your cake balls look bakery-worthy!
Finally, get creative with the decorations! I’ve experimented with different types of sprinkles, and it’s a great way to customize your cake balls for different gatherings – think gold and silver for New Year’s or even edible glitter for a winter wonderland theme.
Common Mistakes to Avoid
One mistake I made was not chilling the mixture long enough before rolling it into balls. If the batter is too soft, the balls won’t hold their shape, making it a messy situation during dipping. I learned the hard way that a proper chill makes all the difference! (See the next page below to continue…)
Another common issue is not properly melting the white chocolate. If it gets overheated or isn’t stirred enough, it can seize up, becoming grainy instead of smooth. I’ve found that melting it in short intervals and stirring often is the way to go for a glossy finish.
Also, be mindful of how you apply the sprinkles. I once tried to sprinkle them on after the chocolate had set, and they just bounced right off! Timing is everything: after dipping, sprinkle while the chocolate is still wet for the best adherence.
Serving Suggestions
These cake balls are perfect for holiday parties, and I love to serve them on a beautiful platter adorned with some festive greenery. You can also gift them in small cellophane bags tied with ribbons; they make for delightful homemade gifts that friends and family will cherish!
For a cozy night in, I often pair these cake balls with hot cocoa or a festive flavored coffee. The sweetness of the cake balls balances beautifully with a warm beverage, creating the perfect cozy treat experience.
Another fun idea is to use these cake balls as part of a dessert table spread during your holiday gatherings. They can be the star attraction among cookies, cupcakes, and other festive desserts, drawing everyone in with their cheerful appearance!
Variations & Customizations
I love experimenting with flavors, and one variation I recommend is adding a hint of peppermint extract to the cream cheese mixture. It gives the cake balls a refreshing twist that’s perfect for the holidays! If you’re a fan of chocolate, trying a chocolate ganache coating instead of white chocolate is also delicious.
If you’re feeling adventurous, you can also incorporate flavored cake mixes instead of just using the Christmas tree cakes. Imagine the possibilities with red velvet or even gingerbread – your cake balls could fit right into any holiday theme!
Lastly, I’ve tried adding a dollop of fruit preserves or flavored cream cheese as a center for a surprise burst of flavor. Raspberry or even orange marmalade creates a delicious contrast to the sweet outer coating, making each bite unique!
How to Store, Freeze & Reheat
Storing these Little Debbie Christmas Tree Cake Balls is easy! I recommend keeping them in an airtight container in the fridge, where they can last for up to a week. If you’re like me and want to keep them around a bit longer, you can freeze them! Just layer them between parchment paper in a freezer-safe container, and they’ll stay fresh for up to three months.
When it comes to thawing, I prefer to let them sit in the fridge overnight. This helps maintain their texture, and they’re as delicious as when they were first made. I’ve tried thawing them at room temperature, but they can get a bit too soft for my liking.
Reheating isn’t usually necessary since these are meant to be enjoyed cold, but if you want that fresh-from-the-fridge taste, just let them sit out for about 15 minutes before serving. That extra bit of warmth makes the flavors even more vibrant!
Conclusion
I hope this recipe brings joy and sweetness to your holiday celebrations, just as it does in my kitchen. Making Little Debbie Christmas Tree Cake Balls is not only enjoyable, but it’s also a beautiful way to share the flavors and memories of the season with loved ones. Happy baking, and may your holidays be filled with laughter, love, and delicious treats!