
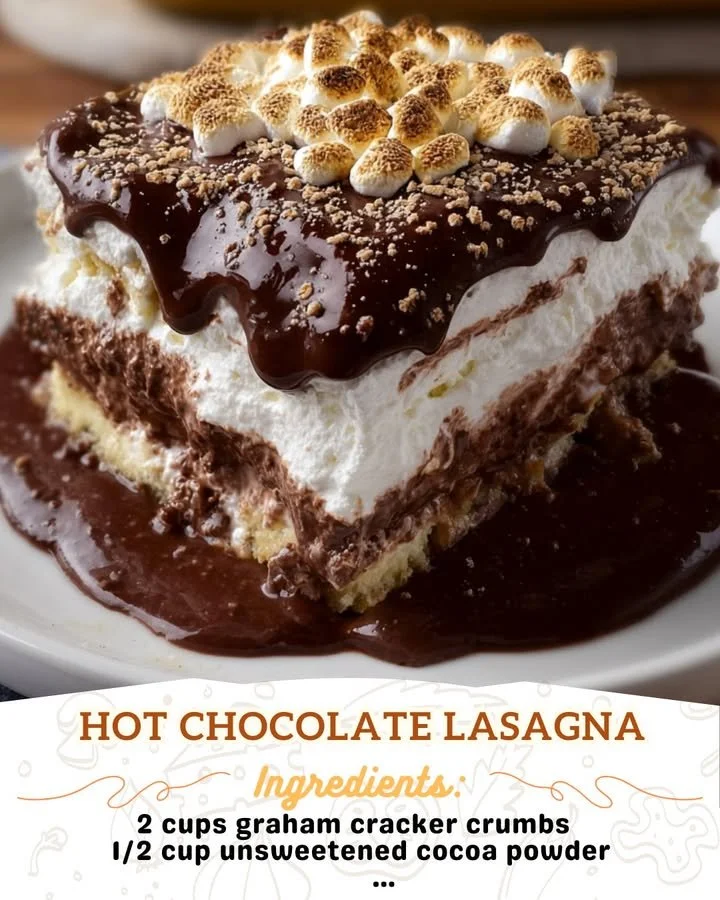
The first time I made Hot Chocolate Lasagna, it was during a cold winter evening when I was craving something chocolatey but a little more fun than the usual brownies. I remember standing in my kitchen, the smell of cocoa powder and sweet cream filling the air, and thinking how comforting it felt to layer everything together like a dessert version of lasagna. When I finally cut into it and saw those beautiful layers of chocolate pudding, creamy filling, and crushed cookies, I knew I had found a dessert that would quickly become a favorite in my kitchen.
Why You’ll Love This Recipe
When I make Hot Chocolate Lasagna, it always feels like the ultimate cozy dessert, and I think you’ll feel the same way when you try it. You get layers of rich chocolate flavor, creamy texture, and a crunchy cookie base that all come together in one irresistible bite. I love how easy it is to prepare ahead of time, which makes it perfect for gatherings, holidays, or just a relaxing weekend treat. Trust me, once you taste those creamy chocolate layers, you’ll understand why I keep making it again and again. (See the ingredients in the next page below…)
Ingredients
- 36 chocolate sandwich cookies (about 3 cups crushed)
- 6 tablespoons unsalted butter, melted
- 1 package (8 oz) cream cheese, softened
- 1 cup powdered sugar
- 2 cups whipped topping, divided
- 2 packages (3.9 oz each) instant chocolate pudding mix
- 3 cups cold milk
- 1 cup mini marshmallows
- ½ cup mini chocolate chips
- 2 tablespoons cocoa powder for dusting
Equipment Needed
- 9×13 inch baking dish
- Mixing bowls
- Electric hand mixer or stand mixer
- Rubber spatula
- Whisk
- Measuring cups and spoons
- Food processor or zip bag with rolling pin
Step-by-Step Instructions
When I start making this dessert, the first thing I do is prepare the cookie crust. I crush the chocolate sandwich cookies until they turn into fine crumbs. Sometimes I use a food processor, but honestly, I often just put them in a zip-top bag and roll over them with a rolling pin. Once they’re finely crushed, I mix them with the melted butter until the crumbs look like wet sand. I press this mixture firmly into the bottom of a 9×13 dish. Don’t rush this step—I learned the hard way that a loose crust will crumble when you slice the dessert.(See the next page below to continue steps…)
Next, I prepare the creamy layer that gives this dessert its soft, fluffy texture. I beat the softened cream cheese and powdered sugar together until smooth and creamy. Then I gently fold in one cup of whipped topping. I’ve tried mixing it aggressively before, and trust me, folding it gently makes the filling lighter and smoother. Once it’s ready, I spread it carefully over the cookie crust. It creates a beautiful creamy layer that balances the richness of the chocolate pudding later.
For the chocolate layer, I whisk together the instant pudding mix and cold milk in a bowl until it thickens. This part always smells incredible because the chocolate scent fills my kitchen immediately. I let the pudding sit for a minute to firm up slightly before spreading it over the cream cheese layer. If you spread it too quickly while it’s still thin, it can mix with the layer below. I learned that patience here makes a big difference in keeping those neat layers.
Finally, I finish the dessert with the toppings that give it that classic hot chocolate vibe. I spread the remaining whipped topping over the pudding layer and sprinkle mini marshmallows, chocolate chips, and a dusting of cocoa powder on top. When I step back and look at the finished dish, it always feels a little magical—like a cozy mug of hot chocolate transformed into a chilled dessert. I place it in the fridge for at least four hours so the layers can set properly before slicing.
Pro Tips for Best Results
I tested this dessert a few different ways, and one thing I learned quickly is that chilling time is extremely important. If you try to cut into it too early, the layers won’t hold together properly. I always let it chill for at least four hours, but overnight is even better. The flavors blend beautifully and the texture becomes much firmer.
Another thing I discovered through trial and error is that softened cream cheese makes a huge difference. The first time I made this, I tried mixing it straight from the fridge, and it left small lumps in the filling. Now I always let it sit on the counter for about 30 minutes before mixing, and the texture becomes perfectly smooth.
One last tip I swear by is using whole milk for the pudding layer. I’ve tried using lower-fat milk, and while it technically works, the pudding ends up thinner. Whole milk gives the dessert a richer texture and helps the pudding set beautifully between the layers.
Common Mistakes to Avoid
The biggest mistake I made the first time I prepared this dessert was not pressing the cookie crust firmly enough. When I tried to serve it, the crust crumbled and fell apart. Now I always use the bottom of a measuring cup to press the crust down tightly so it forms a solid base. (See the next page below to continue…)
Another mistake is rushing the pudding layer. I once poured the pudding mixture over the cream cheese layer before it thickened properly, and the two layers blended together. Letting the pudding sit for a minute or two before spreading makes a huge difference in keeping those beautiful layers intact.
Using warm ingredients can also cause problems. If the pudding mixture or whipped topping is too warm, it can soften the cream cheese layer and make the dessert messy. I always make sure everything is cold and ready before assembling the layers.
Finally, don’t skip the chilling time. I know it’s tempting to dig in right away, but this dessert really needs time in the refrigerator to firm up. Trust me, waiting a few hours will reward you with perfectly clean slices and much better texture.
Serving Suggestions
When I serve Hot Chocolate Lasagna, I love adding a few extra mini marshmallows and chocolate shavings on top right before bringing it to the table. It makes the dessert look festive and even more tempting. Sometimes I drizzle a little chocolate syrup across the top for an extra indulgent touch.
I also enjoy serving this dessert slightly chilled but not ice-cold. I usually take it out of the refrigerator about 10 minutes before slicing so the layers soften just a bit. The flavors seem to come alive when it’s not too cold.
If I’m serving this for a gathering or holiday party, I like pairing it with mugs of warm cocoa or coffee. The contrast between the chilled creamy dessert and a warm drink makes the experience even cozier.
Variations & Customizations
Over time, I’ve experimented with a few variations of this recipe. One version I tried included crushed peppermint candies sprinkled on top, which gave the dessert a fun holiday twist. The minty flavor combined with the chocolate layers beautifully.
Another version I enjoy is adding a thin layer of chocolate ganache between the pudding and whipped topping layers. It adds extra richness and makes the dessert feel a little more decadent. If you’re a serious chocolate lover, I highly recommend trying it this way.
I’ve also seen people add crushed graham crackers or chocolate wafer cookies instead of sandwich cookies for the crust. I tried this once, and it gave the dessert a slightly lighter chocolate flavor. It’s a great option if you want something a little less sweet.
How to Store, Freeze & Reheat
In my experience, this dessert stores beautifully in the refrigerator. I usually cover the baking dish tightly with plastic wrap and keep it chilled for up to three days. The layers stay firm, and the flavors actually get better as they sit.
I’ve also tried freezing it, and it works surprisingly well. I slice the dessert into portions and wrap each piece individually before freezing. When I want a slice, I let it thaw in the refrigerator for a couple of hours, and it tastes almost as fresh as the day I made it.
Since this is a chilled dessert, reheating isn’t necessary. However, if it comes straight from the freezer, letting it thaw slowly in the refrigerator works best. I once tried thawing it quickly at room temperature, and the layers became slightly too soft.
Conclusion
Every time I make Hot Chocolate Lasagna, it reminds me why I love simple, comforting desserts that bring people together. The creamy layers, chocolatey flavor, and fluffy topping make it feel like a cozy winter treat in every bite. I love sharing it with friends and family because it’s one of those desserts that instantly makes people smile. If you try this recipe in your own kitchen, I have a feeling it will quickly become one of your favorites too.