
Homemade Vegetable Broth is a simple, aromatic broth made by simmering a mix of vegetables, herbs, and spices in water until the water takes on their flavor, color, and aroma. It’s lighter than meat stock but still rich and savory, perfect as a base for soups, stews, risotto, grains, and sauces, and it’s an excellent way to use up extra vegetables or kitchen scraps.
What is Homemade Vegetable Broth?
Homemade vegetable broth (or vegetable stock) is essentially flavored water made by gently simmering vegetables like onion, carrot, celery, and garlic with herbs such as parsley, thyme, and bay leaves. Unlike meat stocks or bone broths, it cooks in a relatively short time—often 45–90 minutes—and can be fully vegan, low‑fat, and low‑sodium depending on how it’s seasoned.
You can make it with fresh vegetables or with saved vegetable scraps—onion skins, carrot ends, leek tops, herb stems, and mushroom trimmings—making it both economical and a great way to reduce food waste. The result is a customizable broth that can be kept neutral for everyday cooking or boosted with roasted vegetables, dried mushrooms, and extra herbs for a darker, more robust flavor.
Equipment
- Large stockpot or Dutch oven (at least 5–8 quarts)
- Cutting board
- Sharp chef’s knife
- Measuring cups and spoons
- Fine‑mesh strainer, colander lined with cheesecloth, or nut milk bag for straining
- Large bowl or pitcher for catching strained broth
- Storage containers, jars, or freezer‑safe bags for storing broth
Optional:
- Roasting pan if you want to roast vegetables first for deeper flavor
- Slow cooker or Instant Pot for hands‑off cooking
Ingredients
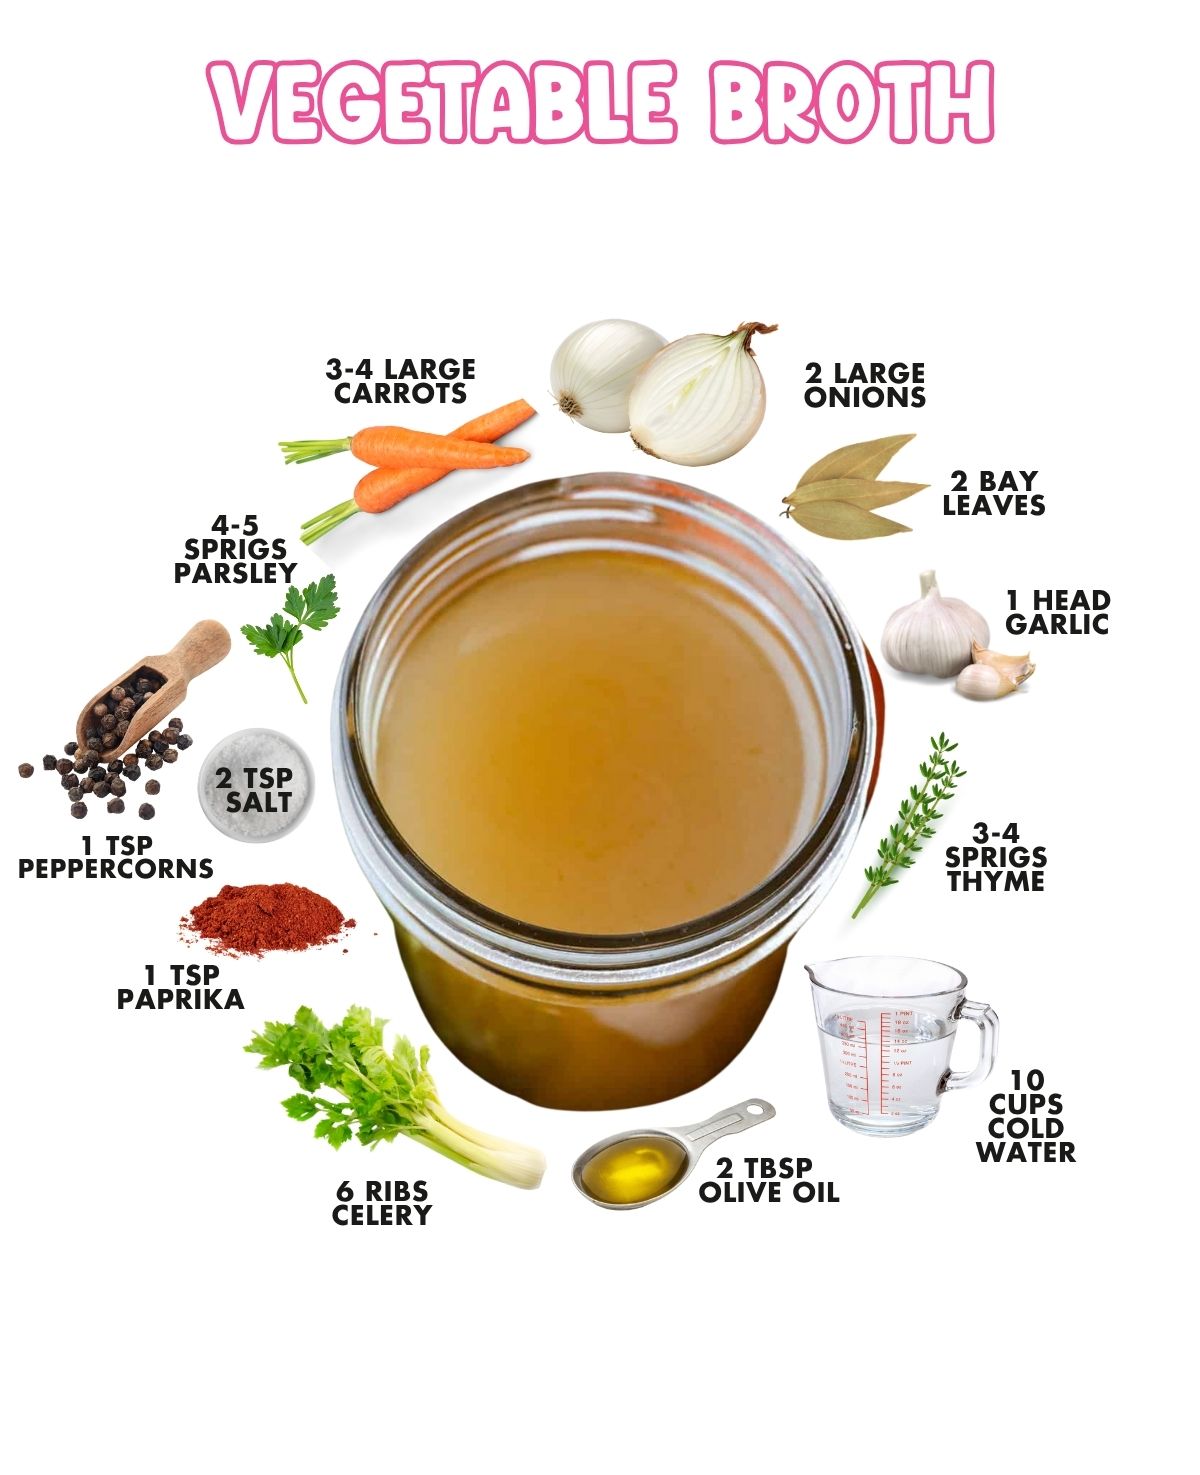
Basic fresh‑vegetable broth:
- 1 large yellow onion, roughly chopped (skins on is fine, just trimmed of any moldy or very dirty parts)
- 3–4 medium carrots, roughly chopped
- 3–4 celery stalks, roughly chopped
- 1 leek, washed well and sliced (white and light green parts; optional but adds depth)
- 1 medium tomato, chopped (optional, adds sweetness and color)
- 4–6 cloves garlic, smashed (skins on or off)
- 1 small bunch fresh parsley, including stems
- 4–6 sprigs fresh thyme (or 1–2 teaspoons dried thyme)
- 2 dried bay leaves
- 1 teaspoon whole black peppercorns
- 10–12 cups cold water, or enough to cover vegetables by about 1–2 inches
- 1–2 teaspoons kosher salt, or to taste (you can also leave it unsalted and season later)
Optional flavor boosters:
- ½–1 ounce dried mushrooms (such as porcini or shiitake) for extra umami
- 1 teaspoon tomato paste for additional richness and color
- 1–2 tablespoons olive oil for sautéing vegetables before adding water
Scrap‑based vegetable broth:
- About 6–8 cups mixed vegetable scraps (collected and frozen), such as: leek tops, fennel fronds, carrot ends and peels, celery ends and leaves, onion skins and ends, garlic ends and skins, mushroom stems, corn cobs, herb stems
- Avoid large amounts of strong cruciferous vegetable scraps (like broccoli, cabbage, Brussels sprouts, cauliflower) as they can make broth bitter
- 2 dried bay leaves
- 1–2 teaspoons dried Italian herbs or thyme (optional)
- 10–12 cups water
- Salt to taste, added at the end
Step-by-step instructions
Homemade vegetable broth is very forgiving, and the process is almost the same whether you’re using fresh vegetables or scraps. The first step is to wash all vegetables or scraps well. Any grit, sand, or dirt left on onion skins, leeks, or carrot tops will end up in the pot and can make the broth gritty, so a thorough rinse under cool water is important.
For a basic broth, onions, carrots, celery, leeks, tomato, and garlic are roughly chopped into large chunks. The shape does not matter because they will eventually be strained out, but cutting them into smaller pieces increases surface area and helps release flavor more quickly.
If using dried mushrooms, they can be added whole or roughly chopped. Parsley, thyme, and bay leaves are left in sprig or leaf form so they’re easy to strain later.
Some recipes add an optional sautéing step for added depth. A bit of olive oil is warmed in the bottom of the stockpot over medium heat, then the onion, carrot, celery, and leek are added and sautéed with a pinch of salt until they begin to soften and take on a little color, usually 5–10 minutes. Garlic is stirred in toward the end so it doesn’t burn.
This step caramelizes some of the vegetables’ natural sugars and can make the broth taste richer, but it’s not strictly necessary if you prefer an oil‑free or very light broth.
Once the vegetables are lightly cooked (or directly in the pot if you skipped sautéing), herbs, bay leaves, peppercorns, dried mushrooms (if using), and any tomato or tomato paste are added. Cold water is poured over the top until the vegetables are covered by an inch or two, usually around 10–12 cups for a standard stockpot. The pot is set over medium‑high heat and brought just to a boil.
As soon as the broth reaches a boil, the heat is reduced to low or medium‑low so it simmers gently, with only an occasional bubble breaking the surface.
A vigorous boil can make vegetable broth cloudy and may break down delicate flavors, so a soft simmer is preferred. The pot is partially covered and left to cook for about 45–90 minutes; many recipes suggest around 1 hour for a bright, fresh‑tasting broth, while going toward 90 minutes can deepen the flavor.
For scrap‑based broth, the process is similar: frozen vegetable scraps are added straight from the freezer into the pot, along with bay leaves, peppercorns, herbs, and water. The mixture is brought to a boil, then simmered for about 30–60 minutes. Because scraps can vary in composition and intensity, many cooks taste after 30 minutes to decide if they want a lighter or stronger broth and continue simmering accordingly.
During simmering, the broth will gradually change color—typically a soft golden or light amber—and the vegetables become very soft and pale. Unlike meat stock, there’s usually no need to skim foam; any small amount that rises can simply be ignored or skimmed off quickly.
When the broth has reached the desired flavor, the pot is removed from the heat and allowed to cool slightly so it’s safer to handle. The vegetables and herbs are then strained out.
The easiest method is to set a large fine‑mesh strainer or a colander lined with cheesecloth over a big bowl or pitcher and pour the contents of the pot through it. Many recipes recommend pressing gently on the cooked vegetables with the back of a ladle or spoon to extract as much flavorful liquid as possible.
At this stage, salt is adjusted. If some salt was added at the beginning, the broth is tasted and additional salt is added only if needed, since the broth may be reduced further in recipes and can become too salty if heavily seasoned early on. Some cooks prefer to leave the broth unsalted, giving them total control over seasoning when they later use it in soups or sauces.
Once strained and seasoned, the broth is cooled to room temperature (or placed in an ice bath to cool more quickly) before being transferred to jars or containers for storage. Any solids are discarded or composted.
Texture and flavor tips
A well‑made vegetable broth should be clear to slightly cloudy, with a clean, savory flavor and gentle vegetable sweetness but no bitterness or harshness. A classic mirepoix base—onion, carrot, and celery in roughly equal proportions—provides the backbone, while extras like leeks, garlic, mushrooms, and herbs layer in complexity. Dried mushrooms, in particular, add umami and a deeper color that can make a vegetable broth feel almost as rich as a light meat stock.
Avoiding too many strong cruciferous vegetables (like cabbage, broccoli, and Brussels sprouts) or bitter greens is important, as they can give the broth a sulfurous or bitter aftertaste when simmered for a long time. A few bits of these vegetables won’t ruin a batch, especially in scrap‑based stock, but they shouldn’t dominate the mix.
Using cold water and a gradual heat‑up helps draw flavor out of the vegetables more effectively. Simmering rather than boiling keeps the broth fresher‑tasting and clearer. If a darker, more roasted flavor is desired, roasting the vegetables in the oven until caramelized before simmering them in water is an excellent technique; this yields a broth that’s more intense and slightly sweeter.
Variations and ways to use it
Vegetable broth is incredibly adaptable. For a Mediterranean‑style broth, tomatoes, leeks, dried mushrooms, garlic, parsley, thyme, and bay leaves can be emphasized, creating a base that pairs especially well with bean soups and tomato‑based dishes. For an everyday, neutral broth, sticking to onion, carrot, celery, garlic, peppercorns, and a couple of bay leaves keeps the flavor balanced and versatile.
Scrap‑based broth is a popular variation where a freezer bag or container is kept for onion skins, leek tops, carrot peels, herb stems, corn cobs, and mushroom stems until enough have accumulated to make a pot of broth. This approach is extremely economical and reduces food waste, and it allows the flavor to change subtly depending on what’s been cooked recently in your kitchen.
Homemade vegetable broth can be used anywhere you’d normally use store‑bought stock:
- As a base for soups and stews, from classic vegetable soup to lentil or bean soups.
- To cook grains like rice, quinoa, barley, or couscous for extra flavor.
- In risottos and braises where you want richness without meat.
- For deglazing pans when making sauces and gravies.
- As a warm, light sipping broth when seasoned simply with salt and perhaps a squeeze of lemon.
Make-ahead, storage, and freezing
Homemade vegetable broth is built for make‑ahead use. Once cooled and strained, it can be stored in the refrigerator for about 4–7 days, depending on how fresh the vegetables were and how cleanly it was handled. Many cooks transfer it to jars or containers in common recipe volumes—1 or 2 cups—so it’s easy to grab exactly what’s needed for a dish.
For longer storage, it freezes very well. Vegetable broth can be poured into freezer‑safe containers, wide‑mouth jars (leaving headspace), or freezer bags laid flat for easy stacking. Some people freeze it in ice cube trays and then store the cubes in a bag, which allows them to drop a cube or two into pan sauces or to quickly adjust the consistency of soups. Properly frozen, it can keep its quality for several months.
Thanks to its flexibility and the ability to use up scraps, Homemade Vegetable Broth is one of those simple kitchen habits that pays off in better‑tasting soups and sauces, lower grocery bills, and less waste—all from a pot of gently simmered vegetables and herbs.