The first time I made Homemade Cream Cheese Mints, my whole kitchen filled with that cool, sweet peppermint aroma that instantly made me feel like I was preparing treats for a special occasion. As I mixed the cream cheese with the powdered sugar, the dough became silky, fragrant, and almost cloud-like in my hands.
It brought back memories of weddings, baby showers, and holiday gatherings where little pastel mints always seemed to appear on platters like edible jewels. When I shaped my first batch, I remember feeling this mix of nostalgia and delight—I couldn’t believe something so simple could taste so magical. Every time I make them now, they give me that same sense of simple, old-fashioned joy.
Why You’ll Love This Recipe
You’ll love this recipe because these cream cheese mints are unbelievably easy, incredibly versatile, and so melt-in-your-mouth delicious that you’ll want to make them for every event—and I can tell you from making them many times, they always disappear faster than I ever expect.
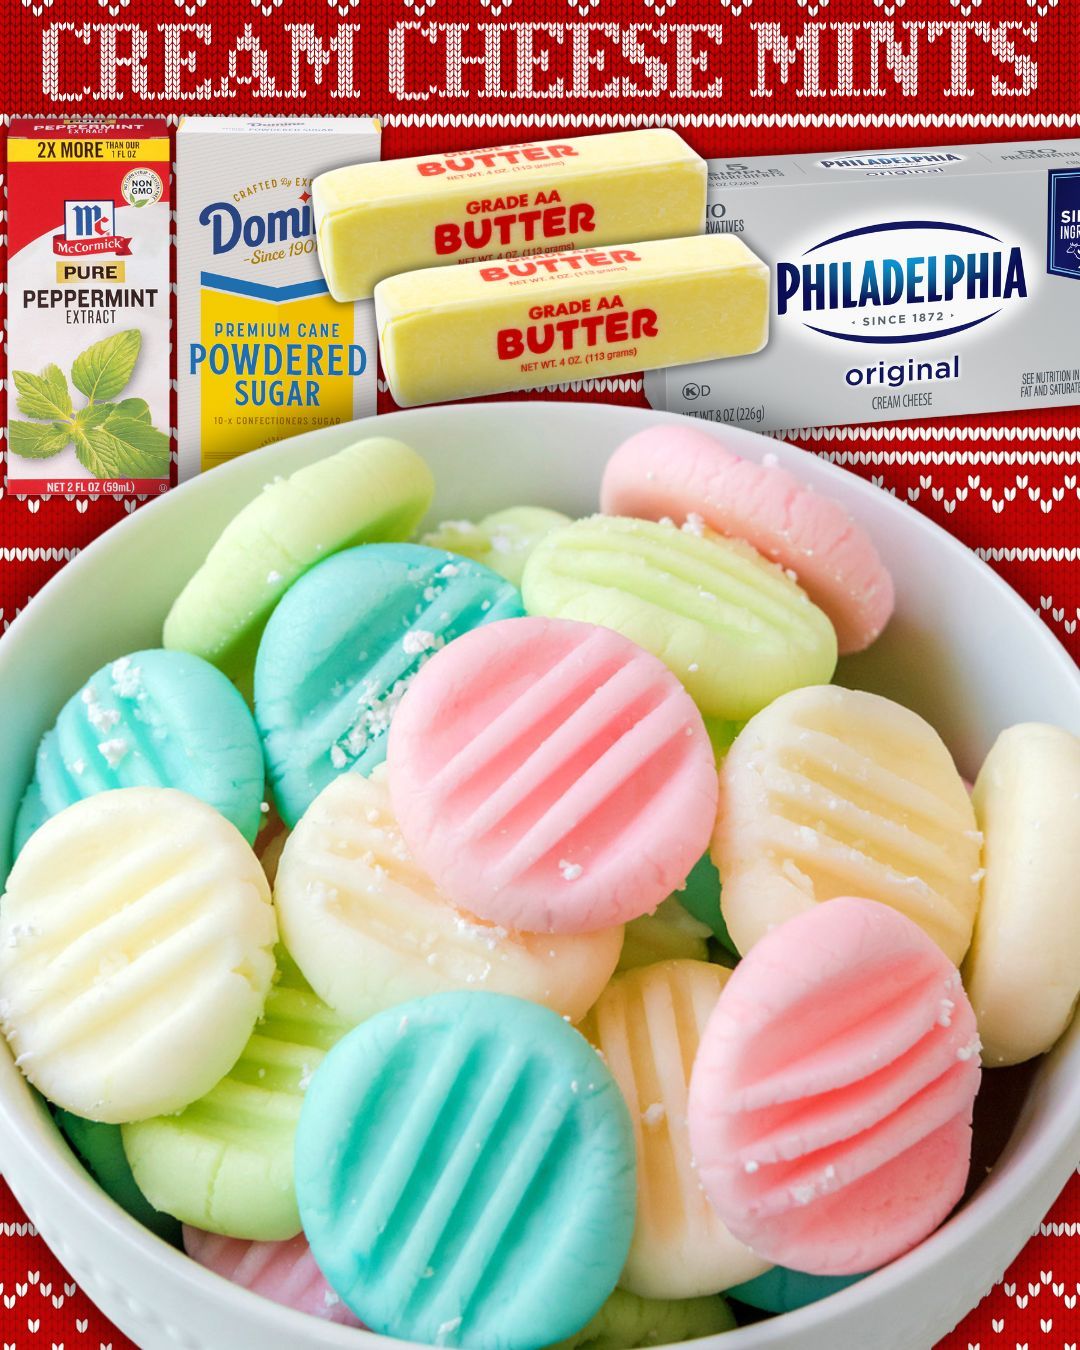
Ingredients
- 8 ounces cream cheese, softened
- 4 cups powdered sugar
- 1 teaspoon peppermint extract
- Food coloring (optional)
- Granulated sugar, for rolling or coating
When it comes to ingredients, I’ve learned a few things that matter. First, make sure the cream cheese is fully softened—cold cream cheese leads to lumps, and trust me, they’re frustrating to fix. Peppermint extract is strong, so measure carefully; a little too much turns the mints toothpaste-like. Powdered sugar provides structure and sweetness, so don’t substitute it. And if you use food coloring, gel coloring works best because it doesn’t water down the dough.
Equipment Needed
- Mixing bowl
- Hand mixer or stand mixer
- Rubber spatula
- Measuring spoons
- Food-safe gloves (optional but helpful)
- Baking sheets
- Parchment paper
- Fork (optional for imprinting designs)
I love using a mixer because cream cheese can be stubborn to blend by hand, especially when the powdered sugar thickens the mixture. Food-safe gloves help keep your hands clean when kneading or coloring the dough—trust me, food coloring stains fingertips fast. A fork creates that classic mint imprint, though you can use molds if you want fancier shapes. Baking sheets lined with parchment give the mints a place to dry without sticking.
Step-by-Step Instructions
The first thing I always do is beat the softened cream cheese until it’s completely smooth. I learned early on that even tiny lumps will show up in the dough later, so it’s worth taking a minute or two to really whip it well.
Once the cream cheese is velvety, I add the peppermint extract and mix again. The moment the mixer hits the extract, the entire kitchen fills with that refreshing minty scent—and it always makes me smile.
Next, I gradually add the powdered sugar, one cup at a time. I used to dump it all in at once, and let me tell you, powdered sugar clouds are not fun to clean up. Adding it slowly helps the dough develop the right texture: soft, thick, and slightly tacky but still workable.
When the dough starts pulling away from the bowl and forms a soft ball, I know it’s ready. If it’s still sticky, I add a little more powdered sugar until it feels like play-dough between my fingers.
Then comes the fun part: coloring and shaping. I divide the dough into sections, wearing gloves to avoid stained hands, and knead in a few drops of food coloring. I’ve made these in pastel shades for Easter, bright reds and greens for Christmas, and even baby blues and pinks for showers.
After coloring, I pinch off small pieces—about teaspoon size—and roll them into smooth balls. The dough rolls beautifully when the texture is right, and honestly, it’s relaxing in a way I didn’t expect.
Finally, I place the mints on a parchment-lined baking sheet and gently press each one with a fork to create that classic ridged pattern. The fork imprint helps them dry evenly and gives them that nostalgic, homemade look. Then I let them air-dry for several hours or overnight until the outside becomes firm and slightly crisp while the inside stays soft and creamy. Every time I bite into one, I’m always amazed by how perfectly melt-in-the-mouth they are.
Pro Tips for Best Results
One thing I learned after testing this recipe multiple times is that cream cheese temperature makes a huge difference. If the cream cheese is even slightly cold, the dough gets lumpy and uneven. I now make sure it sits at room temperature for at least an hour before I begin. This one little step guarantees silky-smooth dough every time.
Another tip is to use peppermint extract, not mint extract. Mint extract has a spearmint flavor that gives the mints a toothpaste-like taste—I learned this the hard way when I grabbed the wrong bottle. Peppermint extract is crisp, refreshing, and exactly what you want for that classic cream cheese mint flavor.
When adding powdered sugar, resist the urge to add too much. The dough firms up as it sits, so it’s easy to accidentally add more than necessary. I’ve found that stopping when the dough is just barely workable leads to the softest mints. If the dough gets too dry, the mints lose their melt-in-your-mouth texture and become crumbly.
Finally, allow the mints enough drying time. I once rushed and tried to store them after just an hour—they stuck together and squished into one big minty clump. Letting them dry fully ensures the outside sets perfectly while the inside stays creamy.
Common Mistakes to Avoid
The biggest mistake I made the first time was using cold cream cheese. I thought, “Oh it’ll mix fine once I beat it,” but it absolutely did not. I ended up with tiny white lumps throughout the dough, and even though the flavor was fine, the texture wasn’t right. Always soften the cream cheese completely—trust me on this.
Another mistake is adding the powdered sugar too quickly. I once dumped the full amount in at once and ended up with a mound of dry, crumbly dough I had to knead like bread. Cream cheese mints should never require elbow grease. Slowly incorporating the sugar keeps the dough light and soft.
I also learned not to over-flavor the mints. Peppermint extract is potent, and adding “just one more drop” can push the flavor from refreshing to harsh. When in doubt, start with less. You can always add another tiny drop, but you can’t take it out.
Lastly, avoid drying the mints in humid or warm environments. I once left them near the stove while cooking dinner, and they absorbed moisture and refused to firm up properly. A cool, dry counter works best for perfect results.
Serving Suggestions
I love serving these cream cheese mints at holiday gatherings because their soft pastel colors brighten any dessert table. I place them in small decorative bowls or candy dishes, and people always gravitate toward them because they look so elegant and nostalgic. They pair beautifully with coffee or hot cocoa, offering a refreshing contrast to warm drinks.
For baby showers, I often color the mints pink, blue, or neutral pastel shades. Arranging them on small tiered trays gives the table a sweet, charming touch. They’re also perfect for gifting—pack them in small tins or clear treat bags tied with ribbon, and they instantly become adorable party favors.
During wedding season, I love shaping the mints using small silicone molds. Hearts, flowers, and initials make them extra special. A few trays of beautifully molded mints always make guests smile, and they’re the kind of treat people remember long after the event is over.
When I’m hosting a casual get-together, I simply serve them alongside cookies or brownies. Guests always comment on their soft texture and cooling peppermint flavor, and they balance heavier desserts wonderfully. Sometimes I even scatter them around dessert platters like edible confetti.
Variations & Customizations
One of my favorite variations is adding a hint of vanilla extract along with the peppermint. It softens the sharpness of the mint and gives the mints a creamier, rounder flavor. I’ve made this version for people who don’t love strong mint, and they always appreciate the milder taste.
Another option is to experiment with colors. I’ve done rainbow batches for kids’ parties, ombré shades for birthdays, and even red-white-and-blue for patriotic celebrations. Gel coloring works beautifully because you only need a tiny bit to achieve rich shades.
You can also roll the mints in granulated sugar before placing them on the sheet. This gives them a subtle crunch and a sparkly finish that looks beautiful under party lights. I’ve served sugar-rolled mints at Christmas, and they almost looked like little frosty snowballs.
For a gourmet twist, try adding a drop of lemon or orange extract to some of the dough. Citrus pairs surprisingly well with cream cheese, creating bright, refreshing mints that feel sophisticated and unique. When I served lemon-tinged mints at a summertime brunch, they disappeared first.
How to Store, Freeze & Reheat
I’ve tested multiple storage methods, and the best way to keep these mints fresh is storing them in an airtight container at room temperature for 1 week. Place a piece of parchment between layers to prevent sticking. They firm up slightly but still maintain that creamy center.
For longer storage, freezing works beautifully. I freeze them in a single layer on a baking sheet, then transfer them to a freezer-safe container. They last up to 3 months, and the texture stays nearly identical after thawing. Whenever I need last-minute treats for an event, I always thaw a frozen batch—they’re a lifesaver.
To thaw, just let the mints sit at room temperature for about 15 minutes. They soften perfectly without becoming sticky. Avoid thawing them in the fridge; I once tried that, and they got too moist and lost some of their firmness.
Since these are no-bake treats, reheating doesn’t apply, but I will say this: if your mints ever feel too firm after storing, leave them on the counter for a few minutes. They’ll regain their creamy texture in no time.
Nutrition Information
Homemade Cream Cheese Mints are definitely on the indulgent side, thanks to the cream cheese and powdered sugar. But because they’re small and melt-in-your-mouth light, they make a satisfying treat without feeling overly heavy. When I want to enjoy something sweet without overdoing it, one or two mints perfectly hit the spot.
The cream cheese provides a bit of richness and contributes that velvety texture, while the powdered sugar gives the mints structure and sweetness. There aren’t a lot of complicated ingredients here, which is part of their charm—they’re simple, sweet, and nostalgic.
These mints are naturally gluten-free, which makes them a great option for gatherings where guests may have dietary restrictions. I love making them for mixed groups because they’re universally enjoyed and safe for most people to eat.
While they’re not low-calorie by any means, they are portion-controlled and satisfying. I always remind myself that treats are meant to be enjoyed—and these little mints offer joy in every bite.
FAQ Section
1. Can I use low-fat cream cheese?
I’ve tried using low-fat cream cheese, and while it works, the texture becomes slightly softer. Full-fat cream cheese creates the best, most stable dough.
2. Can I flavor these mints with something other than peppermint?
Absolutely! I’ve made them with vanilla, almond, lemon, and even orange extract. Just remember that some extracts are stronger than others, so start with less and adjust.
3. Why is my dough too sticky to roll?
This usually means the cream cheese wasn’t soft enough or you need just a bit more powdered sugar. I add 1 tablespoon at a time until the dough becomes workable.
4. Can I use liquid food coloring?
You can, but I don’t recommend it. Liquid coloring softens the dough too much. Gel coloring works best because it adds vibrant color without affecting texture.
5. How long do the mints need to dry?
I usually let mine dry overnight. If the air is dry, 4–6 hours may be enough, but I prefer overnight for perfect firmness.
Conclusion
Homemade Cream Cheese Mints have become one of my favorite nostalgic treats to make because they’re simple, charming, melt-in-your-mouth delicious, and incredibly customizable—and every time I shape a batch, I’m reminded of how much joy a tiny sweet bite can bring. I hope these mints bring just as much delight to your kitchen as they always bring to mine.