
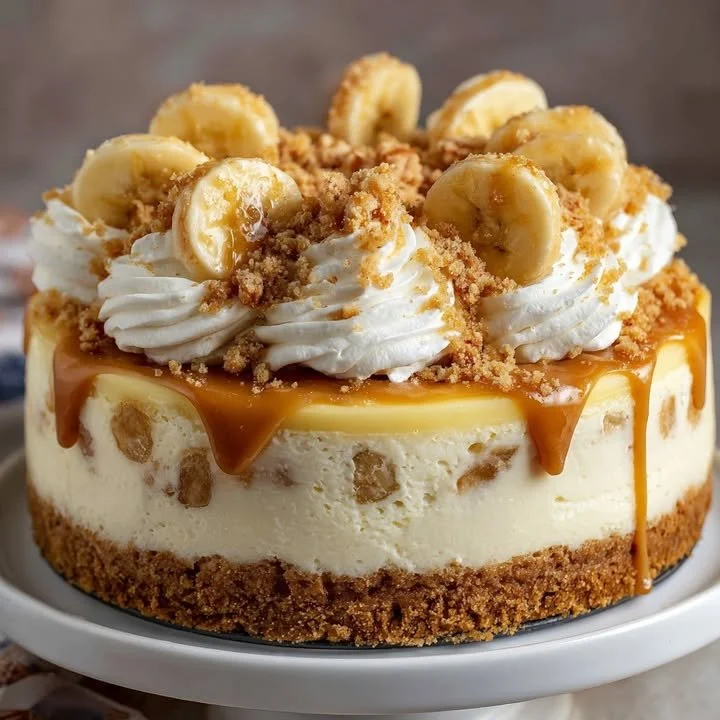
Welcome to my kitchen! If you’re anything like me, you’re always on the hunt for that perfect dessert that can impress guests while also giving you that warm, nostalgic feeling of home. Today, I’m excited to share with you my recipe for Heavenly Banana Pudding Cheesecake. This delightful fusion of creamy cheesecake and rich banana pudding is sure to sweep you off your feet and have you coming back for seconds (and maybe even thirds)!
Why You’ll Love This Recipe
There’s something magical about the combination of bananas, cream cheese, and a buttery crust that just sings harmony to my taste buds. Each slice is like a little slice of heaven wrapped in comfort, and it’s perfect for any occasion—whether it’s a Sunday family gathering or a special holiday. You’ll love how simple yet elegant it is, and how easily it disappears from the table! Trust me, this dessert will become a staple in your home. (See the ingredients in the next page below…)
Ingredients
- 2 cups crushed vanilla wafers
- 1/2 cup unsalted butter, melted
- 2 (8 oz) packages cream cheese, softened
- 1 cup granulated sugar
- 1 teaspoon vanilla extract
- 2 large eggs
- 2 ripe bananas, mashed
- 1 cup heavy cream
- 1 cup banana pudding mix
- 2 cups milk
- Sliced bananas and whipped cream for garnish
Equipment Needed
- 9-inch springform pan
- Mixing bowls
- Hand mixer or stand mixer
- Rubber spatula
- Measuring cups and spoons
- Plastic wrap
- Refrigeration space or fridge
Step-by-Step Instructions
Let’s get started on this culinary journey! I begin by preheating my oven to 325°F (160°C). In my mixing bowl, I combine the crushed vanilla wafers and melted butter, ensuring it’s mixed until it resembles wet sand. I firmly press this mixture into the bottom of my springform pan; this will be the crunchy base that perfectly contrasts the creamy filling. Once pressed, I place it in the fridge to set while I move on to the filling. (See the next page below to continue steps…)
Next, in a large bowl, I beat the softened cream cheese and sugar together until smooth and creamy. The sweet smell of sugar and cream cheese wafting through my kitchen is absolutely delightful. I then casually add in the vanilla extract, followed by the eggs, one at a time—mixing just until incorporated to avoid overbeating. Finally, I fold in the mashed bananas, letting that banana aroma fill the air.
Pouring this banana-cream cheese mixture onto my chilled crust, I couldn’t help but feel giddy. Then comes the baking! I pop it into the oven and let it bake for 60 minutes or until the center is set but still slightly jiggly. After baking, I turn off the oven, crack the door, and leave the cheesecake in there for another hour. This helps prevent cracks, which is essential for presentation!
Once cooled, I prepare the banana pudding. I combine the banana pudding mix with milk and whisk until it’s thick. After letting the cheesecake cool completely, I spread the banana pudding on top, allowing it to meld beautifully with the cheesecake underneath. Finally, I top it off with a generous dollop of whipped cream and some fresh banana slices!
Pro Tips for Best Results
One of my biggest tips is to ensure your cream cheese is at room temperature. I once made the mistake of using cold cream cheese, and let me tell you—it created an unappetizing texture that was less than delightful. Room temperature cream cheese mixes smoothly and evenly every time!
I’ve also tested various crusts, and while the vanilla wafers are classic, I’ve found that adding a bit of crushed pecans or graham crackers to the crust brings an extra depth of flavor. Don’t be afraid to experiment, as I’ve learned that the best dishes often come from a little culinary adventure!
Lastly, make sure to chill your cheesecake for several hours or ideally overnight before garnishing with whipped cream. The flavors have time to develop beautifully, and the texture improves immensely. I promise you, the wait will be worth it!
Common Mistakes to Avoid
One common mistake I’ve made in the past is not letting my cheesecake cool in the oven. This step is crucial for achieving a perfectly smooth top without cracks. Rushing to move it out right after baking could lead to a runny or messy surface. Trust me; give it that hour in the oven.
Overmixing is another pitfall. When combining your ingredients, especially after adding eggs, mix just until combined. I’ve busted out the mixer too aggressively, and the result was a dense cheesecake. Gentle mixing is key for that light, airy texture!
Another mistake is not chilling the cheesecake long enough after baking. I’ve made this mistake thinking I could just sneak a slice too soon! The flavors and textures develop better with time in the fridge. Be patient; I know it’s hard, but you’ll be rewarded!
Serving Suggestions
When it comes time to serve, I like to slice my cheesecake into generous pieces, and I always put a dollop of whipped cream on top. Adding a few banana slices makes the presentation even more inviting. As I set these slices on dessert plates, I’m always struck by the beautiful layers of banana pudding peeking through the fluffy topping!
For a fun twist, you could also serve each slice with a glass of cold milk or a scoop of vanilla ice cream. It adds a delightful creaminess that pairs perfectly with this rich cheesecake.
Lastly, I love to make it a buffet-style dessert table for larger gatherings—laying out the cheesecake alongside fresh fruit, extra whipped cream, and maybe even some chocolate sauce for those indulgent moments. Watching friends and family personalize their slices is such a joy!
Variations & Customizations
If you’re looking to mix things up, why not try adding some crushed pineapple or toasted coconut to the banana pudding layer? I’ve found that these additions give a lovely tropical twist while maintaining that comforting banana flavor. You could even incorporate some crushed candy bars like Snickers for a fun crunch!
For chocolate lovers, I recommend swirling some chocolate ganache into the cheesecake batter before baking or drizzling it over the top. The combination of chocolate and banana is simply scrumptious and adds a decadent touch to your cheesecake.
Lastly, if you’re feeling adventurous and want to switch things up with a healthier version, you can use Greek yogurt instead of cream cheese. It will yield a lighter and tangier flavor, which I have found quite refreshing, particularly during warm weather.
How to Store, Freeze & Reheat
To store any leftover Heavenly Banana Pudding Cheesecake, simply cover it tightly with plastic wrap or store it in an airtight container. It will last for about 5 days in the refrigerator. I can’t resist sneaking a bite the next day; the flavors seem to deepen overnight!
If you’re looking to freeze this cheesecake, you can do so, but make sure to wrap it tightly in plastic wrap followed by aluminum foil. It should keep well for up to 2-3 months. Just remember to thaw it in the fridge overnight before serving to regain that perfect creamy texture.
Reheating isn’t really necessary for this dessert; however, if you do want to enjoy it slightly warmed, just let it sit at room temperature for about 30 minutes before serving. This makes a delightful treat, especially if you add a little extra whipped cream on top!
Conclusion
I hope you feel inspired to whip up your own Heavenly Banana Pudding Cheesecake! It’s more than just a dessert; it’s a culinary adventure that fills your home with warmth and joy. So gather your ingredients, roll up your sleeves, and let your kitchen be filled with the scent of something truly special. Happy baking!