
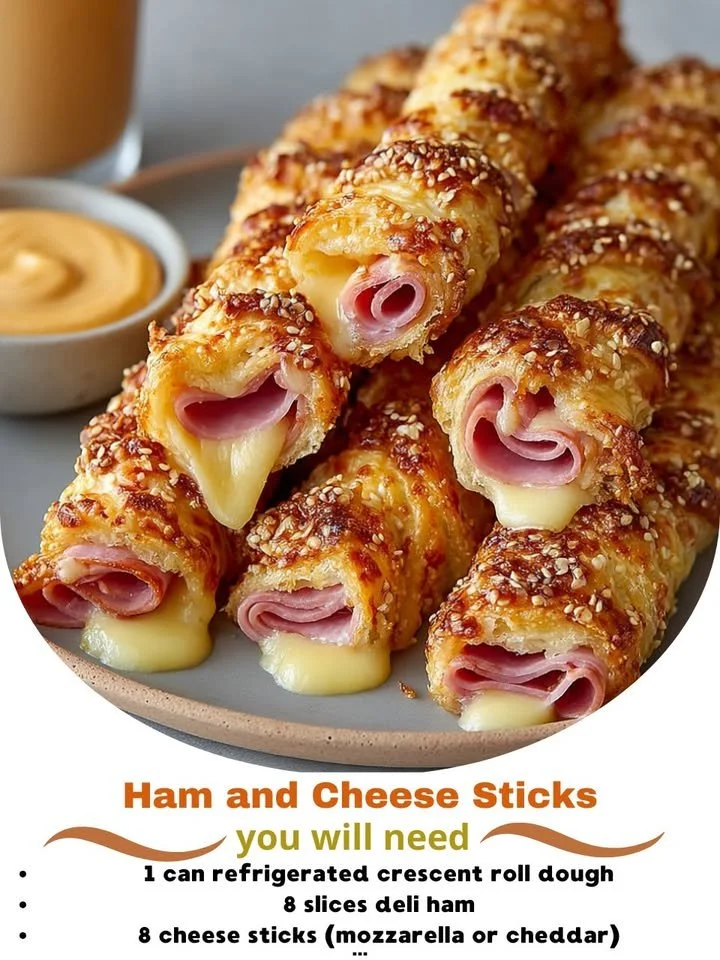
Welcome to my kitchen! Today, I’m excited to share a recipe that always brings a smile to my face – Ham and Cheese Sticks. These little delights are perfect for any occasion, whether you’re hosting a gathering or just need a tasty snack to enjoy while watching your favorite show. They’re warm, cheesy, and bursting with flavor, making them an absolute must-try in my book!
Why You’ll Love This Recipe
One of the best things about these Ham and Cheese Sticks is their versatility. You can whip them up in no time, and they make a fantastic appetizer, party snack, or even a quick lunch. The combination of savory ham and gooey cheese wrapped in golden, crispy pastry is enough to make anyone’s mouth water. Each bite is satisfying, and they always vanish quickly when I serve them at gatherings. It’s hard to resist their allure! (See the ingredients in the next page below…)
Ingredients
– 1 package of puff pastry (thawed)
– 8 ounces of deli ham (sliced)
– 8 ounces of cheese (I love using cheddar or Swiss)
– 1 egg (for egg wash)
– 1 tablespoon of Dijon mustard (optional)
– Salt and pepper to taste
– Sesame seeds (for topping, optional)
Equipment Needed
– Rolling pin
– Baking sheet
– Parchment paper
– Pastry brush
– Knife or pizza cutter
– Mixing bowl
Step-by-Step Instructions
To start off, I preheat my oven to 400°F (200°C), ensuring it’s nice and hot before I pop those delicious Ham and Cheese Sticks inside. While the oven warms up, I roll out the thawed puff pastry on a lightly floured surface. I like to make it a bit thinner, which gives a lovely, flaky texture. Once I’ve got it to the right thickness, I slice it into rectangles – about 3×5 inches works perfectly. Each rectangle will be a cozy pocket for my filling! (See the next page below to continue steps…)
Next, I spread a thin layer of Dijon mustard on each pastry rectangle (if using). Then, I layer a slice of ham and a slice of cheese on top. I usually fold the cheese slices if they’re too large, trying to maximize that cheesy goodness! Don’t forget to season lightly with salt and pepper; it really brings out the flavors. Once I’ve got all my rectangles filled, I fold them over to form pockets and press the edges with my fingers to seal them.
For an extra touch of golden color, I whisk an egg in a small bowl and brush it over the tops of the pastry. If I’m feeling fancy, I sprinkle some sesame seeds on top too! Now it’s time to place them on a baking sheet lined with parchment paper and pop them in the oven for about 20-25 minutes or until they are puffy and golden brown. The aroma wafting through my kitchen while they bake is simply heavenly!
Once they’re out of the oven, I let them cool for a minute before diving in. The combination of textures – the flaky pastry and the melty cheese – is absolutely divine. I love to serve these warm so that they’re at their best. Trust me; once you take a bite, you’ll understand why my friends can’t get enough of these!
Pro Tips for Best Results
I tested this recipe three ways to perfect the Ham and Cheese Sticks! First, I tried different cheeses, and while cheddar and Swiss were amazing, smoked gouda took the flavor to a whole new level. If you love a bit of smokiness, I highly recommend giving that a try!
Another tip is to ensure your puff pastry is well-thawed. If it’s still a bit frozen, it won’t roll out as nicely. When working with puff pastry, keep it chilled until you’re ready to use it. This makes it easier to handle and guarantees a puffier end result. It’s poignant how a little adjustment can impact texture and taste!
Finally, don’t skip the egg wash! The egg gives the pastry a beautiful golden hue and an appealing shine. I’ve made the mistake of forgetting this step, and it definitely affects how tempting they look. Presentation matters, especially for party snacks!
Common Mistakes to Avoid
One common mistake I’ve encountered is overfilling the pastry pockets. The temptation to add more ham and cheese is real, but if they’re too stuffed, they won’t seal properly and can burst open while baking. I found through trial and error that a moderate amount of filling goes a long way in ensuring perfect pockets. (See the next page below to continue…)
Another mistake is not letting the puff pastry rest after rolling it out. It’s important to give the dough a few moments to relax; this helps prevent shrinkage while baking. When I learned this, my Ham and Cheese Sticks became even better!
Also, beware of baking them too long. Once they start turning golden, keep an eye on them! I’ve left them in just a few minutes too long before, and they came out more crunchy than flaky. You want the balance just right!
Lastly, remember that each oven is different. If you find that yours runs hot, I suggest checking the sticks a few minutes early. You wouldn’t want to miss that perfectly golden moment!
Serving Suggestions
When I serve Ham and Cheese Sticks, I love to pair them with a zesty dipping sauce. A simple mixture of ketchup and Worcestershire sauce makes a fantastic complement, or I often whip up a homemade honey mustard to really enhance those flavors. Kids especially love dipping them!
They are perfect as appetizers at parties, but they also make a fantastic addition to a packed lunch. I often make a batch in the morning and store them for a weekday lunch with a side salad, which adds some freshness alongside the warmth of the sticks.
For a cozy snack, I sometimes enjoy them with a bowl of soup. They are ideal for dipping and make for a comforting meal on chilly days. There’s something so satisfying about breaking apart that warm pastry, don’t you think?
Variations & Customizations
One of the best things about this recipe is how easy it is to customize! If you’re feeling adventurous, you can throw in some sautéed mushrooms or spinach for added flavor and nutrition. I once added a bit of jalapeño to the ham for a spicy kick, and it was a hit with my friends!
You can also experiment with different meats. Instead of ham, turkey or even pepperoni would work wonderfully. I’ve also tried adding a layer of pesto for a Mediterranean twist, and I must say, it was a delightful surprise that everyone loved!
If you’re catering to a vegetarian crowd, swap out the ham for roasted vegetables like zucchini or bell peppers. Layer in some fresh herbs like basil or oregano to enhance the flavor profile further. The possibilities are genuinely endless!
How to Store, Freeze & Reheat
To store any leftovers (if you have them!), I recommend placing them in an airtight container in the refrigerator. They usually stay good for about 3-4 days, though I doubt they’ll last that long in my house!
If you want to make a batch ahead of time, these Ham and Cheese Sticks freeze beautifully. I often prepare them in advance, freeze them on the backing sheet, and then transfer to a freezer bag once frozen. When I’m ready to enjoy them, I bake straight from the freezer – just add a few extra minutes to the baking time for perfect results!
When reheating, I find that the oven works best. Just pop them in at 350°F (175°C) for about 10-15 minutes until warmed through and crispy again. Microwaving can make them a bit soggy, so I always stick to the oven for that fresh-baked taste.
Conclusion
I hope you’ve enjoyed this little journey through my Ham and Cheese Sticks recipe! I can’t wait for you to try making these in your kitchen. They’re a delightful treat that never fails to impress. Whether you’re making them for a special occasion or just treating yourself to a cozy snack at home, I know they’ll bring joy to your table. Happy cooking, friends!