
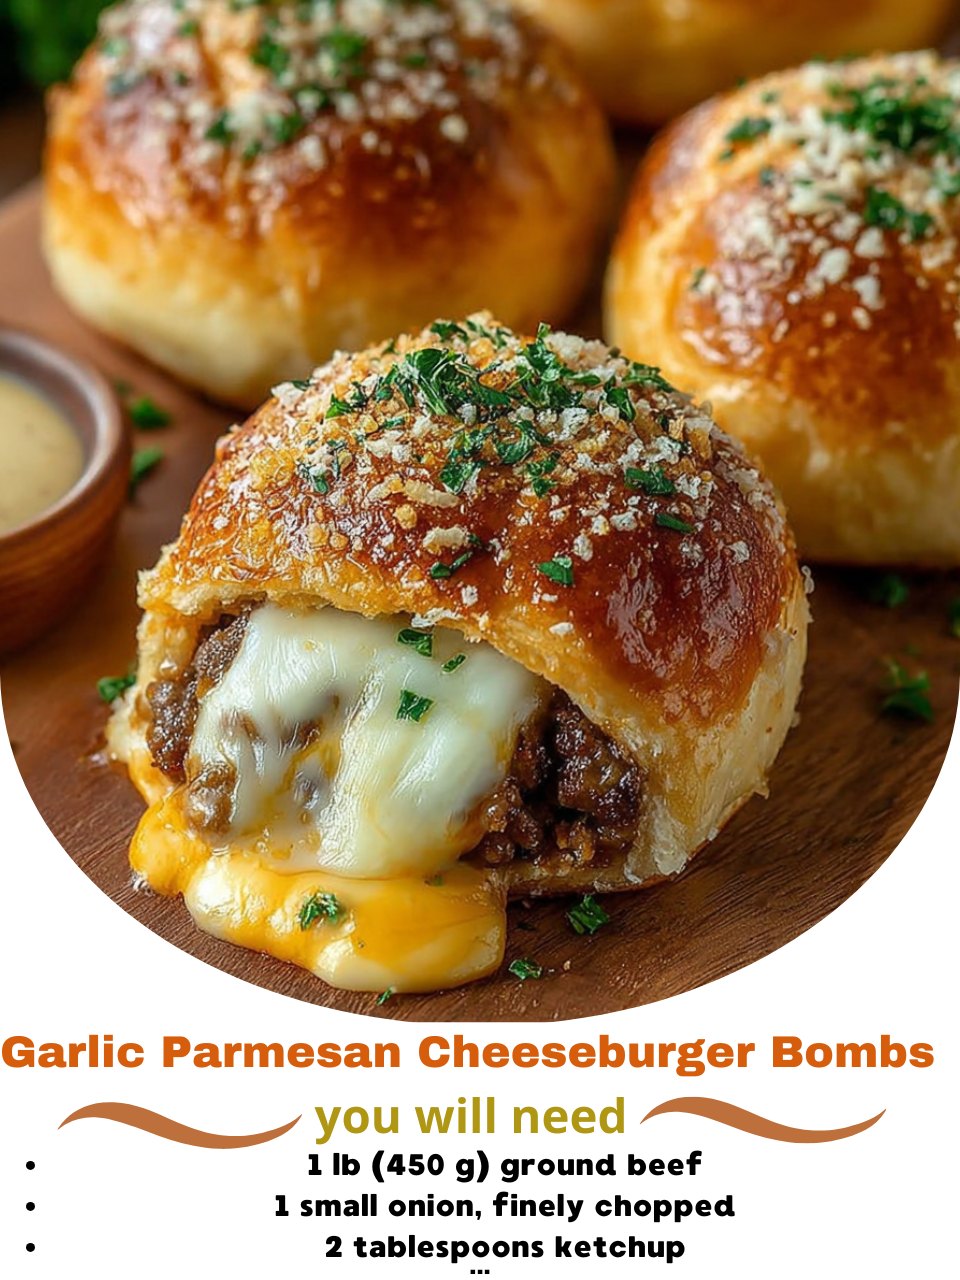
Garlic Parmesan Cheeseburger Bombs take everything you love about a classic cheeseburger—juicy beef, gooey cheese, buttery buns—and transform it into golden, pull‑apart bites brushed with garlicky Parmesan butter. Each “bomb” is a soft biscuit or roll of dough wrapped around a savory cheeseburger filling, then baked until puffed and crisp on the outside with a molten, cheesy center.
Finished with a generous swipe of garlic butter and a shower of Parmesan and herbs, they’re pure snack‑time theatre: perfect for game day, parties, or a fun weeknight dinner with a big salad or fries on the side.
These little bundles are far easier to assemble than they look. Using refrigerated biscuit dough or pizza dough as a shortcut gives you structure and tenderness without any yeast work, while a simple skillet cheeseburger mixture comes together in minutes. Once you’ve made them once, you’ll find yourself dreaming up all kinds of flavor variations.
Why You’ll Love This Recipe
These cheeseburger bombs are built for crave‑worthiness and convenience. The beef is seasoned like your favorite burger—with garlic, onion, salt, pepper, maybe a splash of Worcestershire—and bound together with plenty of cheddar and a bit of Parmesan or cream cheese for extra richness and melt. Tucking the filling inside the dough seals in all those juices and flavors, so nothing drips out, and every bite has the perfect beef‑to‑bread‑to‑cheese ratio.
The garlic Parmesan finish is what sets them apart from other cheeseburger bombs. As soon as they come out of the oven, you brush them with melted butter infused with garlic and herbs, then sprinkle on grated Parmesan.
The result is a glossy, aromatic crust that crackles lightly when you bite in and perfectly complements the savory filling. They’re also built for sharing: lay them out on a platter with dipping sauces like burger sauce, ranch, garlic aioli, or ketchup, and watch them disappear.
Ingredients
- 1 lb (450 g) ground beef (80/20 for juiciness)
- 1 small onion, finely chopped (or ½ teaspoon onion powder)
- 2 cloves garlic, minced (or 1 teaspoon garlic powder, divided)
- 1 teaspoon Worcestershire sauce
- 1 teaspoon salt (to taste)
- ½ teaspoon black pepper
- 1 cup shredded cheddar cheese
- ¼ cup grated Parmesan cheese (for the filling)
- 2 tablespoons cream cheese, softened (optional, for extra creaminess)
- 1 can (about 16 oz / 450 g) refrigerated biscuit dough or 8 large biscuits (or use pizza dough, divided into 8–10 pieces)
- 3 tablespoons butter, melted
- 2 tablespoons grated Parmesan cheese (for topping)
- ½ teaspoon garlic powder (or 1 small clove garlic, very finely minced, for the butter)
- 1 tablespoon chopped fresh parsley (optional, for garnish)
Making the Cheeseburger Filling
Begin by preparing the filling so it has a few minutes to cool before you stuff the dough. Heat a large skillet over medium‑high heat and add the ground beef. Use a spatula or wooden spoon to break the meat into small crumbles as it cooks.
When most of the pink is gone, add the finely chopped onion and minced garlic. Continue to cook, stirring frequently, until the beef is browned and the onion is soft and translucent.
Drain off any excess fat if there’s a lot in the pan—you want the filling juicy but not greasy, or it can make the dough soggy and harder to seal. Return the skillet to the heat and season the mixture with Worcestershire sauce, salt, and black pepper.
Taste a small amount (blowing on it carefully) and adjust the seasoning if needed; this is your chance to ensure the filling is well‑flavored.
Turn off the heat and stir in the shredded cheddar, grated Parmesan, and cream cheese if you’re using it. The residual heat will melt the cheeses, turning the meat mixture into a cohesive, cheesy filling that will be easy to scoop and won’t fall apart. Let this mixture cool down to warm room temperature while you prepare the dough; hot filling can soften the dough too quickly and be harder to work with.
Preparing the Dough
Preheat your oven to 375°F (190°C). Line a baking sheet with parchment paper or lightly grease it to prevent sticking.
Open the can of biscuit dough and separate the individual biscuits. If you’re using pizza dough instead, divide it into 8–10 equal pieces. On a lightly floured surface or just using your hands, flatten each piece of dough into a circle about 4 inches (10 cm) across.
You want them big enough to hold a spoonful of filling, with enough dough around the edges to pull up and seal.
If the dough resists stretching or shrinks back, let it rest for a few minutes; the gluten will relax and make it easier to shape. Keep the dough pieces covered with a clean towel or plastic wrap so they don’t dry out while you fill and fold.
Assembling the Cheeseburger Bombs
Scoop a heaping tablespoon of the cooled cheeseburger mixture into the center of each flattened dough circle. Avoid overfilling—too much filling can make sealing tricky and encourage leaks during baking. If you like extra cheesiness, you can tuck a small cube of cheddar in the center of the meat mixture for a melty “core.”
To form the bombs, bring the edges of the dough up and over the filling, pinching them together firmly at the top to seal. Continue pinching along any seams until there are no gaps. You want a good seal to keep the cheese from oozing out too much in the oven.
Turn each bomb seam‑side down and gently roll it between your hands or on the counter to smooth it into a tidy ball.
Arrange the sealed bombs on your prepared baking sheet with a little space between each to allow for expansion. They will puff as they bake, but they don’t spread dramatically like cookies.
Garlic Parmesan Butter Topping
In a small bowl, combine the melted butter with garlic powder (or very finely minced fresh garlic) and half of the Parmesan reserved for topping. Stir in chopped parsley if you’re using it, or save the herbs for scattering on after baking so they stay bright green.
Using a pastry brush, generously brush the tops and sides of each cheeseburger bomb with some of the garlic butter mixture. This not only adds flavor but also helps the tops brown beautifully in the oven. Reserve a bit of the garlic butter and the remaining grated Parmesan to finish them after baking.
Baking
Place the baking sheet in the preheated 375°F (190°C) oven. Bake for about 12–15 minutes, or until the bombs are puffed and deep golden brown on top.
The exact time can vary depending on your oven and the size of your bombs, so begin checking at the 12‑minute mark. If you used thicker dough or packed them very full, they may need a minute or two longer.
Once they’re golden and you can see some bubbling just under the surface around the base, remove the tray from the oven. While the bombs are still hot, brush them again lightly with the remaining garlic butter. Immediately sprinkle the tops with the rest of the grated Parmesan and a little extra parsley.
The heat will help the cheese adhere and perfume them with a final hit of garlic and butter.
Allow the cheeseburger bombs to cool on the tray for a few minutes before serving. The filling will be extremely hot right out of the oven, and a short rest helps everything set up just enough so the centers stay gooey but not lava‑like.
Serving Suggestions
Serve Garlic Parmesan Cheeseburger Bombs warm as a main dish or appetizer. For a full meal, pair them with seasoned fries, onion rings, a crisp salad, or a platter of raw veggies and dip. On game day or at parties, arrange them on a big board with bowls of ketchup, burger sauce, ranch, garlic aioli, or spicy mayo for dipping.
They’re also great in a “slider” format: split them open and tuck in a slice of tomato, some shredded lettuce, and a pickle chip, then drizzle with extra sauce to make mini stuffed burger sandwiches. Because they’re hand‑held, they’re perfect for tailgates, movie nights, and any time you want something fun and shareable.
Tips, Tricks, and Variations
If you’re worried about leaks, be extra careful when sealing the dough and avoid spreading the filling all the way to the edges; leave a small border of plain dough. Chilling the filled bombs for 10–15 minutes before baking can also help firm them slightly, which minimizes ruptures.
You can easily tweak the flavors. Add finely chopped cooked bacon to the filling for bacon cheeseburger bombs. Stir in a spoonful of cream cheese and a bit of hot sauce for a creamier, slightly tangy center. Use pepper jack or mozzarella instead of cheddar for a different cheese pull. For an Italian‑style twist, season the beef with Italian herbs and add a little marinara to the filling, then serve with warm pizza sauce for dipping.
If you need to stretch the filling or make a slightly lighter version, mix a handful of finely chopped sautéed mushrooms or grated zucchini into the beef mixture; just be sure to cook off excess moisture before adding the cheese so the filling stays thick.
Make‑Ahead and Storage
You can assemble the unbaked cheeseburger bombs a few hours ahead, cover the tray tightly, and refrigerate until ready to bake.
Brush with garlic butter just before they go into the oven. For longer storage, freeze the unbaked bombs on a tray until solid, then transfer them to a freezer bag. Bake from frozen, adding a few extra minutes, until deeply golden and hot in the center.
Leftover baked bombs keep well in the refrigerator for up to three days. Reheat them in a 350°F (175°C) oven or air fryer for 5–8 minutes to revive the crisp exterior and warm the centers. They can also be microwaved in a pinch, though the outside won’t be as crisp.
Conclusion
Garlic Parmesan Cheeseburger Bombs wrap juicy, cheesy burger flavor in a buttery, garlicky, pull‑apart package that feels tailor‑made for sharing. With a short ingredient list, easy assembly, and the kind of flavor that makes people immediately reach for seconds, they’re a natural fit for party menus, family dinners, and any night you’re craving serious comfort with a fun twist.