
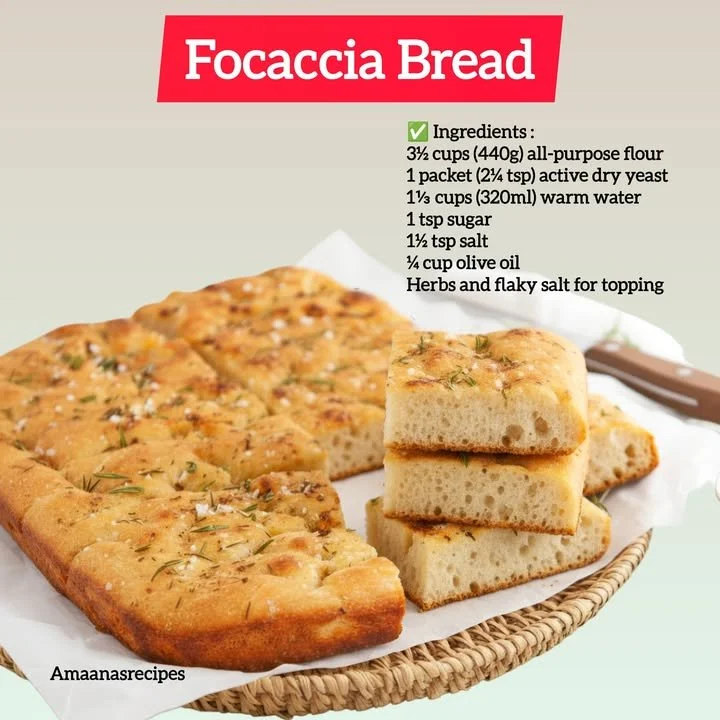
Focaccia bread has been a beloved staple in my kitchen for as long as I can remember. There’s something so comforting about the aroma of freshly baked bread wafting through the house, and focaccia is one of those recipes that never fails to bring a smile to my face. It’s easy to make, packed with flavor, and perfect for sharing with family and friends—or keeping all to myself! Whether I’m serving it alongside a hearty soup or slathering it with olive oil and herbs as a standalone treat, focaccia never disappoints.
Why You’ll Love This Recipe
This focaccia recipe is my go-to for many reasons. Not only does it come together easily with a few simple ingredients, but it’s also unbelievably versatile. When baked to golden perfection, it has a crispy crust that gives way to a soft, chewy interior, making every bite a little piece of heaven. Plus, the possibilities for toppings are endless! From herbs to olives to sundried tomatoes, you can customize it however you like. If you’ve never tried making focaccia at home, you’re in for a delightful treat. (See the ingredients in the next page below…)
Ingredients
- 4 cups all-purpose flour
- 2 teaspoons salt
- 2 teaspoons instant yeast
- 1 3/4 cups warm water
- 2 tablespoons olive oil (plus more for drizzling)
- Fresh herbs (like rosemary and thyme)
- Sea salt for topping
Equipment Needed
- Large mixing bowl
- Wooden spoon or spatula
- Plastic wrap or kitchen towel
- Baking sheet or pan
- Parchment paper (optional)
- Brush for olive oil
Step-by-Step Instructions
To get started, I first combine the flour, salt, and yeast in a large mixing bowl. It’s important to whisk them together well to ensure even distribution. Then, I make a well in the center and add the warm water and olive oil. Using a wooden spoon, I mix until the dough comes together, which usually takes about a minute. You want it to be slightly sticky but manageable, so don’t be afraid to get your hands in there! After that, I cover the bowl with plastic wrap or a kitchen towel and let it rise in a warm spot for about 1 to 2 hours until it has doubled in size. (See the next page below to continue steps…)
Next, once my dough has risen, I generously oil a baking sheet with olive oil, then turn the dough out onto the pan. Now comes the fun part—using my fingers to stretch and press the dough into a rectangle shape. I love taking my time with this step to create those signature dimples that hold all the delicious olive oil and toppings! After that, I cover it again and let it rise for another 30 minutes. During this time, I preheat my oven to 425°F (220°C).
Once the final rise is complete, I dimple the dough once more and drizzle it with olive oil, sprinkling sea salt and herbs over the top. The smell is already heavenly! I pop it in the oven and allow it to bake for about 20-25 minutes, until the focaccia is golden brown and crispy. The moment it comes out, I can hardly resist tearing off a piece—it’s always worth the wait!
Pro Tips for Best Results
I tested this focaccia recipe three ways: with different kinds of flour, various rising times, and numerous toppings. My favorite combination was using half all-purpose flour and half whole wheat flour. The added nutty flavor was delightful! I also found that letting the dough rise a little longer—around 90 minutes—yielded an even fluffier result.
Another thing I’ve learned through my baking adventures is that using warm water is key. Too hot, and you risk killing the yeast; too cold, and it won’t activate properly. The sweet spot is around 110°F (43°C) for optimal yeast action!
Lastly, don’t be shy with the olive oil, both in the dough and for drizzling on top. It adds richness and enhances the overall flavor of the focaccia. I even recommend saving some for dipping once it’s baked—there’s nothing quite like it.
Common Mistakes to Avoid
One mistake I’ve made repeatedly is not letting the dough rise enough. I’ve learned that giving it the full time to double in size truly makes a difference in texture. The longer, slower rise also helps develop those complex flavors.(See the next page below to continue…)
Another little hiccup I encountered was using too much flour while shaping the dough. If you add too much flour, the focaccia might end up dense rather than light and airy! Instead, keep a little bit of stickiness in the dough; it’ll bake up wonderfully.
Sometimes, I’ve also skipped the step of oiling my baking sheet generously, thinking the parchment paper would suffice. Let me tell you, allowing that glorious extra layer of oil makes the crust beautifully crispy. So don’t skip that!
Lastly, it’s easy to over-bake focaccia, so keep an eye on it as it nears the end of the baking time. I usually start checking around the 20-minute mark to ensure it doesn’t get too brown.
Serving Suggestions
Focaccia is incredibly versatile when it comes to serving. One of my favorite ways to enjoy it is simply with a drizzle of olive oil and a sprinkle of balsamic vinegar. It makes for a delicious appetizer that really highlights the bread’s texture and flavor. I often find myself slicing off pieces to dip as I prepare a meal—it’s hard to resist!
It also pairs wonderfully with soups and salads. On chilly days, I love serving focaccia alongside a steaming bowl of minestrone or butternut squash soup. The bread dipped into the warm soup is pure comfort that brings a smile to everyone’s face.
And of course, focaccia makes a fantastic base for sandwiches! I’ve made some scrumptious paninis by layering fresh mozzarella, tomatoes, and basil. Just pop it on a grill, and it becomes an elevated lunch that’s as satisfying as it is impressive.
Variations & Customizations
One of the best parts of making focaccia is how customizable it is! I often toss in garlic for an aromatic twist, or add sun-dried tomatoes and olives to the dough for a Mediterranean flair. Fresh herbs are also a fantastic way to personalize this bread; rosemary is classic, but I’ve had great success with thyme and even basil.
If you’re in the mood for something sweet, try adding caramelized onions and a hint of honey to the dough. The sweetness paired with the savory olive oil creates a delightful combination that’s perfect for serving with cheese or even as dessert with a dollop of mascarpone.
I’m also a fan of playful toppings! Sliced fresh figs, a sprinkle of feta cheese, or a handful of pine nuts all create different flavor profiles. Feel free to get creative and turn your focaccia into a true reflection of your taste buds.
How to Store, Freeze & Reheat
If you somehow find yourself with leftover focaccia, storing it is easy! I usually wrap it in plastic wrap and keep it at room temperature for up to three days. If I want to prolong its life, I’ll pop it into an airtight container.
For longer storage, freezing focaccia is a great option. I slice it into portions and wrap each piece tightly in plastic wrap before placing them in a freezer-safe bag. It can last up to three months—just remember to label and date the bag!
To reheat, I find the oven works best. Preheat to 350°F (175°C), then wrap the focaccia in aluminum foil and heat for about 10-15 minutes. This keeps it from drying out while giving it that lovely crust back. I can almost smell it now!
Conclusion
Making focaccia bread is an experience that warms both the kitchen and the heart. I hope you enjoy baking this bread as much as I do and share it with the people you love. There’s something so special about the aroma of fresh bread and the joy it brings to the table! Happy baking!