
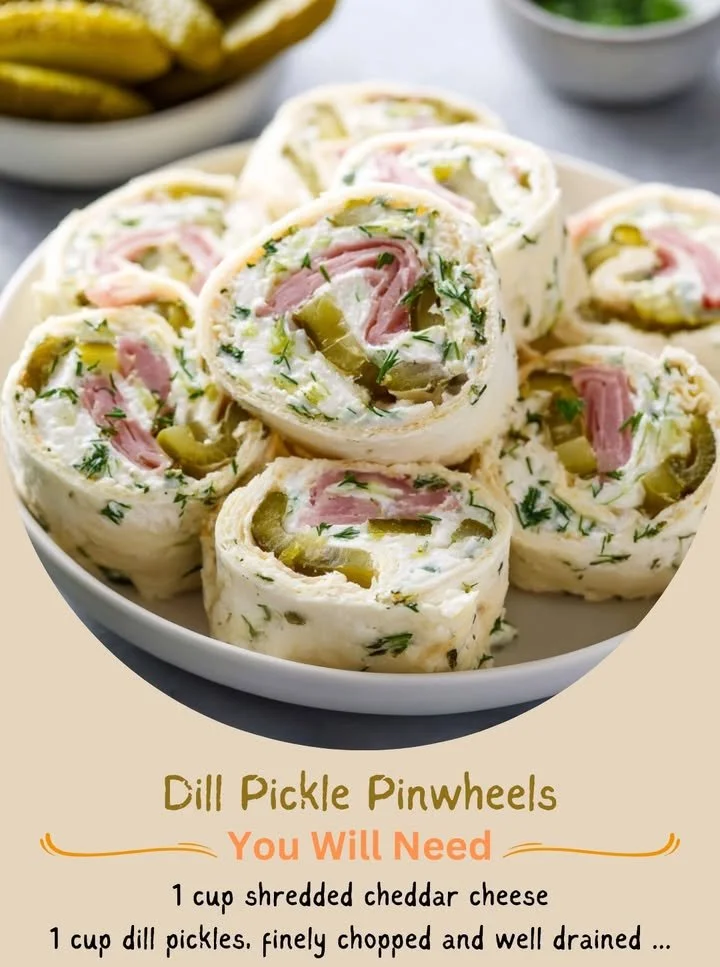
I can’t tell you how many times I’ve whipped up a batch of Dill Pickle Pinwheels in my kitchen, and every single time, they seem to disappear almost as quickly as I can make them! These pinwheels are a delightful combination of creamy, tangy, and savory flavors, all rolled up in a pretty little package. They make the perfect appetizer or snack at any gathering, and I just love how easy they are to prepare. Whether it’s a party, a picnic, or just a weekday treat, Dill Pickle Pinwheels always hit the spot.
Why You’ll Love This Recipe
If you’re a fan of pickles—even just a little bit—you need to try this recipe! They’re bursting with flavor and offer a nice crunch that’s oh-so-satisfying. Plus, they are super customizable, so you can make them to suit your taste buds. Trust me, once you make these pinwheels, you’ll find every excuse to whip them up again. (See the ingredients in the next page below…)
Ingredients
– 4 large flour tortillas
– 8 oz cream cheese, softened
– 1 cup dill pickles, finely chopped
– 1/4 cup fresh dill, finely chopped (or 2 tablespoons dried dill)
– 1/2 teaspoon garlic powder
– Salt and pepper to taste
Equipment Needed
– Mixing bowl
– Spatula or wooden spoon
– Knife
– Cutting board
– Plastic wrap or parchment paper
– Baking sheet (optional for chilling)
Step-by-Step Instructions
To start, grab a mixing bowl and add the softened cream cheese, finely chopped dill pickles, fresh dill, garlic powder, salt, and pepper. Mix everything together until it’s well-combined and creamy. The smell will be absolutely divine, and you might even be tempted to sneak a taste! This mixture is what brings the pinwheels to life with that delightful pickle flavor. Once it’s all mixed up, you’re ready to move on to the next step. (See the next page below to continue steps…)
Next, take a tortilla and spread a generous layer of the cream cheese mixture evenly over its surface. Be sure to get all the way to the edges so that every bite has flavor. After spreading, carefully roll the tortilla up tightly from one end to the other. To keep it secure, I like to give it a gentle squeeze as I roll. Repeat this step with the remaining tortillas and creamy goodness until you have a lovely stack of rolled creations.
Once you’ve rolled up all the tortillas, you’ll want to wrap them in plastic wrap or parchment paper. This helps the pinwheels firm up a bit, making them easier to slice later on. I usually pop them in the fridge for at least an hour. If you’ve got the time, letting them chill for a few hours will do wonders for the flavors! Trust me, they get even better.
Finally, when you’re ready to serve, take the pinwheels out of the fridge and slice them into bite-sized pieces using a sharp knife. Arrange them on a platter, and don’t be surprised when guests can’t resist going back for seconds—or thirds! The colorful swirls of green and cream are always so inviting, and the smell should have everyone gathering around in no time.
Pro Tips for Best Results
When I first started making these Dill Pickle Pinwheels, I went through a few trials before I found the perfect balance of ingredients. I recommend using fresh dill if you can; it really enhances the flavor and gives those little green flecks a beautiful pop. I actually did a side-by-side comparison with dried dill, and the fresh version won hands down in both taste and smell.
Another tip is to ensure that your cream cheese is softened well before you begin mixing. I usually take it out of the fridge at least an hour beforehand. If you’re in a hurry, you can microwave it for about 10-15 seconds, but be careful not to melt it! The cream cheese needs to be spreadable or else you’ll have a lumpy mixture that won’t spread smoothly on the tortillas.
And finally, don’t skip the chilling step! I’ve noticed that the flavors intensify when allowed to meld together for a bit. Plus, it makes the pinwheels firmer and easier to slice. Just let them hang out in the fridge—trust me, it’s worth the wait!
Common Mistakes to Avoid
One common mistake I see is using too much cream cheese. While the creaminess is essential, overly thick layers can make the pinwheels difficult to roll and slice. I learned this the hard way, and it resulted in a messy kitchen as I tried to contain my filling. Keep it balanced and just spread a thin layer for that perfect bite!
Another thing I’ve stumbled upon is not chopping the dill pickles finely enough. Large chunks can cause the pinwheels to fall apart and make biting into them a challenge. Mixing the filling and tasting as you go is the best route to get that perfect consistency and flavor.
Also, be mindful of the type of tortillas you use. I’ve experimented with both flour and whole wheat tortillas, and while both work, I find that flour tortillas are generally more pliable and easier to roll without cracking. If you decide to use whole wheat, just be careful not to over-stuff them.
Lastly, don’t forget to cover those pinwheels tightly in plastic wrap as they chill! If they’re left uncovered, they can dry out, and nobody wants a dry pinwheel. I like to double wrap them and set them in the refrigerator for guaranteed freshness.
(See the next page below to continue…)
Serving Suggestions
Dill Pickle Pinwheels are so versatile! I often serve them at parties with a platter of assorted dips like ranch or hummus for added flavor. Their tangy taste pairs wonderfully with a cool, creamy dip, which keeps everyone reaching for more. I’ve also found they make a great addition to a picnic basket—easy to pack, slice, and enjoy on a sunny afternoon!
Another fantastic way to serve these is alongside a refreshing salad. The bright flavors from the pickles complement salads really well. I love a simple green salad with a light vinaigrette on the side; it balances the heaviness of the pinwheels and makes for a delightful meal.
And don’t forget to serve them at your next game night! They are finger food at its best and perfect for munching on in front of the TV. Just prepare to be asked for the recipe, because these pinwheels are always a hit!
Variations & Customizations
One of the things I love most about Dill Pickle Pinwheels is how adaptable they are! If you’re looking to add a bit of protein, consider including sliced deli meats like turkey or ham. Just layer the meat over the cream cheese mixture before rolling up the tortilla. It adds a nice heft and makes them even more filling.
Another fun twist I’ve tried is adding shredded carrots to the filling. They add a lovely crunch and a hint of sweetness that pairs well with the tangy pickles. Just be sure to chop them finely so that they blend well with the other ingredients and don’t overpower the flavor.
If you’re feeling adventurous, you could even turn them into a spicy variant by mixing in some jalapeños or your favorite hot sauce into the cream cheese mixture. This little kick adds a fun twist that I think many spice lovers would enjoy!
How to Store, Freeze & Reheat
Leftover Dill Pickle Pinwheels—if there are any—can be stored in an airtight container in the refrigerator for up to 3 days. Just make sure you keep them tightly wrapped or in a container to maintain their moisture and flavor. I usually pop them back in the fridge right after a gathering to keep them fresh.
If you want to make these ahead of time, they freeze beautifully! Simply wrap the uncut pinwheels tightly in plastic wrap and place them in a freezer bag. They can be frozen for up to 2 months. When you’re ready to enjoy, just let them thaw in the refrigerator overnight and slice them the next day.
Reheating isn’t necessary since these pinwheels are best served cold, but if you prefer to try warm pinwheels, you could slice them and pop them in the oven at a low temperature (around 200°F) for a few minutes—just keep an eye on them to prevent any burning!
Conclusion
I hope you enjoy making Dill Pickle Pinwheels as much as I do! They are not just a tasty treat; they are a reminder of fun times shared with family and friends. So, grab your ingredients, have some fun in the kitchen, and watch these little bites of heaven disappear in no time! Happy cooking!