
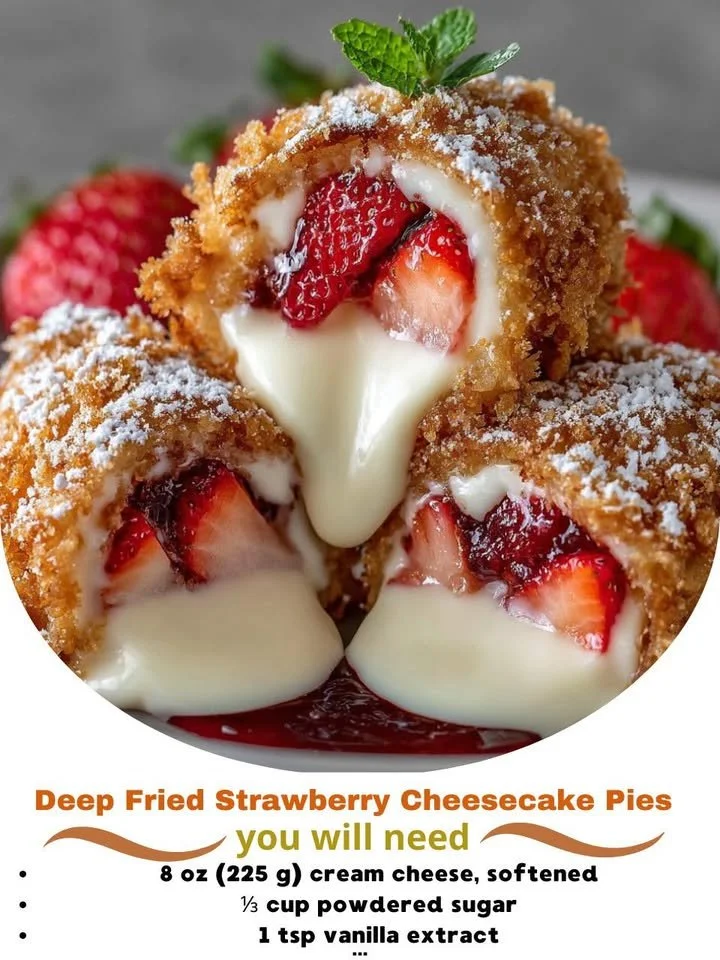
Welcome to my cozy kitchen! Today, I’m thrilled to share a delightful dessert that’s been a hit in my family: Deep Fried Strawberry Cheesecake Pies. They’re the perfect marriage of creamy cheesecake and sweet strawberries, all wrapped up in a golden, crispy shell. Every bite is an explosion of flavors that makes my heart sing. Let’s dive right in and whip up this delectable treat together!
Why You’ll Love This Recipe
I can’t emphasize enough how incredibly satisfying it is to bite into one of these little pies, with the warm, gooey cheesecake filling spilling out and mingling with the juicy strawberries. They make for a perfect dessert to impress friends or simply treat yourself after a long day. Plus, the simple process of making these pies is as fun as eating them! So, let’s get cooking! (See the ingredients in the next page below…)
Ingredients
- 1 package of pre-made pie crusts
- 8 oz cream cheese, softened
- 1/2 cup granulated sugar
- 1 tsp vanilla extract
- 1 cup fresh strawberries, diced
- 1 egg (for egg wash)
- Vegetable oil (for frying)
- Optional: powdered sugar for dusting
Equipment Needed
- Rolling pin
- Mixing bowl
- Electric mixer or whisk
- Cookie cutter (or any round cutter)
- Frying pan or deep fryer
- Slotted spoon
- Paper towels (for draining)
Step-by-Step Instructions
First, let’s start with the filling. In a mixing bowl, I combine the softened cream cheese, granulated sugar, and vanilla extract. With my electric mixer, I whip the mixture until it’s smooth and creamy. Then, I gently fold in the diced strawberries, which adds that delightful fruity burst. This filling is a dream! (See the next page below to continue steps…)
Next, I take my pie crust and roll it out on a floured surface for an even thickness; it’s important for that perfect fry. I use a cookie cutter to cut out circles, about 4 inches in diameter. I place a heaping tablespoon of the cheesecake filling in the center of half of the circles. Make sure to leave a little space on the edges for sealing! Then, I take the remaining dough circles and place them on top of the filled ones, gently pressing down the edges to seal them tightly.
Now it’s time to prepare the frying oil! I heat about 2 inches of vegetable oil in a deep frying pan over medium-high heat. Once the oil is hot (I can tell because it shimmers), I dip a finger in — if it sizzles, it’s ready! I carefully drop my pies into the hot oil, frying them in batches for about 2-3 minutes on each side until they’re golden brown and crispy. The aroma wafting through my kitchen at this stage is truly heavenly!
Once they’re perfectly fried, I use a slotted spoon to remove the pies, placing them on paper towels to drain any excess oil. You might be tempted to dig in right away, but let them cool for a few minutes. This is the hardest part but it’s worth the wait!
Pro Tips for Best Results
I really suggest making sure your pie crust is cold before you roll it out. I’ve tested this three ways: from the fridge, room temperature, and frozen. The cold crust holds its shape better and fries up crispier, giving you that delightful crunch when you take a bite.
Another tip is to keep an eye on the frying temperature. If the oil is too hot, the outside can burn while the inside remains cold. I’ve had my fair share of burnt pies; now, I find that medium heat gives the best results! Consistency is key when frying, and adjusting the heat as needed can make all the difference.
Finally, don’t skimp on letting the pies drain on paper towels; this will help avoid any greasy texture. I let mine rest for a couple of minutes before serving, and that’s when I dust them with powdered sugar for that perfect finishing touch!
Common Mistakes to Avoid
One common mistake I made during my first attempt was overfilling the pies. Trust me, a heaping tablespoon is plenty! The filling expands while frying, and if you pack it in too much, you’ll end up with a messy kitchen and a pie explosion. Oh, what I wouldn’t give to take back those messy moments! (See the next page below to continue…)
Another thing to be cautious about is sealing the edges properly. If they’re not sealed tight enough, the filling can ooze out into the oil. I always make a habit of pressing down hard on the edges and sometimes even crimping them with a fork for good measure. It adds a nice touch and ensures no filling is wasted!
Lastly, be careful with the frying time. These little beauties can go from golden brown to burnt in a heartbeat. I’ve learned to set a timer and stick close to the frying pan while they cook. A few moments of distraction can lead to disappointment, and I’ve had enough of that in my kitchen!
Serving Suggestions
When it comes to serving these delightful pies, I love stacking them on a pretty plate, dusted with powdered sugar for a touch of elegance. I often serve them with a side of whipped cream and fresh strawberries for an extra pop of flavor. The creaminess of the whipped cream complements the sweet, tangy filling perfectly!
For a cozy night in, I pair these pies with a scoop of vanilla ice cream. The warm, crispy exterior against the cool, creamy ice cream is a match made in dessert heaven. Each bite is a bit of magic that I can never resist!
If I want to add a fun twist, I sometimes drizzle chocolate or caramel sauce over the top. It’s a little indulgent, but hey, I believe desserts should be celebrated in style!
Variations & Customizations
While strawberry cheesecake is a classic, I love mixing it up by trying different fruits. Last summer, I made a batch using blueberries, and they were just as delicious! You could also experiment with raspberries or blackberries, giving each pie a unique flavor pop.
If you’re feeling adventurous, you can add some chocolate chips to the filling. Just a small handful provides a lovely surprise in each bite. I adore the combination of chocolate with strawberries; it takes these pies to a whole new level!
For the health-conscious among us, consider baking instead of frying. I’ve tested a few in the oven, and while they won’t have the same crispy texture, they still offer a tasty treat that’s a bit lighter. Just brush them with a bit of melted butter before popping them in at 350°F for about 20 minutes!
How to Store, Freeze & Reheat
If by some miracle there are leftovers (which I highly doubt!), I place the pies in an airtight container and store them in the fridge for up to three days. When I’m ready to indulge again, I reheat them in the oven at 350°F for about 10 minutes. This helps them regain their crispness while warming up that luscious filling.
For longer storage, these pies can be frozen. I let them cool completely and arrange them in a single layer on a baking sheet lined with parchment paper before freezing. Once they’re solid, I move them to a freezer-safe bag, where they can stay for up to three months.
When I’m ready to enjoy a frozen pie, I usually let it thaw in the fridge overnight. Then, I give it a quick reheat in the oven for a crispy finish. It’s like having a bit of summer magic right at my fingertips!
Conclusion
And there you have it! My journey into making Deep Fried Strawberry Cheesecake Pies has been nothing short of delightful, and I hope you find the same joy in making them at home. Whether you savor them on a cozy night or share them at a gathering, these little pies are bound to spread happiness. Happy baking, and enjoy every scrumptious bite!