
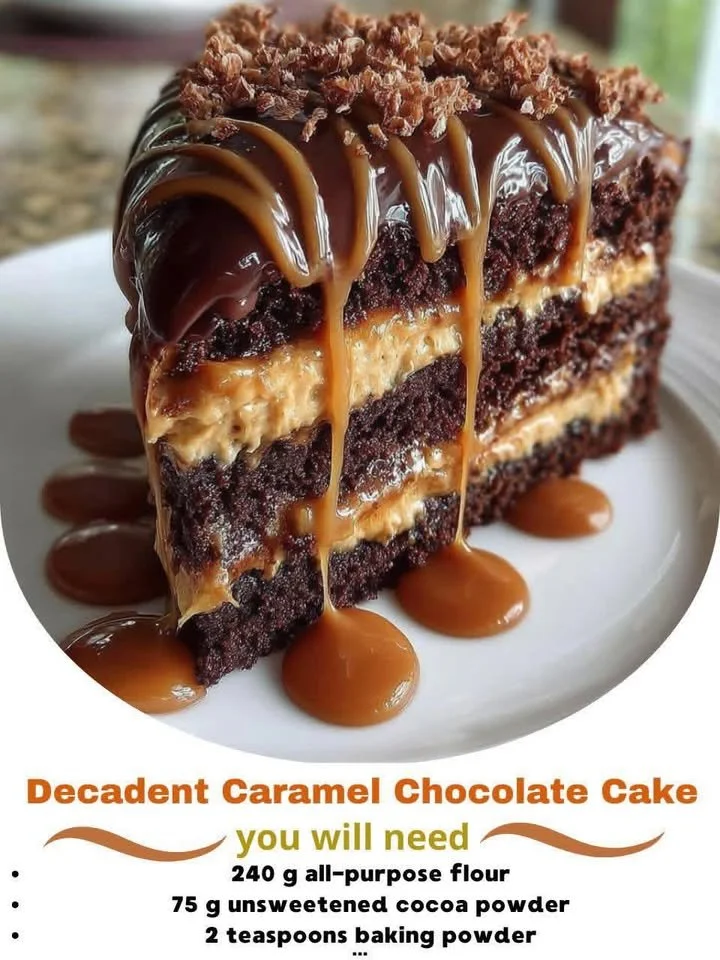
There’s something about a Decadent Caramel Chocolate Cake that just feels like the ultimate treat. It’s rich, it’s luscious, and every bite is a little taste of heaven. I love baking this cake on special occasions and even when I just want to indulge myself. The combination of deep chocolate and smooth, buttery caramel is a match made in dessert paradise. Today, I’m excited to share my favorite recipe with you!
Why You’ll Love This Recipe
This recipe is not just about making a cake; it’s about creating an experience. From the moment you mix the batter to the aroma that wafts through my kitchen, every part is a joy. Plus, this cake is surprisingly straightforward to make, yet it looks and tastes like a masterpiece worthy of any celebration! You’ll impress your friends and family, and they’ll be asking for seconds. Trust me, once you take a bite, it’ll become your go-to celebration cake. (See the ingredients in the next page below…)
Ingredients
– 1 ¾ cups all-purpose flour
– 1 ½ cups granulated sugar
– ¾ cup unsweetened cocoa powder
– 1 ½ teaspoons baking powder
– 1 ½ teaspoons baking soda
– 1 teaspoon salt
– 2 large eggs
– 1 cup whole milk
– ½ cup vegetable oil
– 2 teaspoons vanilla extract
– 1 cup boiling water
– 1 cup caramel sauce (store-bought or homemade)
– Whipped cream for serving (optional)
Equipment Needed
– 2 round 9-inch cake pans
– Mixing bowls
– Whisk
– Rubber spatula
– Measuring cups and spoons
– Wire cooling rack
– Parchment paper
Step-by-Step Instructions
First, preheat your oven to 350°F (175°C) and prepare your cake pans by greasing them and lining the bottoms with parchment paper. In a large mixing bowl, combine the flour, sugar, cocoa powder, baking powder, baking soda, and salt. It’s essential to whisk these dry ingredients together thoroughly to ensure an even flavor throughout the cake. Next, add the eggs, milk, oil, and vanilla, and beat on medium speed for about two minutes until everything is smooth and well combined. Then, gradually stir in the boiling water—I know, it seems a bit odd, but this step will result in an incredibly moist cake! (See the next page below to continue steps…)
Once the batter is ready, divide it evenly between the prepared cake pans. Bake them in your preheated oven for 30 to 35 minutes or until a toothpick inserted in the center comes out clean. The smell in my kitchen at this moment is heavenly! As soon as the cakes are done, remove them from the oven and allow them to cool in the pans for about 10 minutes. Then, carefully turn them out onto a wire cooling rack to cool completely.
While the cakes are cooling, let’s talk about the caramel sauce. If you’re using store-bought, feel free to heat it slightly so it becomes more pourable. However, if you’re feeling adventurous, I recommend making a homemade caramel. It’s a simple process of melting sugar until it’s golden brown, then adding cream and butter. The aroma is just divine! Once everything is cool, place one cake layer on a serving plate, drizzle with caramel sauce, and then place the second layer on top.Don’t hold back on the caramel; the richer, the better!
Finally, feel free to frost the cake with a chocolate ganache or a simple whipped cream if you wish. But I find that drizzling additional caramel sauce over the top is just the cherry on top of this delicious dessert—literally!
Pro Tips for Best Results
I’ve baked this cake several times now, and I’ve learned a few tricks along the way. One important thing I recommend is to make sure all your ingredients are at room temperature before you start. This helps create a smooth batter and leads to a more evenly baked cake. I’ve tried it with cold ingredients, and the texture just wasn’t the same.
Another tip from my kitchen to yours is to let the cake layers cool completely before assembling them. I know it’s tempting to dive right in, but if you layer them while still warm, you’ll risk having a gooey mess instead of stable layers. I’ve definitely made that mistake before, and it was a disaster!
Lastly, if you’re pressed for time, you can make the cakes in advance and freeze them. Just wrap each layer tightly in plastic wrap, and they’ll last for up to three months. I often do this when I know I have a busy week ahead—I can pull them out, thaw them, and assemble in no time!
Common Mistakes to Avoid
One common mistake I’ve seen (and made) is over-mixing the batter. It’s easy to get excited and whip it up too much! Over-mixing can create a tough cake, which is definitely not what we want. I suggest mixing just until the ingredients are combined for that perfect light, fluffy texture. (See the next page below to continue…)
Another thing to keep in mind is not to skip lining your cake pans with parchment paper. I’ve done this too, thinking it would be fine, and I ended up with cake layers that stuck like glue to the pans. It was a sad moment! Trust me, lining your pans is a small step that makes a huge difference when it comes time to serve.
Also, don’t forget to check your oven temperature with an oven thermometer. Ovens can often be off by quite a bit, which can lead to undercooked or overcooked cakes. I learned this the hard way when I pulled out what I thought was a perfectly baked cake only to discover it was still gooey in the middle.
Serving Suggestions
When it comes to serving this Decadent Caramel Chocolate Cake, I always gravitate towards using freshly whipped cream alongside to balance the richness. A dollop on the side is a delightful match! You can also add a sprinkle of sea salt on the top—it creates a beautiful contrast to the sweetness and enhances that caramel flavor.
For special occasions, I like to serve it with fresh berries. The tartness of strawberries or raspberries really complements the rich chocolate and caramel. Arrange a few around the plate for a pop of color and flavor!
Lastly, I love to serve slices of this cake with a cup of coffee or a hot cup of cocoa. There’s something incredibly cozy about enjoying a slice while sipping on a warm beverage, especially on chilly days.
Variations & Customizations
One of the great things about this recipe is how adaptable it can be. If you want to add a little something extra, consider folding in some chocolate chips into the batter before baking. They’ll melt beautifully, adding even more chocolatey goodness to every bite.
For those who love nuts, chopped pecans or walnuts can make a fantastic addition. You could sprinkle them between the layers or even fold them into the batter for a delightful crunch that pairs wonderfully with the soft cake and caramel.
If you’re feeling adventurous, you can switch up the caramel sauce for a salted caramel or even a spiced caramel with a hint of cinnamon or nutmeg. This small tweak can really elevate the cake and create a unique flavor profile that your guests will adore!
How to Store, Freeze & Reheat
If you have leftovers (though that’s often not the case in my house!), you can store your Decadent Caramel Chocolate Cake in an airtight container at room temperature for up to three days. Just make sure it’s out of reach from any curious hands!
To freeze, wrap each layer in plastic wrap and place it in a freezer-safe bag. It can last in the freezer for about three months. When you’re ready to enjoy a slice, just let it thaw overnight in the refrigerator before adding any toppings or serving.
If you want to reheat a slice, I suggest using the microwave for a few seconds. It’s an easy way to warm it up just enough to melt the caramel slightly, making it extra gooey and delicious. Pair that with a scoop of vanilla ice cream, and you’ll be living the dream!
Conclusion
I hope this Decadent Caramel Chocolate Cake brings joy and deliciousness into your kitchen as it has in mine. It’s a wonderful treat for any occasion or just because you feel like baking! Whether you follow my recipe to the letter or put your unique spin on it, I’m sure you’ll create something scrumptious. Happy baking, my friends!