
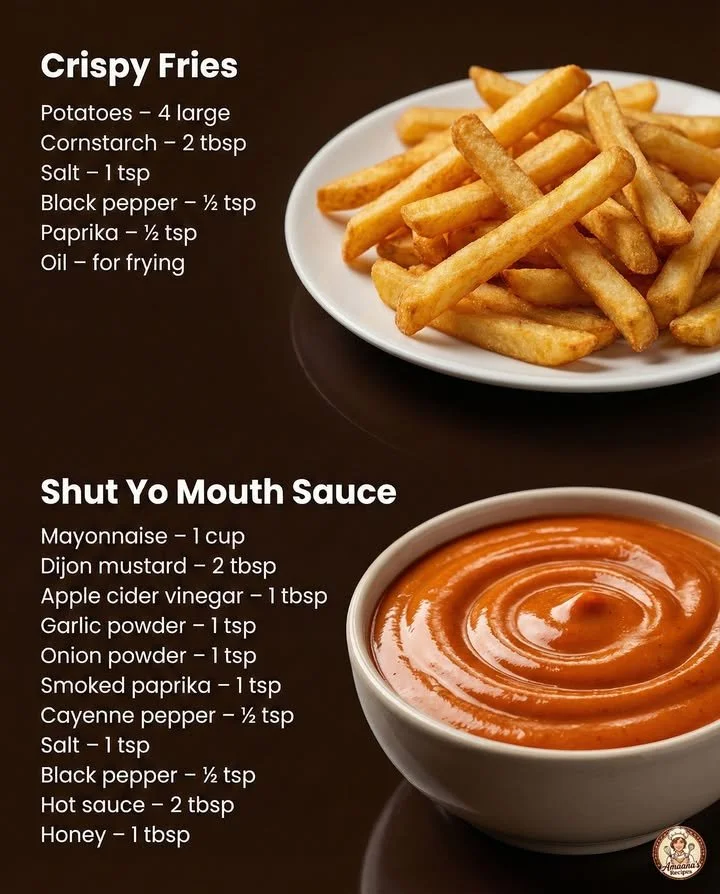
There’s something utterly irresistible about crispy fries. Whether enjoyed as a side dish, a snack, or a late-night craving, I often find myself reaching for a batch of homemade fries when I want to treat myself. I adore watching those golden spears of potato transform into crispy perfection right before my eyes. Believe me when I say, once you master the art of making crispy fries in your own kitchen, you’ll never look back.
Why You’ll Love This Recipe
This recipe guarantees that your fries will come out perfectly crispy and delicious every time. After many trials and tribulations, I’ve honed in on the best methods, tips, and tricks that lead to the ultimate French fry experience. Plus, there’s just something special about making your fries from scratch—they’re fresh, customizable, and always made with love! (See the ingredients in the next page below…)
Ingredients
– 4 large russet potatoes
– 2 tablespoons of vegetable oil (or any oil with a high smoke point)
– 1 teaspoon of sea salt
– 1 teaspoon of garlic powder (optional)
– Freshly ground black pepper (to taste)
Equipment Needed
– A sharp knife or mandoline slicer
– A large bowl for soaking
– A pot or deep fryer for frying
– A slotted spoon or spider for removing fries
– Paper towels for draining
Step-by-Step Instructions
To kick-off this crispy fries adventure, I start by peeling my russet potatoes. I find that leaving some skin on adds a rustic flair and texture. My next step? Cutting them into even strips! Aim for about a quarter-inch thickness for that perfect fry. After cutting, I soak the potatoes in cold water for at least 30 minutes. This prepares them for frying by removing excess starch—a crucial step for that crispy finish. (See the next page below to continue steps…)
The next step is crucial: I drain and rinse the soaked potatoes well, then pat them dry with paper towels. Moisture is the enemy of crispiness! Once I’m confident they’re dry, I heat up my oil to about 350°F (175°C) in a deep pot or fryer. When the oil is ready, I add a handful of fries, being careful not to overcrowd the pot—this helps the fries cook evenly and develop that delightful crunch.
After about 3-4 minutes of frying, I check for that golden color and take them out using my slotted spoon. I let them drain on paper towels, then sprinkle sea salt and any seasoning I like on top while they’re still hot. I’ve found a generous sprinkle of garlic powder adds an extra layer of flavor that’s hard to resist!
Once all the fries are done, I’ll serve them hot, and oh, that smell of golden potatoes crisping up is simply divine. Really, the anticipation builds to a heady moment when they hit the table, and the crunch is hard to ignore!
Pro Tips for Best Results
I’ve tested this recipe in a few different ways to find the ultimate route to crispy perfection. One of the most beneficial tips I can offer is ensuring your fries are evenly cut—this makes for consistent cooking. I invested in a mandoline slicer, which was a game changer for me!
Moreover, I discovered that double-frying is a fantastic technique. After the first fry, I let the fries cool for a few minutes, then pop them back in the hot oil for another couple of minutes. This method takes a bit longer, but the extra crunch is worth it!
Lastly, don’t skip the seasoning step right after frying. I learned the hard way that seasoning cold fries doesn’t have the same impact as when they’re hot. The heat helps the spices adhere better, ensuring every bite is flavorful.
Common Mistakes to Avoid
One common mistake I made initially was starting with wet potatoes. Even a little moisture can prevent that lovely fry from developing a crispy shell, so take your time drying them thoroughly after soaking! (See the next page below to continue…)
Another pitfall is crowding the pot when frying. It’s tempting to throw in as many fries as possible, but this can lower the oil temperature dramatically. The result? Soggy fries instead of crispy ones. I learned to fry in small batches, even if it takes a bit longer.
Also, be cautious about the frying temperature; having the oil too hot can burn the outside while leaving the inside undercooked. I keep a thermometer handy to ensure perfect fry temps! Lastly, if you’re using an old bottle of oil, ensure you check for any rancid smells before using it. Fresh oil makes a huge difference in both flavor and fry quality.
Serving Suggestions
When it comes to serving these delicious crispy fries, the possibilities are endless! I like to serve them with a classic homemade ketchup. The combination of sweet and tangy ketchup paired with crispy fries is simply unbeatable.
Another favorite of mine is topping my fries with melted cheese, jalapeños, and a dollop of sour cream for a loaded fry experience. It turns my simple crispy fries into a snack that’s perfect for movie nights at home.
For a healthy twist, I also love serving them alongside homemade aioli or hummus. It adds a gourmet touch, and I feel good about indulging because I made everything from scratch!
Variations & Customizations
I’ve had a lot of fun experimenting with different seasonings and toppings for my fries. Sometimes, I mix up the spices by adding smoked paprika or chili powder for a hint of heat. I particularly love using a blend of Italian seasoning for a Mediterranean twist; it’s something my friends and family rave about.
For an even fresher take, I’ve tried tossing my fries in fresh herbs such as rosemary or thyme just as they come out of the fryer. The aroma of the herbs combined with the crispy texture is downright appetizing.
If I’m using sweet potatoes, I adjust the cooking time slightly since they can cook faster. The flavor and color change the game, and it’s ideal for a nutritious option when I’m feeling like something a little different!
How to Store, Freeze & Reheat
If by chance I have leftovers (which doesn’t happen often!), I make sure to store them in an airtight container in the fridge. They usually last for about 2-3 days, but I find they lose that crispy character over time.
For longer storage, I often freeze my fries before frying. After cutting, I lay them out in a single layer on a baking tray and freeze until solid. Once they’re frozen, I transfer them to a freezer bag. They can be fried straight from the freezer when I’m in the mood for a quick snack!
When it comes to reheating, I recommend popping them back in a hot oven to regain their crispiness instead of using a microwave. A preheated oven at 400°F (200°C) for about 10 minutes does wonders—they taste just about as good as fresh!
Conclusion
I hope you give this crispy fries recipe a whirl in your own kitchen! There’s something truly satisfying about making them yourself and enjoying every perfectly crispy bite. Trust me, the experience is worth it—your taste buds will thank you! Happy cooking, and here’s to many crispy fries in your future!